Children's sandbox with a roof: photo ideas for giving. How to make a children's sandbox with your own hands: photos and ideas for suburban areas How to build a simple sandbox with a lid
The time of a happy childhood consists of many facets. Loving parents strive not only to provide the child with healthy food and beautiful clothes, but also worry about his development. This direction includes a physical and psychological component. Equipped playgrounds contribute to the pleasant pastime of the child, at the same time forming a lot of vital inclinations in him. The banal children's sandbox is no exception: patience, spatial thinking and the ability to communicate with peers are far from the whole list of character traits developed during the game. Often, children's recreation in the summer takes place outside the city, away from prepared sites. Therefore, you will have to make a convenient sandbox yourself. On which version of the children's design scheme to stop and how to properly organize the whole process, we will tell in detail.
We determine the place
In addition to studying possible schemes and preparing your own drawing, you should correctly choose a place to install a children's sandbox. When considering this issue, many factors are taken into account. Priority placement of a children's sandbox - a sector between the northern and southeastern parts of the site. The logical explanation lies in the influence of ultraviolet rays. The first half of the day is characterized by clear air and soft UV radiation, after lunch the picture changes, the ultraviolet becomes harder, so the formation of a shadow over the children's sandbox is necessary. The diagram below illustrates this idea clearly.
In addition to the orientation to the sun, there are several other factors that determine the installation location of the children's sandbox:
- Good visibility from the window of the house and the most visited points of the site. Children's unpredictability is a common occurrence, so the sandbox should always be in the field of view of the older generation.
- Equipping a children's sandbox in the shade of trees is not recommended. At best, it will become contaminated with bird droppings and other debris, at worst, a caterpillar will fall on the child.
- It is also not recommended to draw up a drawing of a children's sandbox, focusing on the nearest source of moisture, it can be an artificial pond or a regularly irrigated garden bed. Such places can be chosen by spiders, and meeting with them in a children's sandbox will not seem pleasant to a child.
- The northern side of housing construction will also have to be excluded - constant being in the shade prevents high-quality heating of the sand.
Remark ! In addition to installing the structure itself, the scheme should provide for the arrangement of the area around it. To avoid the mass transfer of sand into the house or on garden path, within a radius of one and a half meters there should be a lawn. In its absence, it is recommended to make a blind area around the sandbox.
Having decided on the place, they go directly to drawing up the scheme of the children's sandbox.
Design stages
The work on drawing up the diagram includes several stages: designing the box, starting from its shape, the drawing is supplemented with a cover and canopy project. What will be the basis of the children's sandbox depends on many factors:
- Is it planned to purchase new material or will the remnants of the previous construction be used.
- Your professional skills when working with wooden structures.
- How much time can you allocate to create a children's sandbox.
The most common version of the scheme is a standard square shape, with a side size of 1.2 to 3.0 m. The height of the children's sandbox varies between 25-30 cm, it can be equipped with a bottom. To fill a structure with a size of 2x2 m, you will need about 1 m 3 of sand. Having finished the drawing of the base, proceed to the design of the cover.

Cap options
It is foolish to doubt the need to install a protective element for a children's sandbox. The reasons why the diagram should contain the design of the cover are as follows:
- Attractiveness for dogs and cats to arrange a latrine there. So that children's rest does not end with treatment, hygiene standards should be constantly observed, and the sandbox is no exception. The purchase of expensive mixtures containing fragrances to repel animals does not always solve the problem for a long period. Firstly, the substance quickly disappears, and secondly, the harmlessness of its effect on the children's body is in question.
- During heavy rains, the cover will protect against excessive absorption of moisture by the sand, and as soon as the weather improves, the child will be able to start playing his favorite games in the children's sandbox.
- You can save money and not include the installation of a cover in the scheme, but protection in the form of polyethylene, pressed down by pipes or bricks, is not aesthetic. In addition, it is not possible for a child to remove such protection from a children's sandbox on their own.
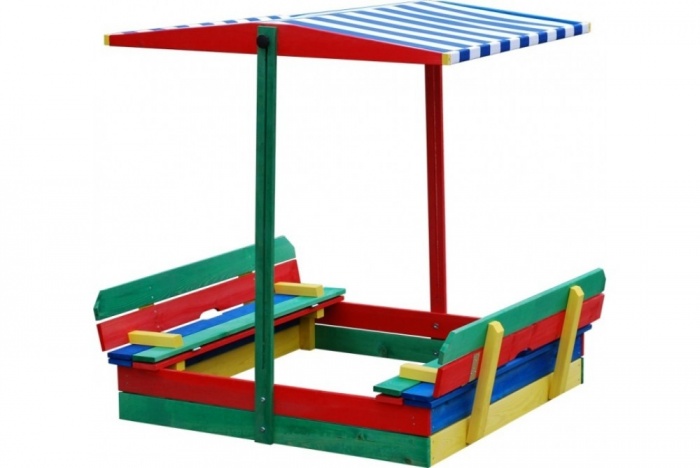
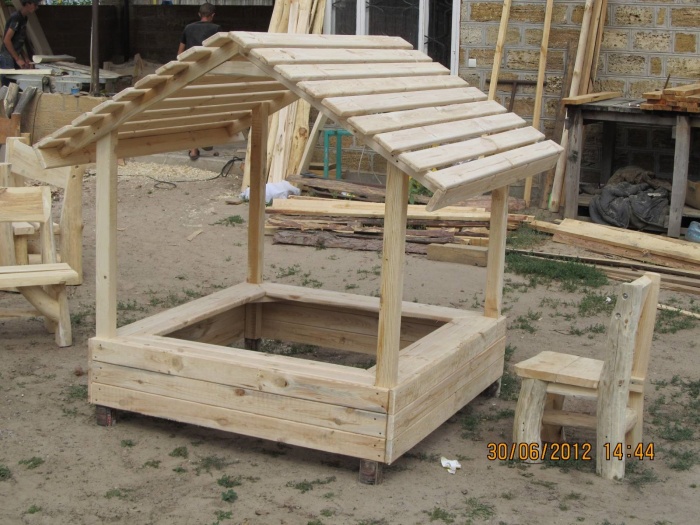
Let's leave options for drawings with complex structures in the form of a fan-opening lid or equipped lifting mechanism aside. The simplest option for a children's sandbox is an ordinary removable shield made of boards, shown in the drawing below:
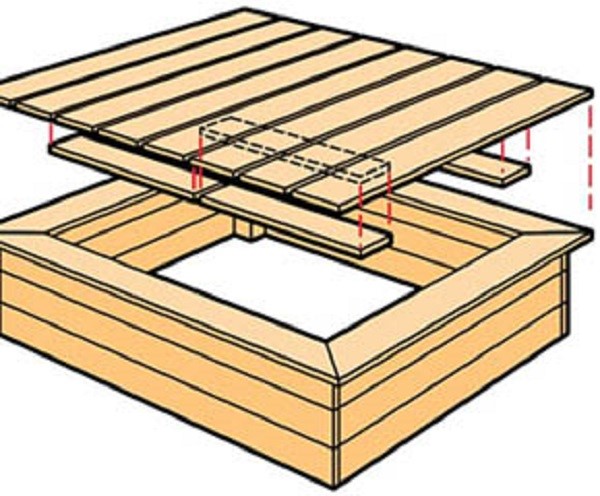
But this is not a very good solution to the problem, due to the possible child injury, if you want to remove it yourself. Recently, models of children's sandboxes equipped with a folding lid, which easily transforms into a bench, have been very popular. The design option is shown in the following diagram:

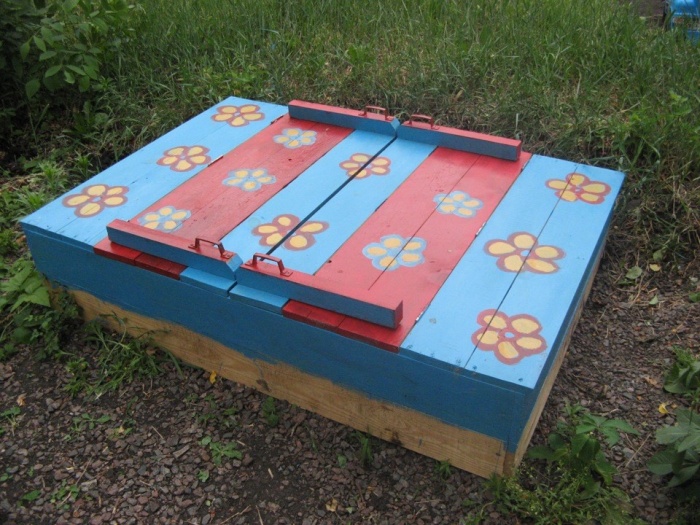
For ease of opening, it is equipped with handles, as in the photo below:
For a children's sandbox, you can use a scheme with a sliding lid, which later plays the role of a shelf or bench without a back. Convenient lower stands provide ease of opening and contribute to the stability of the structure.

Canopy equipment
The scheme of the canopy also has many variations. Depending on the planned life of the children's sandbox, thick fabric, plywood or thin boards can be used as a material. Mounting is selected based on the overall dimensions of the structure:
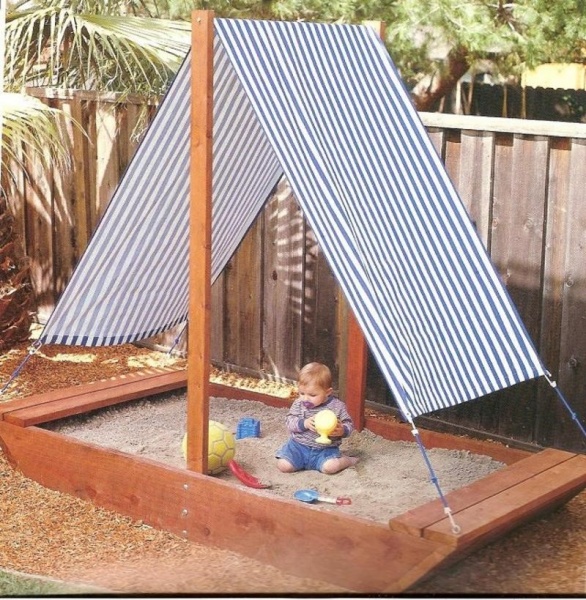
- For small children's facilities, two poles with a crossbar and a stretched awning are enough.
- You can stop at the version familiar from childhood and create a drawing with a fungus. But it is better to leave such protection from the sun as a last resort, because the pillar in the middle of the children's sandbox often brings continuous inconvenience, and the shadow goes to the side.
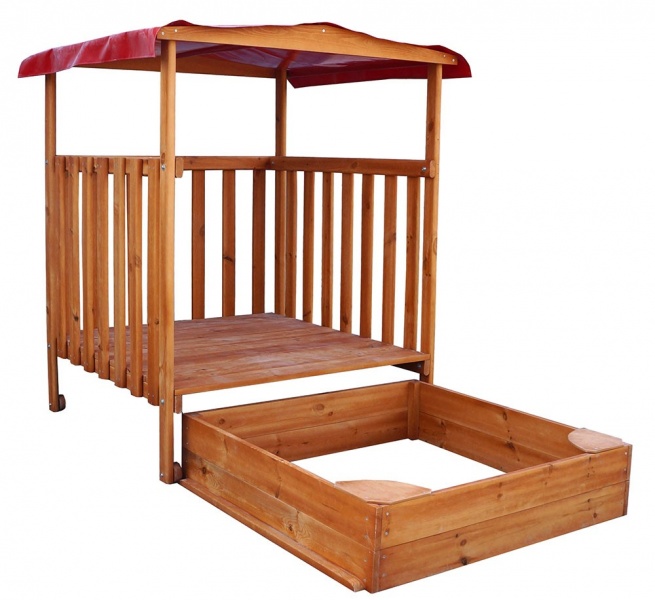
- For three-dimensional structures, it is recommended to install four support pillars. In this case, the canopy can be flat or in the form of a gable roof.
The drawings and photos below will help you decide on the shape of the canopy you need for your children's sandbox scheme.
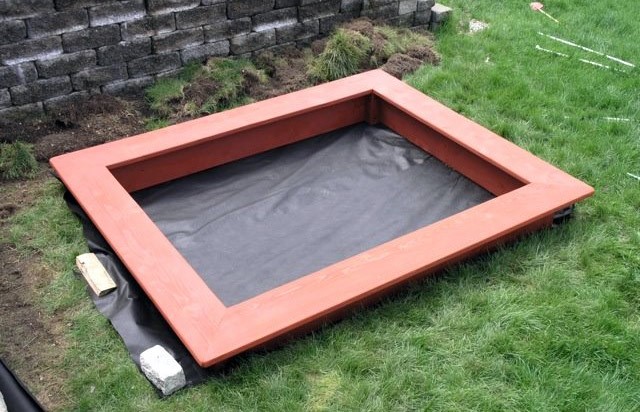
We prepare the site
It is extremely rare that structural schemes are used in the work, which are removed for the winter or equipped with rollers for moving around the site. In most cases, a children's sandbox is installed on a permanent basis, so you should first take care of preparing the site. The process consists of the following steps:
- The area for the future children's sandbox is deepened by 20 cm.
- After leveling the soil, it is covered with sand by 5 cm and treated with a rake.
- It is optimal to use geotextiles or agrofibre as a drainage base for a children's sandbox. With a modest budget, dense polyethylene or propylene matting is suitable, which is spread with a margin of 30 cm along the border. This will prevent the germination of weeds and the penetration of pests, while speeding up the drying process of the sand.
- After installing the box, the recess not occupied around the children's sandbox is covered with soil and rammed, and the excess edges of the film are cut.
See the photo below for an example workflow:
The nuances of the construction process
After carefully rechecking the drawing of the children's structure, according to the chosen scheme, they proceed to the purchase, cutting and preliminary preparation of the material.
Material
Wood is the most commonly used material for the manufacture of children's structures. At proper processing and timely preventive care, a wooden sandbox will last more than 10 years. Details cut according to prepared drawings are coated twice with a water-polymer emulsion.
Remark ! The elements of the children's sandbox, which will be in the soil, are treated with bituminous mastic.
If the long-term operation of the children's sandbox is not planned, you can take aspen or alder for its manufacture. Coniferous trees will help to increase the service life. For construction, it is convenient to use quarter or tongue-and-groove boards. How to assemble a box from them is clearly shown in the following diagram:
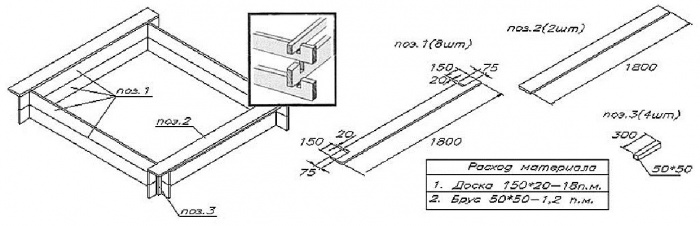
Box assembly
Focusing on the drawing, the box of the children's sandbox is assembled together. The boards are attached to the pieces of timber 50x50 using self-tapping screws. If the side of the structure exceeds 1.8 m, it is necessary to provide for additional fastening of the beam in the middle of the wall in the scheme. The height of the beam for a permanent children's structure, according to the drawing, should be 30-40 cm. The corners of the children's sandbox need additional reinforcement. How to do it correctly, see the diagram below:
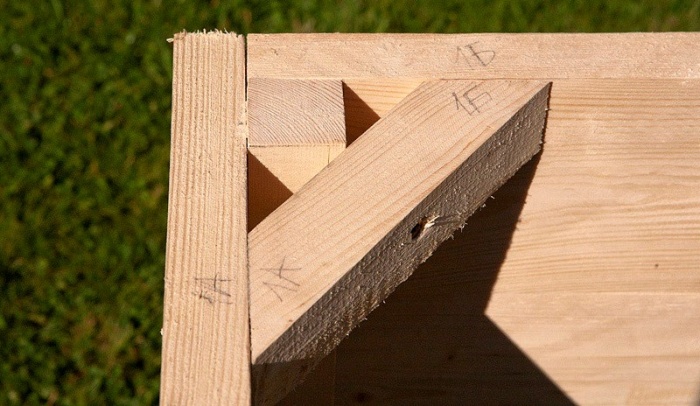
Advice ! All wooden parts should be carefully sanded to avoid injury to the child. Special attention give the corners that it is desirable to round off a little.
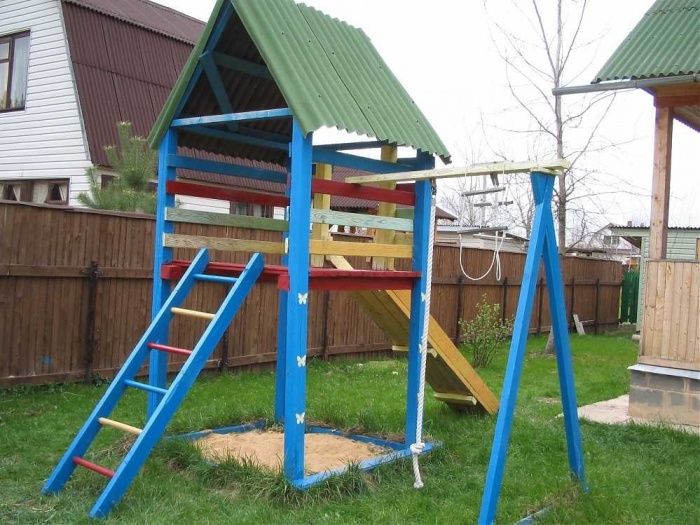
We have considered the simplest version of the sandbox box. The presence of experience and free time allows you to improve the design. After the foundation, they proceed to the equipment of the cover and canopy according to the prepared drawing. The scheme below will allow you to equip a miniature sandbox house that your child will like:

Also interesting is the children's building, where the sandbox is connected together with a slide:
And finally, a few more interesting ideas, which will be useful when creating your own drawing:


Good luck in your work and creative inspiration!
Suburban area in fact all year round requires attention and care. Adults, busy with chores, cannot devote enough time to children. Therefore, it is very important to organize the leisure of children in the country. The ideal option is to build a children's playground. And it is better to start the device of a children's corner with a sandbox. DIY sandbox, even how independent element, will take little fidgets for a long time.
It is necessary to choose the place of installation of the future sandbox and materials for its manufacture, taking into account the following factors:
- Children, even those who are keen on the game, need supervision. Therefore, the sandbox must be installed so that the child is always visible to adults.
- The sun's rays can harm the health of the child, lead to sunstroke and burns, but a solid shadow is not the best option. Therefore, it is desirable to place part of the sandbox in the shade, and part in an open place so that the sand can dry out after rain.
- Drafts and excess moisture also adversely affect the health of children. Therefore, the sandbox should be located away from the water and not stand in the open wind.
- From trees, especially old ones, dust and dry leaves often pour. Therefore, in order to avoid sand pollution, it is better to install the structure away from them.
- Some plants lead to allergies, and some attract stinging insects. Therefore, you need to make sure that there are no honey plants and plants that cause allergies nearby.
- Well-crafted wood and reliable fastenings will help to avoid splinters and injuries.
- Hard materials such as stone, brick or iron can also cause harm, so it is advisable to stop using them. And of course, you need to make sure that there are no sharp corners, nails, cords, and so on.
In addition to the entertainment function, sand games perform a developing and psychological one. Soft loose material soothes and liberates nervous system, contributes to the development of creativity, fine motor skills of hands, perseverance.
Different types of sandboxes: pros and cons (table)
| Classification parameter | View | Description |
| Design features | open sandbox | Typical simplest design, which performs the main function - a playground |
| closed sandbox |
|
|
| Material | Tree |
|
| Plastic |
|
|
| Other materials | To this day, other materials are used to make sandboxes: brick, stone, metal. But these materials do not guarantee the safety of children. Hard, sharp surfaces increase the risk of injury. | |
| Type of allocation | advanced | The sandbox can be deepened into the ground, which is very effective for strengthening the foundation. In this case, drainage with a thickness of about 15 cm is necessary in order to avoid the accumulation of moisture. Then it is covered with agrofibre or a dense film, in which holes are made every 10 cm. Such a base will prevent grass germination, the appearance of insects and sand mixing with the soil. |
| uplifted | This design is installed on concrete base or grass. It is necessary to provide that even the smallest child can independently climb into it, for which low sides 380-400 mm high are made, which are half covered with sand. | |
| Configuration | Figured sandboxes | Constructions in the form of cars, boats, flowers, animals, and so on, serve as an additional game detail. |
| Game centers | The simplest example is a stump sandbox. The child can not only play with sand, but also run around the structure itself. |
Photo gallery of options
You don't have to stick to the traditional square shape.  Usage car tires
  The child must be protected from sun rays: a bright large umbrella will help
  The lid will help protect the sand from debris and moisture.
 ![]() The bright cover transforms into comfortable seats, thus adding a place to relax
The bright cover transforms into comfortable seats, thus adding a place to relax  Easier to use, but more difficult to manufacture, solid lid version
  Can also serve as a separate game element
  Such a sandbox allows the child not only to play with sand, but also to walk along the sides, to warm up a little
  Typical sandbox - easy to manufacture
  To protect children from the sun, you can make a canopy
  It will also protect the sand from dirt.
  The original boat will please your child
  Another version of the sandbox in the form of a ship
Preparatory work
Considering all of the above, it is more convenient and practical to make an in-depth wooden sandbox with a lid.
Drawings and dimensions of the children's sandbox
Initially, you need to decide on the size of the future design. If there are a lot of children and there is enough space on the site, then you can make a large sandbox 2x2 m in size. For the games of one or two children, it is quite enough to make a square structure 1.5x1.5 m in size.
Despite the simplicity of the design of the future sandbox, it is better to have before your eyes visual diagram. Thus, you first need to draw a drawing that will help determine the right materials, correctly calculate the size and quantity.
Looking at the drawing, you can see that the side boards on both sides should be slightly longer in order to form the correct closed angle.
How to choose material
Consider the following facts:
- Tree tree - discord. The durability of the structure may depend not only on the quality of processing, but also on the type of wood: pine, linden or larch are less susceptible to decay.
- The sides of the future design must withstand heavy loads. To ensure strength, it is necessary to use boards with a thickness of at least 30 mm.
- Sanding and sanding an already assembled structure is extremely inconvenient. It is advisable to grind the prepared parts well before assembly and treat with an antiseptic, which will avoid unprotected places. It would be prudent to paint the iron hinges in advance too.
- Most importantly, do not forget what is inside. The sand must be clean, free of foreign impurities, well sculpted. Therefore, it is better to give preference to river or quartz sand, after sifting it through a fine sieve, which will help get rid of dust, possible insects, foreign objects.
Materials and tools (for a structure measuring 1500x1500 mm)
When purchasing materials, the presence of a foundation cannot be discounted. To build the foundation you will need:
- expanded clay, small stones or river pebbles for drainage;
- agrofibre, dense polyethylene or plywood sheet.
The basis of the sandbox is a frame with sides of 1500x1500 mm. To make a frame you will need:
- timber 50x50x450 mm (for corner elements) - 4 pieces;
- beam 50x50x1000 mm (for strengthening corners) - 1 piece;
- board 30x150x1500 mm (side walls are short) - 4 pieces;
- board 30x150x1560 mm (lateral long) - 4 pieces;
- sealant - 1620mm;
- self-tapping screws 45 mm - 50 pieces.
A transformer cover will be attached to the finished frame. For her, you need to prepare the following materials:
- board 20x125x1560 mm - 12 pieces;
- timber 30x30x250 mm (for fastening the seat) - 4 pieces;
- timber 30x30x450 mm (to strengthen the back) - 4 pieces;
- loops (canopies) 40 mm - 12 pieces;
- self-tapping screws 45 mm - 50 pieces;
- self-tapping screws 25 mm - 60 pieces.
For processing and registration you need:
- wood preservative;
- wood primer;
- paint or varnish for coloring.
The materials are ready, but without the tools, the process will not budge. Therefore, it is necessary:
- roulette;
- pencil;
- pegs with a rope tied to them;
- shovel;
- hacksaw or jigsaw;
- grinder or sandpaper;
- drill and drills;
- screwdriver or a set of screwdrivers.
Step-by-step instructions: making and installing a wooden sandbox with a lid
The work is best done in several stages. First of all, it is desirable to assemble the frame of the sandbox, then make the base and install the box in the prepared place. And only after that, install the cover.
Case assembly
We fasten the sanded and antiseptic-treated boards together in the form of a square using corner elements - long bars, not forgetting to pre-outline and drill holes for self-tapping screws.
If ordinary insulation is glued between the first and second tiers, the boards will fit closer to each other and the sand will not spill out into the cracks.
To avoid spilling sand through the cracks between the boards, it is advisable to glue the usual insulation
To give greater strength to the future sandbox, you need to securely fix the corners with the help of additional bars.
An additional bar attached diagonally will add reliability to the structure
The ends of the corner bars, approximately 15 cm long, will be in the ground, so they must be covered with drying oil, bitumen or used machine oil. Now the frame of the future sandbox can be carefully transferred to the installation site.
The frame of the future sandbox is ready for installation
Foundation construction and frame installation
The site, selected taking into account all the tips and recommendations, is leveled and cleaned of debris. For more accurate marking, it is necessary to add 15–20 cm to the dimensions of the future sandbox on each side. We make markings with the help of pegs with a rope stretched over them, checking the correctness of the angles.
We remove the top layer to a depth of about 20–25 cm, making a slight slope towards the center. This is necessary so that the water that gets into the sandbox does not accumulate, but falls into the drainage. In the center we make a hole with a diameter of about 50 cm and about the same depth. We fill it with material prepared for drainage.
Then it is necessary to pour a five-centimeter layer of sand and carefully compact it.
The base itself, which can be made of different materials, is laid on the resulting “pillow”. The main thing is not to forget to make holes in it at a distance of about 10 cm from each other, again to prevent the accumulation of moisture.
We install the finished frame on the resulting base. Now you can proceed to the main stage.
Mounting the cover that transforms into seats
We thoroughly fasten two boards on each side to the sides. Then we proceed to the assembly of the moving parts of the cover. To do this, we fasten the remaining boards in pairs with the help of bars.
The elements obtained from the first pairs will serve as the seat, and the elements with long bars will serve as the back. The protruding parts of the beam will act as a support, preventing the back from leaning back.
We attach the “seat” element to the firmly screwed boards with the help of three loops located at the same distance from each other. In this case, the hinges should be on top, and the bars connecting the seat boards should be on the bottom.
We attach the back to the seat, also with the help of hinges, not forgetting that this time the hinges “look” inside the box, and the bars are outside.
IN this option assembly, final stage quite problematic, because the part of the back has to be screwed in fact by weight. There is another way. First, fasten the back and seat together, and only then put them on top of the box and attach them to the rigidly attached boards.
Attention! To avoid possible injuries, it is important to "drown" the hats of the screws. You should also check that the lid opens and closes easily.
Finishing
So, the sandbox is ready! Now preferably with sandpaper or grinder smooth out possible corners. After that, even if all the wooden and iron parts have already been processed, it is better to go through the antiseptic again.
You can simply varnish the resulting design, but it is best to paint. And here fantasy comes to the rescue. Do not forget that this is a playground for children. And the kids love it bright colors. Color the sandbox with different colors. Additionally, you can draw patterns, funny pictures by hand or apply through a stencil. The main thing is that the children are happy, and they feel comfortable in the new sandbox.
To prevent small builders from spreading sand throughout the site, it is better to make a separate path to the sandbox.
Video: do-it-yourself transformer sandbox making workshop
It is easy to please a child by making a bright, beautiful sandbox with your own hands. It doesn't matter if it's a simple sand box or an interesting design. The main thing is that the sandbox is pleasing to the eye, safe and comfortable. And then the child will receive incomparable pleasure. And if the children are happy, then the parents are happy.
Your baby is growing up, and it's time to think about a children's cozy corner on personal plot. And what is your favorite pastime at this age? Of course, the games fresh air. One of the main attributes of the playground is a sandbox where children can play with sand from morning to evening. Installing such a structure in the yard is as easy as shelling pears, since they are sold in specialized stores ready-made. However, their price often does not please caring parents. The best solution in this situation, there will be a sandbox with a do-it-yourself lid. This does not require special skills, and as a material, you can take any improvised means.
Types of sandboxes for children
If you decide to make a sandbox for your beloved child with your own hands, so that you are not ashamed to show your friends a photo of the structure, then before you start work, you must definitely figure out what types of these structures exist.
By design features It is customary to distinguish between two types of sandboxes:
- open;
- closed.
open structures
Perhaps the presented type can be called the most common and popular in playgrounds. It is made and installed quite simply. Although in a "pure" form they can rarely be found. Today, many masters complement them with a variety of decorative elements giving them original shapes. Open sandboxes are often combined with houses, benches, slides and other elements. The most popular options are:
- Sandbox mushroom. In the center or on the side of such a design, they have wooden pole with a roof so that children can play safely without overheating in the sun.
- Sandbox-sailboat. An umbrella or a canopy acts as a roof, which performs the function of protecting babies from the sun's rays.
- Mobile sandbox (folding). A feature of this structure is the ability to transfer it to any place. Perhaps this is due to the presence of a collapsible frame.
Advantages:
- all materials for manufacturing are available and are relatively inexpensive;
- installation does not require special skills and abilities;
- develops the physical and mental skills of the child;
- if a breakdown occurs, then fixing it is quite simple;
- simple and easy to use.
Flaws:
- since the structure does not close, leaves, precipitation, debris get into it.
- while the sandbox is unattended, animals can “choose” it, turning the child’s favorite building into a toilet;
- the sand will loosen over time.
Despite the fact that the open sandbox has few drawbacks, its functionality is sharply reduced compared to the closed design, in particular due to the need for constant cleaning of debris.
Photo gallery: open sandboxes
Mushroom - a classic children's sandbox design  Sandbox-sailboat perfectly protects the baby from exposure to sunlight
  A folding sandbox is perfect for those who like to travel a lot with children.
  The open sandbox is the most popular option.
  A canopy can also be placed near the sandbox
Closed sandboxes for children
This type of sandbox appeared relatively recently, but thanks to many advantages, it has already earned the sympathy of parents.
Closed sandboxes are divided into:
- Classic (covered). In this embodiment, the structure is tightly covered with a board after the game.
- A sandbox that transforms into benches or a table. Such a structure differs from the rest in that it allows you to turn the cover into an additional playground or into seats with backs on both sides.
Advantages:
- the lid closes the sandbox from precipitation, debris and animals, and also prevents sand from weathering;
- you can store various children's equipment under the lid (shovels, scoops and rakes);
- there is an additional playground for children's fun;
- prices for materials for manufacturing are low;
- reliable and durable construction.
Flaws:
- in the event of a breakdown, repairing a closed sandbox will be more difficult than an open one;
- will require a large amount of materials for manufacturing.
Photo gallery: sandboxes with a lid
 Appearance closed sandbox can be absolutely anything
  Lid protects sand from moisture and debris
  The lid can be transformed into benches
Almost every parent has the opportunity to build a sandbox for their beloved baby on their backyard. However, in order for the structure to last for a long time and not pose a danger to the child, it is worth following a few recommendations when manufacturing and installing it:
- The sandbox should be in the field of view of parents so that they can check at any time what their child is doing.
- In order to reduce the chance of infection through sand, it is recommended to choose an installation site away from trees.
- The dimensions of the structure must be chosen so that in the end it fits more than three children.
- The structure should be installed on an elevated area, since with this arrangement it will not collect sedimentary moisture.
- It is necessary to install the sandbox so that one part of it is in the sun and the other is in the shade. This will allow the sand to warm up evenly without burning the child.
- It is better to choose river sand, because it is cleaner and contains a minimum amount of impurities.
- In order to prevent stray animals from trying to "choose" the sandbox, you can treat the outer perimeter with a special tool that repels cats and dogs.
- Before starting construction, it is imperative to check that all boards are sanded.
- For manufacturing, use only high-quality materials.
- When choosing an installation site, it is recommended to immediately check if there are any thorny bushes, allergens and other plants nearby that could harm the child.
- Ensure that there are no electrical wiring, a variety of hoses and pipes around the perimeter of the structure.
- It is advisable to make a lawn around the sandbox, sown with grass that is resistant to trampling.
- It is recommended to locate the structure on the south side - so the sand will warm up faster.
What material to choose
There are three classic options that can also be combined with each other:
- wood;
- plastic;
- metal.
Each of them has its own advantages and disadvantages.
Tree
Wood designs are classic and popular.
Advantages:
- long service life with proper care;
- environmental friendliness;
- safety;
- availability;
- poor thermal conductivity.
Flaws:
- the need for periodic staining to maintain a neat appearance;
- susceptibility to decay, since the tree is easily susceptible to any impact (this can be avoided by processing by special means);
- increased risk of injury if the surface is unfinished and there are gaps.
Plastic
Structures made of plastic and plastic can be safely called modern version sandboxes. Often they are purchased ready-made, because these materials are extremely inconvenient for do-it-yourself processing.
Advantages:
- in the manufacture of safe, harmless and high-quality plastic;
- there is no need for constant care and periodic painting;
- any precipitation is unimportant to him;
- the sandbox is easy to install and operate;
- has a compact size;
- plastic is a fairly light material, which means that the design of the sandbox will be mobile;
- a wide range of bright, colorful and saturated colors of the design is presented.
Flaws:
- plastic fades over time and becomes faded;
- expensive;
- unstable to ultraviolet, as a result of which the plastic is subject to deformation.
Metal
Metal structures, like wooden ones, are familiar to everyone since childhood. Quite often they could be found in the courtyards of the city. However, today they are acquired and built quite rarely, since they have several times more disadvantages than advantages.
Advantages:
- long service life;
- structural strength and reliability.
Flaws:
- manufacturing complexity, since welding machine and you can’t build such a sandbox with special skills;
- high price;
- increased thermal conductivity;
- susceptibility to corrosion.
Preparation for work
Careful preparation will help facilitate the work of making a sandbox with a lid with your own hands.
Drawing up a drawing with sizing
Any construction is customary to begin with a design scheme. Having decided on the type of construction and material for manufacturing, you must consider whether you will have a regular cover or a transforming one. Also carefully plan all the stages of creating a sandbox.
Sandbox lid consists of:
- Door hinges.
- Back support.
- Mounting bases.
- Sandbox boards.
- Bench backs.
- Limiter.
This version of the lid is optimal, since it not only closes the sandbox from debris, but also transforms into benches.
Tools and materials
Due to the fact that the structure has the shape of a square, we need boards of the same length and width. Materials you will need:
- 8 boards with a size of 1500x150x30 mm (2 boards on each side of the side);
- 12 bars measuring 700x50x50 mm (for fixing the wooden elements of the sides);
- 4 boards measuring 1500x175x30 mm (for the lower part and base for fastening);
- 4 bars - 1500x200x30 mm (for the back of the bench);
- 4 limiters - 175x60x30 mm;
- 4 stops - 700x60x30 mm;
- 4 metal door hinges.
To cover the base, you will need a special waterproofing coating. Great option will be dense polyethylene. The area that it will occupy is easy to calculate: you need to multiply the width of the structure by its length (1.5 m * 1.5 m = 2.25 m²). Since it will also be necessary to cover the sides with polyethylene, it is recommended to leave a margin of 12 cm on each side.
For the construction, you will need a few more tools:
- bayonet and shovel;
- hacksaw or jigsaw;
- hammer;
- screwdriver or screwdriver;
- building level;
- grinder or sandpaper;
- brushes and roller for painting;
- chisel;
- electric drill;
- square;
- a set of drills for wood;
- bolts with nuts;
- self-tapping screws;
- construction roulette;
- wooden stakes and cord.
Photo gallery: tools for making a structure
 The shovel will help to make indentations for the base
  A screwdriver will help speed up the process of tightening bolts
  Instead of a jigsaw, you can take a hacksaw
  The chisel will allow you to make recesses in the wood the right sizes
  You can take a square and professional
Step-by-step instructions for making a children's sandbox with a folding bench
- After you have decided on the place, you need to mark up the site. To make the calculations more accurate, it is recommended to install pegs around the perimeter and pull a cord between them. With the help of a tape measure and a square, you can make the corners even.
- Now you need to remove the top layer of soil with a shovel. It is desirable to make the depth a little more than 25 cm. This step will eliminate the rotting of plants and the appearance of various living creatures in the sandbox, as well as ensure the reliability and stability of the structure.
- Next, you need to level the bottom and fill it with gravel and sand with a layer of 10 cm. Then the surface of the pit is rammed and leveled. Due to this, water will not accumulate under the sandbox.
- After preparing the bottom of the pit, you need to lay the base of the structure. Polyethylene is suitable for this. It must be laid on the bottom of the pit, after making several holes in it with a nail. This is necessary so that the moisture does not linger for a long time in the sand, but goes into the ground.
- At this stage, you need to make a frame for the sandbox. For this, sides are constructed from two boards. For fastening, it is customary to use self-tapping screws, bolts or metal plates. The connecting part is the bars - they fasten the sides with inside sandboxes.
- Before installing the sandbox in the soil, you need to dig 9 holes around the entire perimeter of the prepared hole, into which the supports will then enter.
- Then the boards are fixed with self-tapping screws to the upper edge of the board, which serve as the basis for the cover.
- To the boards you just installed, you need to attach door hinges at a distance of 35 cm from the edge.
- Now you need to fix two more boards. Loops are installed on the opposite side.
- Then you should install the boards that will serve as the back. The corresponding wooden parts are fixed with self-tapping screws.
- Now you need to fix the limiters to the base of the seat.
- In order for the back of the benches to have an emphasis, you need to install the bars and fix them with self-tapping screws.
- At the end, it is necessary to install the structure in specially prepared holes in the ground, fix it well.
Features of finishing a wooden structure
Having completed the construction of the sandbox, it is necessary to process it with special tools, thanks to which it will look beautiful. It is important to choose the right paint. Cheap options can evaporate in the hot sun and release harmful chemicals that can get into the lungs of a child. Also, some paints and varnishes, after drying, begin to stick to hands, and this is highly undesirable. Therefore, you should contact a specialized store, where they will tell you the safest and most convenient option for a children's sandbox.