The device and procedure for installing a seam roof, its pros and cons. Do-it-yourself seam roof: a detailed description Seam roof
Before you study the information on how to competently lay and equip a seam roof, you should familiarize yourself with the basic terms of such a design.
Seam roofing is a special modern coating, where compound adjacent structural parts produced by means of special folds.
The picture is one of the elements of modern roofing, in which all edges and edges are previously prepared for the arrangement of the seam connection.
Among the main advantages of the roof can be noted possibility of long-term use of the coating based on the presence of a modern anti-corrosion coating.
The seam elements are lightweight and have a smooth surface. Due to this, snow and water do not linger on the surface.
In this article, we will analyze in detail how to make a seam roof from iron sheets and how to properly prepare a crate for a roof using a special technology.
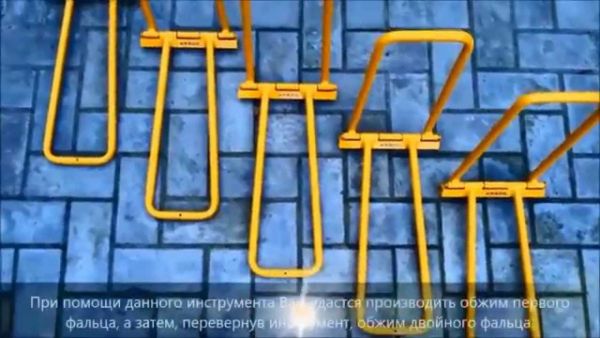
The device of a seam roof begins with the choice of fastening - a seam. The folds can be standing and recumbent, and they differ in that with the help of horizontal folds it is possible to effectively connect all the elements that are in the same position. Standing elements can connect the roof along the entire length of the slope.
Folds are characterized different types produced compound, which can be single and special double. In the first case, this is one classic bend, the double one is distinguished by the possibility of ensuring maximum tightness. Such folds are used in those areas of the roof where there is a danger of moisture accumulation, from leakage, which is typical for the gutter.

Types of castles
Seam roof tool
For proper installation, many tools, different nozzles for them and other elements may be required. Before installation, it is worth preparing the following roofing tool for seam roofing:
- All possible measuring devices - plumb, level, levels.
- A tool for detecting the difference between the height of all surface points in relation to one or another set level. Equipment is required to measure the possible rise in level.
- Manual and more modern electric scissors, which are needed for cutting and accurately cutting out roofing elements.
- Nibbler for the implementation of the operational process of sharpening.
- Hacksaw and construction jigsaw for efficient framing.
- Standard Bulgarian.
- Household drill and puncher.
- Mounting gun for pressing out. Rubber and wooden mallets.
You can cut the rebate panels using angle grinders. The main thing is that all untreated areas are carefully protected from sawdust, and the cut points must be treated with special anti-corrosion compounds.
Seam roof installation tool
roofing cake
The seam roof cake is characterized by a special multi-component system, which, in addition to the roofing itself, consists of various other elements. This can be attributed, as well as high-quality. Hence the name roofing cake - it consists of a large number of layers. If the cake is arranged correctly, a lot of different problems can be avoided. This is an ideal opportunity to prevent the appearance of icicles, the process of accumulation of condensate and heat loss.
NOTE!
The arrangement of the pie requires special attention, since errors in the design process of a particular layer will seriously reduce the overall strength indicators as well as structural durability.
Of serious importance in the process of designing and arranging the roof is competent. It removes excess moisture from all the roofing cake. To remove water through the membranes into the equipped ventilation, it is worth leaving several holes in the roof during installation. A wooden crate will cope with this process perfectly.

roofing cake
What is a clamp and why is it needed
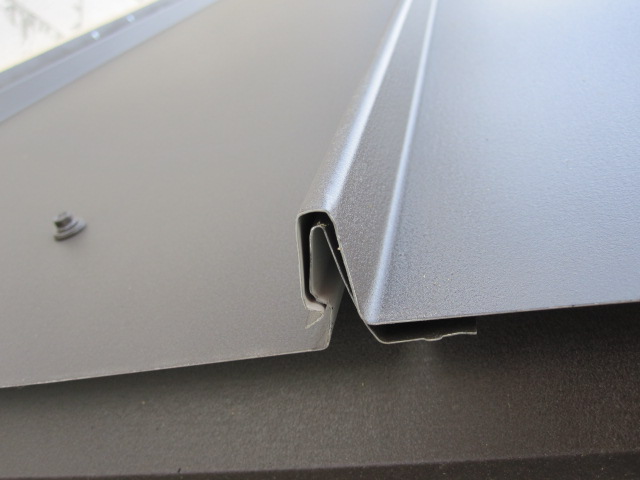
In the process of arranging a roofing seam covering, fastening devices such as clamps are used. In fact, this is a special device that is designed for fixing roofing sheets. You can not use nails, which can violate the integrity and complete tightness of the coating.
The use of a clamp greatly simplifies the installation process of roofing, ensures the overall durability of the system. Finishing the roof with similar elements makes it aesthetic and as tight as possible.

Lathing under the seam roof
Seam roofing is fastened strictly to the preliminary  installed crate. This will help prevent sagging of steel sheets, but only if the required pitch range is fully met.
As a crate, materials such as:
- Galvanized metal profile.
- eco friendly wooden beam 50 to 50.
- Board 100 by 32.
These elements are attached strictly from below and upwards, that is, from the cornice part to the roofing ridge. If a metal crate or a discharged wooden crate is installed, it is worth using a high-quality anti-condensation film before installing it on the rafters. When using a special continuous batten or other completely continuous base, a special category film will be required throughout the decking.
Lathing step - 20 centimeters, it is allowed to use a step in the range of 20-40 centimeters.
The material provides the following benefits:
- The device of a permanent ventilation duct, which will remove condensed moisture that appears on the reverse side of the roof, made of metal;
- Effective preventing destructive corrosion metal elements, as well as rotting wood elements;
- Significant noise reduction from precipitation.
Where the installation of roof nodes - valleys, roof cornices, as well as connections and junctions to various protruding elements of the structure, the second crate profile element is mounted. This gives increased strength and rigidity to the installed panels.

Additional elements
The design of the crate is made even, the presence of recesses, as well as various protrusions, is unacceptable. roof ribs and standard skates are mounted straight, and the lowest board is also straight.
If the crate is made of wood, preference should be given to such types of wood as aspen, spruce, fir, pine. Humidity of boards should not be more than 12%. To give wood strength, for its durability, the material should be impregnated with special antiseptics.

crate
It is possible to significantly increase the operating time of a wooden crate by coating it with drying oil. A structural steam-diffusion film is laid on the already finished crate. Its durability, as well as the quality of the entire roof, as a whole, depends on the competent arrangement of the crate. Even relatively a slight deflection of the sheets is able to weaken the density of the mounted folds.
If an insulated roof is being installed, without fail good ventilation must be provided. In this situation, first a counter-lattice is placed, a special hydro-windproof membrane is mounted under it, and only then the crate itself
Seam roof slope - optimal and minimum
In the process of arranging a seam roof, it is important to observe the slope of the roof. It can be optimal or minimal. The choice is made on the basis of the architectural and planning features of the building.
The optimal slope is on average 10-15 degrees of inclination.
In the higher part, builders take out ordinary living quarters, in the lower part, utility rooms and bathrooms. The optimal slope of the roof can be steeper, then the angle of inclination can be 20-30 degrees.
With regard to the minimum slope of the seam roof, they are recommended for certain categories of roofing. The design features of such a roof make it possible to cover any size of roof without problems, as long as they are flat.

Roof slope
In this case, the angle of inclination does not go beyond the 15-degree indicator. The type of material used directly depends on the slope angle. suitable for roofing at 20%. ideal for roofs with a slope of 5%. In all cases, when installing the coating, small overlaps must be taken into account. A special sealing tape must be laid in the joints.
Seam roof waterproofing
 When installing a roof, it is important Special attention attach to the seams. This is one of the most important indicators that has a direct impact on ensuring the sealing of the roof and seam.
By using a special coating equipped with a self-locking seam and a double standing seam, a high level of tightness can be achieved.
It is equally important to use a high-quality fastener, that is, nails, self-tapping screws and a seam roof clamp, made of high-quality galvanized steel.
They play an important role in ensuring sealing, the longer they will retain their quality, preventing leaks.
The correct installation of hydro and thermal protection under the roof completely reduces the risk of rapid wear of the roofing. High tightness rates will be maintained for decades.
Seam roof installation - instructions
The construction of a structure from a professional point of view must be carried out under the careful observance of certain conditions, as well as the sequence of actions established by professionals.
Do-it-yourself seam roof:
- Production of special paintings that will be used to cover standard slopes and other details, such as overhangs and roof gutters. For this purpose, blanks or paintings are produced according to a previously prepared drawing and scheme.
- The edges of these parts must be bent, that is, they are prepared for use with seam joints.
- Raising previously prepared paintings to the structure, their connection with special standing folds. Pre-installed paintings are securely attached to the wooden crate with clamps. One side is brought into the fold, the other is attached to the beam of the mounted crate.
- At the final stage aprons are mounted on all holes present made from high quality steel.
- If you have any questions about the installation of the coating, we recommend that you watch the video below.

Rebate clamp

Seam tie
CAREFULLY!
In the process of using sheets 10 meters long, it is worth fastening them securely to the crate installed on the roof, using clamps of a special floating type. Only in this way the roof will not lose a high level of tightness at all, even with temperature changes.
Installation of snow retainers
Roof installation work involves the installation of special  fences. This is a kind that is able to solve a huge number of different problems.
By means of fences, snow can be reduced from the roof. This will completely prevent the possibility of damage to health and property. It is possible to protect growing plantings next to the building.
Fences seriously improve working conditions in the process of performing work related to roof maintenance. Snow guards effectively prevent possible damage to the drain.
It is important to carry out such roof railings in full compliance with the requirements officially fixed in SNiP 21-01-9. The documents state that fences must be present on roofs with a slope of 12 degrees and with a total eaves height of 10 meters or more.
Snow guards for seam roofing should not only be reliable and durable, but also attractive in terms of their external characteristics. It is desirable to ensure that the design is fully consistent general style Houses. For this, special profile pipes or similar materials. All parts of the fence should be painted with a special polymer paint on a special powder basis.

Installation of snow retainers
Useful video
Detailed installation of seam roofing in the video below:
Conclusion
If the work is carried out strictly in compliance with the listed rules and conditions, the seam roof can rightly be classified as a durable and at the same time unpretentious coating during operation. Roofing can be installed without problems in private buildings, as well as in public buildings.
In contact with
Seam roofing is a great option for roofs with a slight slope. The German masters invented the seam roof (you may have already guessed by the name). In translation, "falz" means just a gutter, and the installation of a seam roof consists of such simple connections - they snapped or clamped, and that's it. But why then, with such simplicity, seam roofing is not common?
The problem is that before the fold was made from sheets only by hand. The process was time-consuming, the joints were not too smooth, and it was difficult to talk about the tightness of such a roof. And only with the advent of professional equipment, seam roofing rediscovered itself: smooth joints, any length and speed of installation did their job. Want to know more?
The roof, which is made from individual metal sheets, is called a seam. Seam roofing appeared in Russia a little over 100 years ago, and quickly gained its popularity. And with the production of mechanical and electric seaming tools (previously, the folds were connected only by hand), its installation became available to everyone. See for yourself:
From the advantages:
- The light weight of the roof, which is valuable for any buildings.
- Excellent leak protection. All thanks to tightness! There are no through holes anywhere on the seam roof that could become a hotbed of corrosion or other problems.
- Seam roofing is also attractive for its ease of installation, which almost anyone can handle.
- Such a roof can be made not only on ordinary pitched roofs but also on more complex architectural objects.
- The seam roof looks aesthetically pleasing and is combined with any kind of building materials.
- The main advantage of a folded roof is 100% tightness of the roofing, under which neither snow nor rainwater can get through. The fact is that in such a roof there are a minimum of holes, unlike a metal profile, which means a minimal risk of moisture getting into the under-roof space. No corrosion!
- 20 years minimum service life. In principle, seam roofing is also durable due to the fact that its joints are inaccessible to water. Plus, it does not have transverse seams and open joints that would prevent water runoff and snow melting.
And a fairly simple installation:
We note right away that all the shortcomings that are usually attributed to the seam roof come from improper installation.
- So, the most common complaints are about the strong noise from the rain, when the drops simply drum on the seam roof. To avoid this, the crate must be used perfectly flat, then the metal sheets will fit tightly enough to it and not create a noise effect.
- Periodically repair of folds is necessary. See how they were made and with what.
- An avalanche of snow. Yes, on such a flat roof, he has nothing left to do but quickly move out, but what are the snow holders for then? In Europe, for example, even a house is not insured if there are no such elements on the roof.
- Simple design and lack of a rich choice of colors and textures. Yes, not everyone likes the minimalist aesthetics of a seam roof. But a matter of taste is always a subjective matter, and someone in the same way does not want to see the ubiquitous metal tile in the eyes.
Now look what else you can do to get rid of the noise:

Choice of design and material
To make it convenient for you, we suggest to start with a little understanding of the concepts.
Paintings are rectangular metal elements with folds, which are mounted on the roof. The standard form is steel sheets in the form of a rectangle with carved corners. From the pictures and spread the seam roof.
Falz- This is a specific seam, which is obtained by bonding together different sheets of metal. The advantage is that with such a connection, the density is quite high, and neither sealants nor adhesive compositions to ensure complete sealing. And, in addition to their main task, the folds play the role of stiffening ribs for the entire roof.
Klammer- This is a special piece of fasteners that is nailed directly to the base of the roof. A simple clamp has the same shape as the future fold blank, and the movable one ensures the future thermal expansion of the metal (compression and tension at different times of the year).
As you can see, everything is simple and you don’t need to bother with anything.
Painting material
Seam roofs are made from both galvanized steel and various non-ferrous metals. Here are the materials most often used for seam roofing today:
Option #1 - Steel
The most common option. Steel seam roofing can be galvanized, non-galvanized or additionally coated with a polymer. Of the advantages - corrosion resistance, low cost and durability (60 years of service).
But over time, the steel, unfortunately, noticeably tarnishes. And therefore, for the installation of a seam roof, steel paintings need to be taken only those that are covered with a colored multi-layer coating. And when buying those, make sure that they have a special protective film on them - this is the only way the material will not be scratched during transportation.
But in any case, even a high-quality polymer coating on the roof will not be durable: due to sun rays, acid rain and the most important enemy - a humid maritime climate.
Option #2 - Copper
This is the most beautiful roof, which just burns on a sunny day. Its main plus is that no biological living creatures will take root on it, especially moss. But there are a lot of minuses - such a metal is soft, requires careful handling and is quite expensive.
Over time, copper also becomes covered with a patina - a layer of oxides, and becomes a dark brown color. And even later - green, and nothing needs to be restored. And it is precisely because of oxides that copper cannot be combined with other materials on a seam roof.
Copper seam roofing is also valuable for its flexibility - it is easy to make roofing architectural masterpieces with it, not to mention simple roofs:
Option #3 - Zinc
The zinc seam roof is additionally covered with a protective layer - zinc carbonate. Over time, such a roof acquires a chic silver-gray color. A zinc roof lasts for about 50 years, which is relatively short, and therefore in Europe this material is no longer used for making paintings.
Option #4 - Aluminum
Such a roof is the most resistant to mechanical damage and corrosion, and can last more than 100 years! A pleasant silvery sheen will only please the eye.
In addition, this material is lighter than steel and more resistant to corrosion. But aluminum is bad because it expands and contracts much more with temperature changes. That is why the installation of such a roof has its own characteristics:

Option #5 - zinc-titanium
This is a strong, successful alloy of zinc and titanium: zinc does not corrode, and titanium has both strength and ductility. This spav is also valuable for designers, because over time it becomes covered with a noble patina. The roof looks great!
Option #6 - Aluzinc
Aluzinc is a steel picture with an aluminum-zinc coating, which has valuable self-healing properties and perfectly protects scratches and cuts from corrosion.
Option # 7 - an alloy of three metals
Titanium-zinc-copper alloy. There is not much copper here, only 0.005%, but this is enough to give the roofing material plasticity, which makes profiling easier.
Special coating
If your home is located in a seaside area or an area with poor environmental conditions, or simply with a hot and humid climate, then purchase folded paintings covered with pural. Only this polymer is able to protect at a high level from sea air, rain with acidic impurities and scorching ultraviolet radiation.
Production technology
Seam roofing is also divided according to production technology - into cast and rolled.
Cast roofing has been used in Russia for a long time, and its reliability has already been tested. It is easy to mount such a folded roof with your own hands and without special tools, there are no transverse seams, and the surface is solid and durable. But the rolled seam roof is already new technology with its own advantages and disadvantages. These are metal strips for the entire length of the slope, and immediately with prepared edges on a special machine. The fold is formed double.
And according to the width of the paintings and the presence of stiffeners, the folded roof is divided into the following types:
- Double fold and two stiffeners. Such a roof is most in demand in the industrial sector. She breaks warehouses and large buildings with a variety of roof slopes. Standard width - 5.57 m, working - 5.45 m.
- Double fold and two stiffeners, but less width - 35.2 m (working 3.4 m). Such roofs cover the roofs of cottages, large residential buildings and historical monuments.
- Double fold without stiffening ribs. There are also two types of such roofs, based on the actual width - 5.57 m and 3.52 m. Both are quite suitable for residential buildings and ordinary private houses.
And folded panels can also be ordinary and starting, trapezoidal and parallel:

Market offers
If we talk about brands, in Russia, as well as abroad, the most popular Finnish folded roof from Ruukki, with self-latching folds.
More pleasant prices - for the materials of the domestic plant "Insi". It has been on the market for more than 16 years, and is quite pleased with the quality of its products. In production, there are both ordinary glossy and matte paintings, as well as unique ones, to create a special roof design.
Seam roof installation technology
For the installation of such a roof, neither special supports, nor expensive lifting equipment, nor additional consumables are needed.
Stage I. We prepare the base
It is possible to arrange seam roofs both on the crate and on a solid base. Both bars and metal hat profile are suitable.
It is only important to adhere to the step between the rafters of no more than 2.5 meters - otherwise even the strongest steel sheets run the risk of bending, and the seams will immediately disperse:

But how to bend the lining sheet yourself:

Stage II. Working with paintings
On workplace You can bring both ready-made paintings and rolled steel, which you will cut on the spot.
As soon as the steel paintings are ready, they are raised to the roof. Lay out along the cornice directly on the crate and start installation from the middle.
Stage III. We prepare additional elements
For the roofing of roof edges, valleys, ridges and elements such as a chimney, a roof connection and a dormer window, it is necessary to make ready-made paintings from rolled steel in advance - but already in a figured shape.
Here detailed master class how to make your own dropper for a seam roof:


Stage IV. We bend the folds
So, we moved on to the most important technological issue: how to make folds?
Connection types
Folds in such paintings are single and double, standing and recumbent. To simplify, all horizontal folds are called recumbent, and vertical folds are called standing:

Single standing seam is the easiest to install:

A double fold is a double fold of an edge. It must be done in the most problematic places on the roof, where snow and water usually accumulate - valleys, gutters and other complex joints. It is the strongest and tightest, which is why it is the most popular abroad.
Double standing seam is recommended for roof pitches less than 25°. True, in Russia double fold is still considered an unreasonably expensive technology. Although in fact the price is exceeded quite a bit, but the reliability of such a connection is much greater. Here is how you can make it during the roofing process:

But, if you want the seams between the paintings not to be visible, and the entire roof to look even, then make recumbent folds. And horizontally, the paintings are connected to each other only by recumbent folds - so that the coverage is maximum. If the captured steel strip does not reach the depth, such pictures will disperse over time.
The third type is an angular standing fold, which is also called L-shaped. It is recommended for roofs with slopes greater than 25°. In execution, it is simpler than a regular fold - you just need to correctly bend the top edge of the seam.
Stiffener Height
And now let's talk about the height of the fold, which also serves as a stiffener for such a roof. The fact is that this connection is absolutely waterproof, unless it is exposed to standing water. But where on the roof can it come from in this form? Very simple - from the thickness of the snow. Therefore, the height of the fold matters, and in especially snowy regions it is made considerable.
Additional sealing
Additionally, in order to prevent water from entering the seam, special sealing gaskets are installed in the rebate during installation. A special material is used that calmly tolerates exposure to high temperatures (up to 90 ° C) and compression, because rolling mechanisms for folds will still be used.
Another important point: all fasteners that you will use must be only anti-corrosion. Otherwise, in a couple of years, a new beautiful roof will be covered with rusty streaks.
Rebate technology
You can fasten the folds together with a hammer and wooden beams, with a special hand tool or with the help of electromechanical machines. The simplest option is a frame:

Before you bend the recumbent fold, the picture must be attached to the flooring with a separate narrow strip in order to stabilize its position.
The bend is made from the front and back, and the vertical elements of the sub-fold are left and right.
Clamp application
The most common fastening method is clamps. They are bent by 25 mm, and the paintings are nailed on the right side.
Clamp - a metal strip made of galvanized steel, 80-120 cm long and 0.5-0.7 mm thick. You can cut a clamp from a regular galvanized sheet with a simple hand tool. Next, place the clamps along the edge of the paintings every 60 cm and fasten with self-tapping screws (4.8x28).
So, first we put the picture on the crate, then we fix it with a clamp, and only then we cover it with another picture. You need to nail the clamps along the line connecting the two paintings: one sheet is placed on the clamp from above, and the second is slipped from below, and we wrap three layers of metal in one direction, after which we close the folds to the end. We press, and we get a strong and reliable connection with a clamp, which is hidden inside and holds both sheets on the roof. This mount is a 100% guarantee for long years from leaks and cold air.
Now let's see how the work of a professional differs from an amateur. So, for an ordinary home craftsman with quite dexterous hands, one mallet, scissors and a hook bender are enough to install gutters. But an experienced person, a specialist in his field, is armed with at least a dozen expensive special scissors, not to mention frames, tongs and other tools. Moreover, the total cost of such a set can be more expensive than the folding machine itself.
To close the folds today is most often used semi-automatic tool, the use of which gives many significant advantages:
- High performance.
- High quality seam.
- Preservation of the polymer coating of paintings.
- Ability to work with metal of any thickness.
More recently, paintings have also been produced whose folds are easily snapped into place by pressing - and no tools!
We wrote about how to choose a material for a seam roof, as well as what types of seam joints are considered the most reliable, in. Today we will talk about the design features of a metal roof and the technology of its installation.
Guaranteed to protect the seam roof from condensate, deformation and depressurization will help to comply with certain rules regarding the arrangement of the roofing pie, the features of laying the roofing itself and the sequence of its installation.
In this article, we will consider the following questions:
- What elements does a seam roof pie consist of.
- How to equip the cornice overhang of a seam roof.
- The sequence and technology of installation of folded panels.
- Arrangement of valleys and junctions of seam roofing.
If the construction of a house begins from the foundation, then the arrangement of a seam roof begins with the creation of a roofing pie that protects the attic from condensation and cold. Wherein roofing cake serves as a reliable protection against the noise that occurs during precipitation.
Pavel T. FORUMHOUSE user
If the roof insulation is 250-300 mm (I have 300), then no noise is heard (unless, of course, hail is the size of an egg). The only place where I can hear the rain (and even then weakly) is in the bathroom, which has a stretch ceiling.
In order for the thermal insulation to be of the required thickness, the insulation can be laid in several layers (between and under the rafters).
The roofing pie of the seam roof consists of several layers:

Let's consider them in more detail.
Supporting crate - lower wooden slats, on which a vapor barrier film and insulation are placed.
Vapor barrier film is a special material that does not allow moisture to penetrate from the room into the insulation.

Rafter - wooden beams section 200x50 mm. The distance between the rafters is 1.2 ... 2 m.
Mineral wool is most often used as a heater. The insulation is laid between the rafters directly on the vapor barrier film, which, in turn, is supported by the lower crate.

Waterproofing is a special film that allows moisture to pass through only in one direction (from bottom to top). Waterproofing does not allow under-roof condensate to penetrate into the insulation, but allows moist air to accumulate in the layer mineral wool. Waterproofing film is a diffusion (breathable) membrane that is sold in hardware stores.

berd80 FORUMHOUSE user
You can spread a diffusion membrane, you can use a special volumetric membrane (only it costs decently). No consensus was reached on this issue.
Waterproofing spreads across the rafters in the direction - from the bottom up (starting from the eaves, towards the ridge). The film is attached to the wooden rafters with staples (using a stapler). Individual strips of the waterproofing membrane are overlapped (overlapping width - at least 100 mm). On gable overhangs, it is necessary to provide an overhang of the film (the width of the overhang is approximately 150 mm).
The film should not be in a taut state, and the allowable sagging of the membrane between two adjacent lags is 35 mm.
In no case should the same material be used as a vapor barrier and waterproofing. Moreover, you can not change their places. All this will lead to the accumulation of moisture in the insulation or, conversely, in the room. The development of mold and the consistent destruction of building structures in this case are guaranteed.
The counter-lattice is a 50x50 beam, which is nailed to the rafters over the waterproofing film. The counter-lattice allows you to create an air gap between the waterproofing and the seam coating.
A special sealing tape is placed under the counterbars, which ensures tightness in the places of nail joints and protects the insulation from moisture.

Lathing - transverse strips nailed to the counter-lattice at a certain distance.
Arhios FORUMHOUSE user
A bar 50x50 (counter-lattice) is nailed along the rafters, and on them (across) - planks 100x25 with a run-up (batten).

The counter grille provides ventilation of the under-roof space, which eliminates the condensate that forms there. In order for the counter-lattice to perform its functions with guarantee, the cornice overhang of the seam roof must be made according to the following scheme:

The crate must be strong, rigid and even. The maximum clearance between the crate and the control rail 1 meter long must not exceed 5 mm.
Effective ventilation of the under-roof space is provided by a ventilated ridge.

As well as a ventilation mesh PVC tape, which is stretched between the crate and the frontal board of the cornice overhang.

Thanks to these two elements, a constant blowing of the under-roof space is ensured.
The step of the crate deserves special attention - the distance through which the transverse strips are nailed. In accordance with the set of rules for the arrangement of a metal seam roof (SP 17.13330.2011), the distance between the individual laths of the crate should not exceed 200 mm. This allows the foot of a person walking on the roofing to rest on two boards at once, which protects the metal from deformation.
Along the edges of the roof (in the places of roof overhangs), as well as in the gutters, a continuous boardwalk with a width of at least 700 mm is created.

Some users of our portal recommend making a continuous crate over the entire area of the seam roof, which, in general, is not a mistake (especially if this coincides with the recommendations of the manufacturers of seam paintings). For example, in accordance with the technological requirements, a continuous crate without fail “spreads” under a zinc-titanium roof.
A solid crate is a conditional concept. A small gap (no more than 10 mm) must be left between each transverse plank of the crate, which will compensate for the thermal expansion of the wood.

For more details, you can find out by visiting the corresponding FORUMHOUSE section.
Procurement of materials
If you decide to make seam paintings from rolled or sheet metal, then you cannot do without the use of sheet bending and seam-rolling machines. Purchase similar equipment personal construction- inappropriate. But this does not mean that metal should be bent manually.

vasilpolt FORUMHOUSE user
It is better to use the service of a team that has a machine for rolling pictures. The quality of the roof in this case will be better than if you bend the rolled products by hand. There is even a separate service - "Picture rental". Virtually every roofing company that has the necessary equipment offers it to their customers. Try searching in your area.
Also, with the help of sheet bending equipment, you can make the necessary additional elements. What kind of additions will be needed for construction - it depends on design features roofs.

The photo shows typical profiles, the geometry and dimensions of which may differ depending on the characteristics of a particular roof.
Device and installation of the cornice unit
Installation of a folded roof begins with the arrangement of cornice overhangs. Immediately pay attention to the fact that the cornice overhangs have a different design. It directly depends on the design. drainage system. Drainage systems, in turn, can have hanging or wall drains.
The cornice overhang with a hanging gutter does not have transverse seams, which makes the roof more airtight and easier to install. Considering that snow and ice can easily damage the suspended gutter, the roof surface with long slopes has to be equipped with additional elements for snow retention.

A system with wall-mounted drains and flat top ebbs has a more complex design, and its installation is best left to experienced tinsmiths. The rigidity of the system with wall gutters is an order of magnitude higher than that of its counterpart with hanging gutters.


Roofer1959 FORUMHOUSE user
Regarding the gutters: if they are done correctly, then any are good. Wall-mounted - more reliable in terms of rigidity, and I can vouch for its safety. But there is a weak point - eyeliner paintings (especially if the fold is single). Suspended is deprived of this minus, but its rigidity under certain operating conditions can be called into question.
There is no consensus on which drain should be installed complete with a seam roof. But no matter which option you personally like, the eaves knot will have to be equipped according to the same principles.
Installation of the cornice unit begins with the installation of drips and ventilation tape.

The lower cornice profile - a "drip" (through which the condensate formed in the under-roof space will drain) - is mounted on the rafters and covered with a waterproofing membrane. This is done at the stage of arranging the roofing pie.
A thin layer of adhesive or roofing sealant should be applied between the waterproofing and the drip.
Sometimes the lower drip is not used at all: for example, if the under-roof space is well ventilated (using a ventilated ridge on top and a ventilation tape on the bottom). But it is better if it is, after all, installed.
nekorsakov FORUMHOUSE user
Installed first plastic mesh on the gap between the crate and the frontal board. On top of the mesh, cornice strips were stuffed, which were fastened to the crate with galvanized roofing nails, hammering them in a checkerboard pattern. The slats were mounted along a cord stretched along the cornice overhang, and the mesh was simply attached close to the edge.

PVC mesh protects the roof space from insects and debris. The distance between the cornice strip and the ventilation mesh must be at least 2-3 cm.
If it is planned to use suspended gutters as part of the roof, it is necessary to think in advance how to install eaves hooks for the gutter system. So, long cornice hooks, which are attached to the upper crate, are wound directly under the eaves bar. Under each hook, it is necessary to make a recess in the surface of the crate. Otherwise, the folded pictures along the edge of the overhang will go in waves.

To give the cornice overhang additional rigidity, metal roofing crutches are installed under the cornice strip.

The crutches cut into the flooring flush with the surface of the crate (similar to gutter hooks) and are attached to it with self-tapping screws.

The distance between two adjacent crutches is 60-70 cm.
Standard crutches are commercially available, but it is quite possible to make them yourself. For the manufacture of crutches, a steel strip is most often used - 40x4 mm. Billets of the required size are welded together, after which they are drilled and subjected to anti-corrosion treatment (treated with a primer).

Fasteners for galvanized roofing (including crutches) must be made only from galvanized steel.
The standard T-shaped crutch for the eaves has a width of 100 to 200 mm, and its length depends on the design features of the roof.

Crutches are used to reinforce cornice overhangs, as well as other roof elements. Therefore, they can have different geometry, which depends on the direct purpose of the product.

Seam joints themselves are already stiffeners. Therefore, on roofs with suspended gutters, roof spikes may not be used, but may be replaced by strips of galvanized or painted metal. They are installed along the overhang. Steel strips are placed on top of the eaves strip or placed under it - depending on the geometry of the eaves profile.

nekorsakov
Before the installation of the folded paintings, it was necessary to install additional strips of metal, reinforcing the rigidity of the overhang and forming a ledge (50 mm), for which the folded edges were then fastened and crimped.
Seam roofs equipped with wall gutters and flat flashings must be reinforced with roofing spikes without fail.

Having completed the arrangement of the cornice assembly, you can proceed to the next stage of work. But first, let's talk a little about the construction tool.
Tools and fixtures for mounting folded paintings

A mallet (plastic, wooden or rubber) and a hammer are tools for forming bends and other elements of a seam roof.
Shlyazen (mandrel, mandrel-blade) - a device that serves to form ridges and arrange locks at junctions (valleys, bypass ventilation ducts and chimneys, etc.).


Straight and corner pliers (large and small) for forming seam bends and other complex elements and roofing.


Crimping roof frames - used for crimping L-shaped and double seams. In fact, both frames are used to close the double fold, because its folding is carried out in two passes: the L-frame closes the single standing fold during the first pass, and the frame for closing the double fold is used during the second pass.

There are also frames for bending roof overhangs. They are used when mounting various paintings (including self-latching ones).
A set of scissors for metal with various cutting angles.

It is impossible to cut the panels with a grinder or other abrasive tool! It destroys protective covering material.
Installation of roof slopes on the example of a gable roof
Installation of roof slopes begins with installation launch pad. The key difference between the launch panel and the ordinary panel lies in the special geometry of the profile, thanks to which it is possible to attach the picture to the crate from two sides at once.


The step between adjacent fasteners (clamps) is 40 ... 50 cm.

Clamps must completely repeat the geometry of the bends that are on the side shelves of the folded paintings. Such fasteners can be made independently, or can be purchased on the construction market.
If the length of the roof slopes exceeds 6.5 meters, experts recommend using movable clamps that allow you to compensate for possible deformations from the thermal expansion of the panels.

After installing the starting picture, the rest of the roof is installed.
nekorsakov
Next to the laid and fixed picture, the next one is laid, which overlaps (with a folded edge) closes the nail shelf of the previous panel. Both paintings are crimped into the lock together with already installed (hidden) clasps. The result is a very reliable and tight connection, because all the fasteners are covered with sheets of metal.


Seam joints are crimped in a standard sequence. First, with the help of a frame for closing the horizontal lock, the first crimp is made. Then, with the help of a frame for closing the double seam, a second crimp is made.

The finishing picture is cut to size (so that it does not protrude beyond the gable overhang), folded over and fastened with clamps to the crate. The gable overhang is subsequently closed with a special profile.

Foamed soundproofing tape, which can be placed under the seam panels along their entire length, additionally protects the room from noise generated during rain. The tape is cut to size and stapled to the crate.

We have described the sequence of installation of paintings made on folding equipment according to individual sizes. Installation of a self-latching roof has its own nuances.
For example, during the installation of self-latching panels, roofing screws are used instead of clamps, which are screwed into the nail strips of the seam paintings. There are elongated holes on the nail strips that help to compensate for the thermal deformation of the panels.

For fastening clamps and self-latching panels to a wooden crate, roofing nails or galvanized self-tapping screws with a press washer (for wood) that have a flat head should be used.
To prevent the self-latching roof from rippling in hot weather, the self-tapping screws must be screwed exactly into the middle of the oblong hole. At the same time, having screwed the self-tapping screw completely, it should be unscrewed by about a quarter of a turn (so that the panel can move slightly under the action of thermal expansion).
Roofing in places of cornice overhangs
The ridges of the folded paintings, located in the places of the cornice overhangs, should be cut (literally by 2 ... 3 cm).

After that, the remaining (protruding) part of the picture will easily bend under the cornice overhang, forming a reliable and tight cornice ledge.


It is not necessary to completely remove the extreme part of the comb. It can be bent by forming a neat decorative cap at the end of the fold.

Installation of side end plates
We present the installation scheme of the side gable profile.

- The bar on which the wind bar is attached (the dimensions of the bar are selected based on the geometry of the wind profile).
- Roofing self-tapping screw "metal-wood".
- Side end plate.
- Start/finish panel of seam roofing.
- Self-tapping screw with a press washer.
- Klammer.
At the junction of the roof slopes, the end strips are connected as follows.

Installation of a ventilated ridge
The main elements of a ventilated ridge are: the upper ridge profile, ventilation grille and supporting elements.

nekorsakov
I decided to put the lower (supporting) slats between the crate and the picture, without fixing anything additionally. On top of them I mounted the upper strips (with some overlap). As a result, the support bar is held not by individual self-tapping screws, but by a whole roofing sheet, fixed with clamps and crimped with adjacent sheets. In this mounting option, the perforated wall of the support bar turned out to be pushed deep from the edge, which seemed to me better both aesthetically and functionally (away from the "aggressive" external environment with its precipitation).
Pipe Bypass
Chimneys and ventilation shafts are protruding elements, bypassing which, when arranging a seam roof, requires certain skills in performing tin work. Consider the standard bypass option using the example of a self-latching roof. It can be installed by any non-professional roofer.

Pieces with locks are cut off from standard seam panels (indicated in red in the diagram). Adjacency strips (side aprons) are formed from them, which, on the one hand, are adjacent to the pipe wall, and on the other, they snap into place with neighboring paintings. The space between the side aprons is closed with abutment strips (upper and lower), which do not have a latch. A hook is made on the top bar, on which a picture is placed, suitable for the chimney from above. The lower bar with a hook lies on the lower picture.
The aprons adjoining the pipe walls are closed with roofing sealant.
Panels that have rolled under a double fold are mounted in the same way at the place bypassing the pipe.

All four aprons, in this case, are connected to the adjoining paintings by recumbent and standing folds.
Valley device
Immediately pay attention to the requirements for arranging the base for the valley bar: the base here will be a solid wooden crate.

The design of metal junctions should ensure maximum tightness of the roof at the junction of two slopes. Therefore, the valley bar must be fastened to the crate with clamps (in no case with self-tapping screws), and the adjoining paintings to the valley should be closed with a double fold.


Sofa owner
Not The best decision- perforate the paintings (and at the same time the valley) with self-tapping screws. It is more correct to make a fold (hem) on the edge of the picture and bring it to the corresponding fold of the valley. The result is a recumbent fold. The size of the overlap is approximately 30 millimeters. The endova, in turn, is fastened with clamps to the crate.
These rules are relevant for folded patterns and profiles made from sheet or rolled products on sheet-bending / seam-rolling equipment. When installing junctions on a “snap roof”, the instructions and recommendations of the roof panel manufacturers should be followed.
Connections to the wall
Adjacency to the wall is a structural element, without which no complex roof can do. Similar connections have simple design and are performed using a special profile.

You can find out more, as well as about the technological points associated with its installation, in the corresponding section of our portal. You can get information by reading an article based on the recommendations of FORUMHOUSE users. For those readers who want to see a visual master class on the installation of a seam roof, we have prepared a small thematic video.
CLASSICA and ELEGANT are fastened directly to the lathing with self-tapping screws through a bend hidden during installation; between themselves, the panels are attached to a self-latching fold. The presence of ribs increases the rigidity of the panel during installation and transportation and reduces the noise level from external influences during the operation of the roof.


PRAGMATIC is fastened to the crate with the help of "PRAGMATIC" clamps (fig. 14), the panels are fastened to each other on a self-locking fold. Roof panels with l-shaped seam are fastened to the lathing using "STANDART" clamps (Fig. 15); are interconnected by a double standing seam using a manual or mechanized tool.
Seam panels are manufactured at the INSI Facade and Roofing Factory according to pre-declared lengths, which are determined as a result of careful measurements of the roof slopes (basic size: from the eaves to the ridge).

2. Accessories


3. Lathing for seam roofing
Seam roofing is installed on a sparse or continuous crate. To prevent sagging of steel sheets, it is very important to observe the required design step of the crate during installation. The following can be used as a batten: galvanized metal profile PSh-28 manufactured by CJSC INSI, wooden beam 50x50, board 32x100, which are attached from the bottom up (from the eaves to the ridge). From correct device The durability of the roof depends to a large extent on the lathing, because even a slight deflection of the sheets weakens the density of its folds.
For seam panels with a self-locking seam, it is recommended to use a metal crate. If used as a crate wooden planks or bars, you must follow the instructions of paragraph 7.3 of SP 17.133330.2011. ROOFING.
When using a metal crate and a discharged wooden crate, it is recommended to lay an anti-condensation film before installing it on the rafters. In the case of using a solid wooden crate or other solid bases (flooring), it is recommended to lay a special structural vapor-diffusion film directly on the flooring. This film provides:
- device of a permanent ventilation duct for the removal of condensed moisture formed on inside metal roofing;
- prevention of metal corrosion and wood decay;
- noise reduction from rain and hail.

In the places of installation of cornices, valleys, junctions with the protruding parts of the building, a second profile of the crate is installed, which gives additional rigidity to the panels. In the region of the valleys, the pitch of the lathing profiles is not more than 200 mm. In the area of installation of snow retainers, it is necessary to install two hat profiles one after the other.
For Standart seam panels with roof slopes of 3-20°, it is recommended to use a wooden crate. Along the eaves, along the entire perimeter, it should be made in the form of a continuous boardwalk with a width of at least 700 mm. In grooves and valleys, the crate should be made in the form of a continuous boardwalk up to 700 mm wide on each slope. It is also recommended to use a continuous crate with a complex roof configuration. In the area of the transverse joint of the folded panels, a board with a width of at least 120 mm should be laid. A joint of panels is formed on it with the help of a recumbent fold.
The crate under the roof should be even, without protrusions and recesses; the ridge and ribs must be straight; the bottom board of the cornice overhang must be straight. Wooden crate is made of pine, spruce, fir and aspen. The moisture content of wood should not exceed 12%. To protect the wood of the roof sheathing from decay and extend its service life, the wood is impregnated with antiseptics, coated or painted. The service life of wood increases and if it is covered with drying oil in a dry state. Requirements for a wooden crate and its installation are listed in SP 17.133330.2011. Lay a special structural vapor-diffusion film along the crate.
In the construction of an insulated roof, to ensure ventilation under the roof space, it is necessary to use a counter-lattice, under which a hydro-windproof membrane is attached, and only then a crate.
4. Installation of a roof from STANDART panels
Options for joining panels along the length, arranging cornices, ridges, finishing chimneys, ventilation shafts for roofs from standing seam panels at various slopes are recommended to be adopted in accordance with SP 17.133330.2011. At minimum slopes 3°-10° it is necessary to seal the seam roof with sealing tape Abris S-LB. Maximum length the slope, when fastening the seam roof with fixed clamps, should be no more than 6 meters. For longer lengths, it is necessary to use "sliding" clamps. The locations of "sliding" and fixed clamps along the length of the panel should be taken in accordance with SP 17.133330. 2011, appendix C.

If an organized drainage device is provided from the roof, then before installing the roof deck, it is necessary to fix the holders gutter. They are fastened with a step of no more than 750 mm to the rafters or the bottom lath of the crate (see installation of the drainage system).
Then a cornice is attached along the lower edge of the slope. Fastening is carried out with self-drilling galvanized flat head screws (Fig. 16)
5.2 Mounting the seam roof valley

At the next stage, the installation of the elements of the valleys is carried out. During installation, only the lower valley is used. Fastening is carried out with self-drilling galvanized screws with a flat head, along the edge of the valley, closer to the bends. The junction of the valleys is carried out with an overlap of at least 200 mm, the upper elements must be wound onto the lower elements. The edge of the seam roof valley is brought out to the eaves (Fig. 17). Figure 18 shows an option for attaching panels to a valley. At a distance of 100 mm from the inner bend of the valley, a seam roofing sealant is applied. Folded sheets are laid on it and attracted to the valley with roofing screws painted in the color of the roof.


Before starting the installation of folded panels with your own hands, it is necessary to perform a control measurement of the slopes with the establishment of flatness and perpendicularity with respect to the lines of the ridge and cornices. The diagonals of the rectangular slopes should be equal. Seam roofing can be laid both from left to right and from right to left, strictly observing the direction: with the lower lock towards the subsequent installation. Therefore, when lifting the panels, it is necessary to turn them around, taking into account the direction of installation. For the installation of seam panels, self-tapping screws 4.8x22 with a press washer are used, and for component elements and in places where panels overlap along the length - 4.8x20 (for a metal sheathing of a seam roof) or 4.8x35 mm (for a wooden sheathing) with a sealing gasket. Sheets are fastened to each line of the crate. Each subsequent panel is aligned with the slope, superimposed on the previous one, snapped into place and then attached to the crate. Fasten the folded edge of the panel along the eaves and ridge with 4.8x20 (4.8x35 for wooden lathing) painted screws with a sealing gasket, two screws per fastening. (Fig. 19).
When arranging longitudinal joints, the sheets are mounted from the bottom up. With a slope length of more than 6 m, it is recommended to make it composite due to the inconvenience of transporting and installing sheets. Seam roof sheets are laid with an overlap along the length of 200 mm. Adjacent joints must be at least 400 mm apart. Thus, the plane of the roof with a long slope usually consists of two standard sizes of panels "a" and "b". In this case, the length of panels 1 and 2 differs by the spacing of the joints (Fig. 20).
When installing a composite ramp, operations are performed in the following sequence (Fig. 21):
1) cut the lower part of the "lock" from the outside on panel 1 (Fig. 22); 2) fasten panel 1 with self-tapping screws to the crate; 3) put panel 2 on panel 1 with an overlap of at least 200 mm and fix it to the crate with self-tapping screws; 4) cut the lower part of the "lock" of panel 3 (similar to item 1); 5) make lock connection of panel 3 with panels 1 and 2; 6) fasten the panel with 3 screws to the crate; 7) panel 4 is superimposed on panel 3 with an overlap of 200 mm and is connected in a "lock" with panels 2 and 3; 8) fasten the panel with 4 self-tapping screws to the crate. Then repeat steps 1 to 8.

5.4 Gable
The pediment-45 is fastened in such a way as to cover the upper fold. The pediment is fastened to the lower bend (Fig. 23). If a sheet was cut, it is necessary to bend the edge of this sheet up by 20-25 mm (Fig. 23). The pediment is fastened with roofing screws with a sealing gasket.
5.5 Skate
The ridge is installed on the upper edge of the slopes on the finished roofing. The upper part of the folded pictures is folded up by 25 mm. The skate can be shaped (semicircular) or flat. When installing a cold roof with a slope of 25 ° or more, the ridge is fastened with roofing screws into the upper edge of the seam lock (Fig. 24).

5.6 Wall profile
At the junction of the roof to the wall, pipes and dormer windows a wall profile is installed. The profile is superimposed on the seam panels (the panels are bent upwards by 25 mm along the edge of the junction with the wall) and attached to the wall (Fig. 25).

Brick rectangular pipes protruding from the roof are framed with a wall profile according to fig. 27-32. The number of profiles is equal to the perimeter of the opening in the plane of the roof plus 2 meters.
step 1 - Installation of the lower pipe apron (fig. 26)
First you need to prepare the junction of the lower apron to the side surfaces of the pipe. To do this, using the elements of the apron as a template, cut lines are marked on the pipe. Then, with the help of a corner-cutting machine ("grinder"), a strobe is made in the brick walls of the pipe. Having cleaned the strobe and the surface of the lathing from brick dust, the installation of the elements of the lower apron begins, after cutting each element and bending it along the slope of the roof. When installing the apron, the bent upper edge is inserted into the strobe, the vertical wall is pressed tightly against the surface of the pipe, and in this position the element is fixed with roofing screws with a sealing gasket to the crate. The first element is mounted to the lower face of the pipe, then two side ones and at the end - the element to the upper face. The overlap of the upper elements on the lower ones must be at least 150 mm. After fixing all the elements to the crate, the edge of the apron inserted into the strobe is coated with silicone sealant. Attention! For better adhesion, the strobe must be washed with water.
step 2 - Installation of the bottom sheet from the pipe to the cornice (Fig. 26)
At this stage, a flat (galvanized or painted) sheet is installed. The length of the sheet must correspond to the distance from the lower edge of the pipe to the eaves or the nearest valley, the width must be not less than the width of the lower element of the apron (including side bends). Bring one edge of the sheet under the lower element of the apron, and bring the other from above, onto the cornice or valley. After fixing flat sheet make bends to the crate from its sides with a hand tool.
step 3 - Laying the seam panels (fig. 27)
Lay the seam panels from the bottom and from the sides of the pipe, beforehand bending upwards by 25 mm at the junction points.
step 4 - Installing the wall profile along the bottom of the pipe (Fig. 28)
Install the wall profile to the lower edge of the pipe, preliminarily adjusting it to the width of the pipe, according to the figure. Cut the protruding vertical parts from the bottom and bend to the side edges of the pipe. The profile is attached to the pipe using dowels with mandatory sealant treatment.
step 5 - Installing the seam roof on the side faces of the pipe (Fig. 29)
step 6 - Installation on the top face of the pipe (fig. 301)
Install the wall special profile on the upper edge of the pipe. Cut the protruding vertical parts from the bottom and bend onto the side edges of the pipe, securing with dowels.
step 7 - Installing the seam panel on top of the pipe (fig. 31)
Install the top seam panel over the wall profiles and side seam panels. Leave a gap of at least 100 mm between the bottom edge of the panel and the pipe. Treat the lower edge of the standing seam (50 mm) with a seam roof sealant.


If it is planned to sheathe the pipe with a profiled sheet, then after framing the pipe, a hat profile frame is mounted, a profiled sheet is attached to it, the corners are made with an outer corner 50x50 (Fig. 33)
The chimney is attached to the pipe with dowel-nails before the installation of the profiled sheet.
The number of drainpipes is determined from the standard - no more than 52 sq.m for a pipe with a diameter of 100 mm of the roof area per one drainpipe. Usually the number of downspouts is chosen for aesthetic reasons. The construction of a drainage system on the north side of buildings should be avoided in order to prevent it from freezing in winter.
In case of a risk of freezing of the drainage system, heating systems for gutters and pipes can be used.
Gutter holders are mounted at a distance of 0.75 m from each other, pipe holders - no further than 3 m from each other (for example, 3 holders are needed for a 5 m long pipe, two are enough for a 3 m long pipe).
With a catchment area of less than 30 sq.m per downpipe, the gutters can be installed with a zero slope, with a larger catchment area, the slope of the gutters can be up to 5%.

step 1 - Installing the gutter holders
The installation of the drainage system begins with the installation of the gutter holders. Divide the total length of the gutter into equal segments, as noted earlier (but not more than 900 mm).
step 2 - Marking for gutter holders
According to the result obtained, mark on the lower crate the installation locations of the gutter holders.
step 3 - Bending the gutter holders
Number the holders from the top mark to the drain funnel. Having determined for yourself the desired slope (up to 5%), mark the place of the bend on each holder. In this case, the place of the bend of the holder should be lower than the design position by 2.0 - 2.5 cm relative to the roof slope line (Fig. 36).
step 4 - Attaching the gutter holders
Aligning the bend with the edge of the battens, attach the gutter holders with self-drilling galvanized screws 4.8x22 with a flat head, 3 pcs. on the mount. When using 50x50 bars as a crate, a double bar must be installed to securely fasten the holders.
Step 5 - Creating a slope
Fit two wall profiles to the dimensions of the side faces of the pipe. Installation of profiles - by analogy with the installation of the lower profile. To the seam panels, fasten the wall profile to the sealant using roofing screws with a sealing gasket.

step 6 - Mounting the nozzle
In the gutter, at a distance of 150 mm from the bottom edge, cut a hole with a diameter of 100 mm for the branch pipe. Insert the branch pipe in the place of the hole (Fig. 38) Insert the front edge of the branch pipe under the outer bend of the gutter. Bend the nozzle flange onto the rear edge of the gutter and fasten it with two 4.2x16 self-tapping screws (Fig. 38).
Step 7 - Installing the Gutter Ends
Install gutter plugs at the ends (Fig. 39).
step 8 - Installing the gutter
Insert the chute into the holders by inserting the rear edge of the chute into the ledge of the holder (Fig. 39).

step 9 - Connecting the gutters
Install the connecting element of the gutter at the junction of the gutters (Fig. 40 and 41).
step 10 - Mounting the angled elbow
Use the corner elbow to create a transition to the building wall. The length of the connecting pipe is determined locally (Fig. 42).
step 11 - Mounting the pipe
The pipe is fixed to the wall using pipe holders. The pipe is measured, if necessary, extended at the place of installation of the pipe holder, fixed with a lock (Fig. 43).
Step 12 - Mounting the Drain Elbow
The drain elbow completes the drainpipe, serves to drain water from the foundation of the building; should be located at a distance of 300 mm from the blind area of the building (Fig. 44).

7. Snow holder and seam roof fencing
For safe movement on the roof at the level of the eaves, starting from the second line of the crate, roof railings are installed.
The fence is made depending on the slope of the roof and its type. Seam roof fencing is fastened to the sheathing profile through a seam panel and a sealing rubber gasket at the wave deflection point with self-drilling galvanized bolts 5.5x25 mm for metal sheathing and 5.5x60 mm for wooden sheathing. It is forbidden to fasten a roofing fence to one seam picture. Between themselves, the sections of the fence are bolted (Fig. 45).

To prevent the descent of large masses of snow, snow retainers are installed. The design of the snow retainer consists of brackets and pipes. The brackets are installed in the deflection of the wave and are fastened through the metal tile and rubber sealing gasket to the roof sheathing. In the places of installation for fastening the bracket, an additional crate profile is pre-mounted at a distance of 120 mm. Snow guards are installed above the roof railing. In the absence of a roof fence, snow retainers are installed no lower than the third row of the crate. With a slope length of more than 10 meters, it is recommended to install two rows of snow retainers. In areas with big amount snow precipitation provides for the installation of a thrust bracket. The snow retainer rod is attached at one end to the bracket and the other to the purlin profile through a sealing gasket and a metal tile sheet. Recommendations for the selection of the number of brackets, brands fastener depending on the construction of the folded roof and the snowy construction area, can be obtained from the program by setting all the necessary parameters. It is forbidden to fasten the snow retention bracket to one sheet.

8. Accessories

As accessories, weathercocks, decorative spiers, chimneys are installed on the roof. Installation of all accessories is carried out in accordance with the norms of SNiP.
Master Flash roofing seals are used for the arrangement of exits from the roof of antennas, masts and ventilation pipes of round cross section with a diameter of up to 330 mm (with an outer surface temperature of up to 130) °.
9. Processing of wooden structures
Wooden structures used in the installation of seam roofs need antiseptic and flame retardant (fire) treatment. Processing can be carried out both before the assembly of structures (processing of individual boards and bars), and after (processing of rafters and battens). Processing is carried out various methods(immersion in a container with a solution, brush application, spray application).
10. Tools for the installation of seam roofing
- Screwdriver with hexagon socket 8 mm.
- Electric nibbler or nibbler.
- Manual roofing scissors.
- Mallets (wooden, rubber).
- Hacksaw, jigsaw, hammer (used in the construction of rafters and battens).
- Angle grinder ("Bulgarian"), puncher, drill, gun for pressing out sealant (used when installing a wall profile).
- Level, level, plumb line, measuring instruments and fixtures.
11. Attention
Cutting seam panels and components with cutting and angle grinders ("grinders") is allowed only if the unprocessed areas are protected from flying sawdust and subsequent anti-corrosion painting of the cut points.
Use as ridge or valley seals polyurethane foam is strictly prohibited!
All products manufactured by INSI Façade and Roofing Plant are designed for use on pitched roofs according to these installation instructions. The INSI plant is not responsible for damages or losses that may occur when INSI products are used to perform functions that are unusual for them.
Distinctive roofing material among the traditional ones, one can name a seam roof. This metal coating is quite durable and reliable, but it does not look like a metal tile, slate or roofing material. Her appearance attracts attention. But reliability and appearance are not the only things that make this type of roof popular. We will talk about the advantages of the roof later. But the seam roof got its name due to the seam with which sheets of metal are fastened to each other. Such a connection is strong, reliable and tight.
Let's find out how a seam roof works, how it differs from others and how to install it. In addition, we will find out how to repair a seam roof.
Pros and cons of seam roofing
Seam roofing is a covering made from sheets of metal that are joined by a seam seam. For the first time in Russia, they heard about it more than 100 years ago. She quickly gained popularity. A machine for seam roofing was created, which made a seam on sheets.

And the most accessible method became when they invented a tool for seam roofing, which rolled up the seam. Before, everything was done by hand. What are the benefits of such a roof?
- Coating durability and strength.
- Price-quality ratio.
- Light weight.
- Economical consumption of material.
- Huge range of colors.
- Due to the smooth surface on the roof, there are no accumulations of snow and rain.
- The coating is sealed, without seams on the outside. Water will not get under the roof.
But along with the advantages, there are also disadvantages:
- Since it is metal, it is noisy. In order not to hear the sound of rain on the roof, you will need a little soundproofing.
- Difficult installation and the need to have a special tool.
- A lightning rod device is mandatory, as the roof accumulates an electric charge.
Basically, a seam roof is valued not for its beauty, but for its reliability and tightness. Since there are no seams on the outside of the coating. Sheets, or as they are also called - paintings, are attached to the crate with clamps, and the seams are rolled up with a frame. Depending on the seam, there are several types of seam roofing.
Types of coverage
Seam roofing is performed in 4 different ways:
- Single recumbent.
- Single standing.
- Double recumbent.
- Double standing.

The last of them is considered the most reliable and durable. The thing is that the seam is then the most protected, and the roof will be almost monolithic. She is not afraid of external influences. For complex structures two types of seams are used. For transverse seams (horizontal) - recumbent, and for longitudinal (vertical) - standing.
In addition, the material from which the paintings are made can be different:


If you have already decided what material you will make your roof from, let's look at how the seam roof is installed.
Making a pitched roof
Roofing instructions are not too complicated. Basically hard to do preparatory work. You need to take care of everything in advance the right tools and materials. Pictures can be bought ready-made, or you can bend on the machine. It is better if the picture is the same size as the roof slope, then installation will be easier. In addition, you will need clamps for fastening, and a frame for seaming. If schematically and step by step, then you can make a roof like this:

Note! Do not forget to make holes for the chimney or ventilation pipe in advance, protecting them with an elastic penetration.
To understand how to do the job, we suggest you additionally watch the video:
Self-locking seam roof
The task of building a seam roof for teapots was simplified when a self-locking sheet was made. Indeed, this method is convenient, reliable and simple. Even a beginner can do it right. The thing is that the formation of a seam seam does not require special skills and tools. Their structure is quite simple.

How is the installation carried out? Everything is similar to the technology that we considered. Sheets are stacked on the crate.
Advice! The most important thing is to set the first sheet correctly.
Then it is fixed with clamps and another sheet is connected to it. And this is where the self-locking mechanism comes into play. Sheets simply interlock with each other without much technique. Convenient locks grab and a seam is formed. The work is not difficult and is performed much faster than the traditional version.
The package includes the following items:
- self-locking roofing pictures;
- lower and inner valleys;
- side gables from the rain;
- profiles and aprons;
- clamps and screws.

If you are in doubt whether you can make a traditional fold, you can always resort to new technologies that will make your job easier.
Seam roof repair
It is clear that no matter what type of roof you make, it will have to be repaired during operation. If, when working with a seam roof, you followed the technology, followed all the rules and chose quality materials, then you will not have to do the repair of the seam roof soon. When, nevertheless, a certain area was damaged, it is necessary to replace the paintings.

In the case where the roof is made of zinc or aluminum, a regular patch can be used. Tinning and soldering for zinc is not a problem. If it is aluminum, then the patch should be 7-8 cm wider than the area. It is fixed with screws. For sealing, the joints must be lubricated with roofing glue twice with drying.
In most cases, repairs have to be done due to leaks. They appear after many years of use. The reasons are as follows:
- mechanical damage or corrosion on the sheet;
- sagging of the picture due to the large crate step;
- loss of tightness of the seam;
- changing the geometry of the room.

To identify the cause, you need to examine the attic. When you find out what is leaking at the joints, you need to additionally roll the seams, and then treat them with a sealant. If there is a leak at the chimney or in places with an apron, you need to dismantle everything and reinstall it. In this case, you need to use high-quality sealant. A repair will cost a pretty penny, in which it rotted rafter system. Replacing it is almost impossible, so you have to dismantle the roof and do it again. To avoid this, you need to immediately eliminate any leaks and additionally treat the tree with an antiseptic.
Summing up
Thus, you have learned how to make a good and reliable seam roof. It can serve you for many years. If you did everything right, then your seam roof will be like in the photo below.
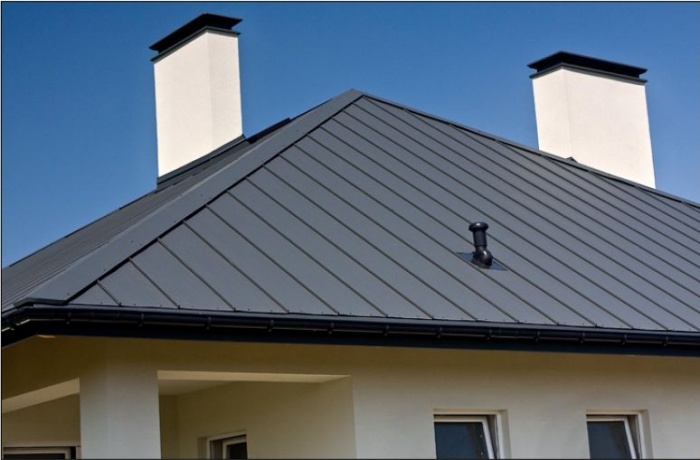
By following all the tips, you will be able to cope with the task.