Do-it-yourself garden drill with an electric drive. Electric drill for earthworks: specifications, instructions, reviews
During the pouring of the concrete solution, each layer is compacted. This is done manually by punching the mixture laid in layers with rods of different materials(metal, wood). All work can be done much faster with the help of special devices - vibrators. But the factory vibrating plate purchased for home use, is not always an economically viable option, because it is expensive. To work for her several times, and then leave her to just lie does not make any sense. In this case, you can make a vibrator for concrete from a perforator with your own hands. Homemade will speed up the tamping process and improve the quality of the work.
To implement the project in practice, you will need the following materials and tools:
- metal (steel) plate of the required dimensions, thickness from 50 to 70 mm;
- an iron bar or reinforcement (rectangular or circular) of such length that it is possible to reach the bottom of the exposed formwork structure when pouring concrete;
- perforator;
- an old drill or a pike, a spatula, a chisel, even a crown;
- grinder with discs for metal;
- welding machine with electrodes;
- ruler or tape measure;
- marker.
The minimum power of the perforator should be 1.5 kW - only such a tool will provide the required performance without overheating.
One side of the rod with a cross section of 15-20 mm is processed so that it can be inserted into the perforator cartridge. A stainless steel plate is welded to the second side. This requires special electrodes.
It is better that the rod also be from of stainless steel. Concrete is an aggressive environment. Ordinary metal is largely exposed to chemicals, and also wears out mechanically faster.
The sequence for manufacturing a tamping nozzle is as follows:
- cut off a rectangle of the required dimensions from a steel sheet with a grinder, and a piece of the required length from a round or rectangular rod;
- weld the plate to either end of the rod;

- cut off with a small margin the seat of the drill;

- weld it to the rod.

If you do not use an old drill, then you will need to make a special adapter for a punch chuck, or use machine tools to carve a seat on the free end of the rod. It is easiest to immediately use a drill of the desired length. On the basis of a perforator, more complex devices can also be made, for example, with a flexible shaft, which will additionally mix the working solution.
A home-made rammer for small concrete (the simplest manufacturing option) is presented in the video.
Owners of cottages or private houses are often faced with the need to dig holes for fence posts or pile supports. For drilling the earth, both hand tools and those equipped with an electric or fuel drive (for example, gasoline) are used. In the first case, the work will take a longer time, and will also require large labor costs. Buying or renting powerful devices is not cheap, so craftsmen figured out how to make homemade hole drill from a perforator.
But home-made devices, in comparison with factory counterparts, have the following cons:
- they can only drill relatively shallow holes of small diameter;
- they are not suitable for working on hard ground.
Structurally homemade devices consist of three parts:
- perforator;
- conventional earth auger;
- adapter or reducer.
The last 2 parts of the device can be made by hand. For sale even special nozzle (auger) for drilling, which is attached to a powerful puncher or drill. A working tool made in this way is shown in the photo below.

An important point is the amount of power and the number of revolutions of the perforator, which will be used in conjunction with the drilling device. The optimal value of the first parameter for a manual model of a homemade yamobur is 2 kW. It should be taken into account that, depending on the number of revolutions, the drill can be connected directly to the punch chuck or through a gearbox. For models with a power of 2 kW, the latter is not needed.
Optimal for drilling is the number of revolutions of the working nozzle from 60 to 300 per minute. This value depends on the properties of the soil in the area.
Drilling is performed in two ways:
- continuous;
- with periodic soil extraction.
In the first case, you will need a more powerful tool (with more torque).
Algorithm for making a homemade drill
To make a drill for holes with your own hands, you will need, in addition to a puncher, such tools and materials:
- angle grinder;
- a welding machine with a brand of electrodes corresponding to the metal used;
- electric drill;
- unnecessary perforator drill;
- metal reinforcement or rod for the manufacture of rods;
- material for the cutting part;
- cable and sockets to make a simple extension cord.
The work of converting a perforator into a device that can be used to drill holes in the ground is directly in the creation of nozzles. All work is performed in the following sequence:
- cut off a piece of the desired length from a rod or tube using a grinder (about a meter is enough if the power of the tool is 2 kW);
- knives are attached to the lower end (connection methods and design features of the cutting part are discussed below);
- cut off from the drill its base, designed to install this nozzle in a perforator cartridge;
- weld the cut fragment to the tube.
The simplest version is ready for use in work. If you do not use the base from the old perforation drill, then you will need to grind a seat from the rod for the tool chuck or for the adapter used.
In addition to the manual model, you can make semblance of a stationary drilling rig , possible variant which is shown in the photo below.

To provide power to a homemade pit drill, you will need to purchase or make your own extension cord.
The operation of the created device is shown in the video.
Manufacturing of the cutting part
Used as knives:
- discs from circular saws of a suitable diameter;
- ready-made augers from factory motor-drills or agricultural machinery;
- a metal sheet from which circles of the required diameter are cut out, sharpening them and bending them as needed.
The cutting part can be made removable (bolted) or fixed (welded to the rod). Both options are shown in the photos below.


Cutting part design must meet the following parameters:
- be larger in diameter (enough for 5 mm) than this parameter for the holes being created;
- it is necessary that the angle between the blades is 25-30 degrees;
- the front (cutting) part of the knives should be sharpened at an angle of 45°-60°.
It is advisable to make the tip of the drill from a drill designed for drilling metal, so that the tool enters the soil mass more easily.
At its core, converting a perforator into a vibrator or an earthen drill consists in making a nozzle that is appropriate in terms of functionality and size. Difficulties can arise only if you independently prepare a seat on the rods for a cartridge or adapter. In general, the manufacture of the considered options will not require much time and effort.
Everything can be done by our Russian Kulibins, so a home-made ice drill is not a problem for us, if the task were set.

To begin with, let's decide what manufacturing process we have to do, because each thing can be:
- make from scratch;
- finalize;
- retool.
Today's editorial assignment obliges us to talk about making an ice drill with our own hands from scratch and refining existing models with gasoline engines using a gearbox.
What are we not talking about?
In this material, you will not read about the conversion of manual ice drills to electric ones by connecting a screwdriver to them. There will be no description of this process, since there is no actual manufacturing here, but there is a connection of three parts: an auger, an adapter and a drill together.

Manufacturing from scratch
It is even scary to begin to describe this complex process. Without locksmith, turning, welding and milling abilities and skills, it is simply unrealistic to make an ice screw with your own hands. For craftsmen, this is probably not very difficult, so let's start.
To describe the manufacturing process, we have chosen several models:
- shoulder blade
- annular;
- framework;
- screw.
They have one thing in common - the upper part with handles, or a brace. So let's try to make it first.
Even this is a rather complicated process for an uninitiated person, judge for yourself:
- We select a pipe of a suitable diameter.
- On the ground or floor, we draw the bends of our rotation.
- Pour dry sand into the pipe and plug it with corks so that it does not spill out. Bending without sand can damage the metal.
- We bend the pipe using gas burner or blowtorch.
- We weld a bracket to the bottom of the brace for connection with the auger.
- We drill holes on the handle like on a factory Barnaul storm.
- We grind and paint the workpiece.
- We buy a repair kit for the Tonar ice drill in the store.
- We strengthen the upper and middle handles from the kit in the prepared holes.
The rotator is ready, the most difficult task remains - the manufacture of the lower part of the mechanism.

shoulder blade
This homemade ice screw is easier than others to make. A cutting piece cut from a steel plate is simply welded onto the down tube. It is slightly bent in the form of a spatula, one edge of which is sharpened with sandpaper.
Although such a drill can make a hole in the ice, and it is cheap and easy to manufacture, it still has plenty of shortcomings:
- dulls quickly;
- the absence of an auger makes it often necessary to scoop out sludge;
- slowly cuts ice;
- difficult to rotate.

Annular
At the base of such a drill is a ring with knives and an attached frame. At the top, the frame is connected to the pipe, and the pipe to the brace. A strip of steel is twisted into a spiral and fixed pointwise to the frame. It appears to be a fully functional model.
Framework
This do-it-yourself ice screw is also easy to manufacture. Let's describe this process in detail:
- We weld a sharp tip into the pipe for centering on ice.
- In the lower part, steel bars are welded to the pipe on both sides at an angle of 30 degrees.
- At the bottom we connect them with a strip with an axis from the pipe. You should get two triangles, the largest angle of which is approximately equal to eighty degrees.
- We drill holes in the plates and fasten the knives with bolts and nuts.
- We adjust the angles of attack of the knives with the help of additional pads made of metal plates and washers of various thicknesses.
Sludge from the holes made by an ice drill of this design will also have to be scooped out with a scoop.
Auger
This one cannot be completely done at home. If someone thinks that the whole problem is with the auger, then this is not so. The main detail of such a mechanism is the base for knives. It can only be made by specialists in workshops.
Let's skip the process of creating this part and describe the rest of the process:
- We weld a part to the pipe from above for connection with a brace.
- From below we also attach a seat for knives for welding.
- From sheet metal cut circles.
- We cut them to the center from one edge and bend them in the form of an auger blade.
- Having bent a sufficient number of blanks, we weld them to the pipe.
- We grind and paint the resulting product.
- We connect both parts of the ice screw into one.
- We screw the knives.
Motorization refinement
In this part of our story, we will talk about converting a trimmer or chainsaw into an ice drill. The main issues that arise during this work are the manufacture of the adapter and the selection of the gearbox.
An ice drill from a new type of chainsaw, such as those produced by Shtil, Hugsvarna or Chinese comrades, also require the manufacture of an additional ergonomic handle. Our old friendship does not require such alteration.
Converting a trimmer to an ice screw is most suitable for models with a folding bar. The adapter for connecting such a mechanism to the screw is the easiest to make.

Each of the chainsaw or trimmer models requires its own refinement, so there is no one universal prescription manufacturing. It is best to find an experienced craftsman and come to him with your tool and together with him make a decision and draw a scheme for manufacturing the desired adapter.
No less important for working on winter fishing gearbox for ice drill. With its help, the parameters of the rotation of the shafts are changed, reducing or increasing the speed. This greatly affects the quality and speed of drilling holes.
If the adapter is specially machined, then the gearbox is selected from some kind of operating mechanism, for example, from a roller conveyor.

An important task is right choice an auger for an ice drill, it is desirable that it coincides in the direction of rotation with that of a gasoline tool.
It is important to make an ice drill from a chainsaw carefully, taking into account the slightest nuances, because the alteration is very painstaking and expensive, and the finished product will be used for a long time. It is important to make sure that the finished tool is easy to repair and maintain, parts are available and interchangeable.
Today, you will not be surprised by the fact that experts often use an electric or gasoline drill for earth. This allows them to significantly reduce drilling time, and a person practically does not spend physical effort with such equipment. In this article, maximum attention will be focused on electric drills for earthworks.
Modern drills - types, which one to choose?
Initially, let's figure out what drills exist today. All models can be safely divided into three types.

- Hand drills. This type is used for drilling, as a rule, single holes. It takes a lot of physical strength to operate it.
- Petrol drills. This type of equipment is very common. It can be used for both individual construction and professional. The units are powerful and efficient.
- Motor drills are electric. These units are not as powerful as gasoline, however, their operation does not require much physical effort. They are convenient for individual construction, when drilling holes for poles, when planting trees and bushes. However, it is worth remembering that a garden electric drill will only work if there is an extension cord for the electrical network.
Summing up, we can conclude:

- the first type is simple, but not productive,
- the second type is powerful, productive and can be used when working on any soil,
- the third type (electric drill) is less productive, requires a wired extension cord, and can be used for individual construction.
Given these characteristics, you can easily choose the drill that is right for you!
Consider the technical characteristics of two models of electric pit drills.
Texas ea1200 electric drill
 Consider its main technical characteristics:
- power 1200 W;
- maximum drilling diameter 150 mm;
- maximum drilling depth 800 mm;
- generated noise level 90 dB;
- weight 12.8 kg.
 Specifications:
- power 1050 W;
- maximum drilling depth 1 m;
- drilling diameter range 80 - 200 mm;
- weight 14 kg.
As can be seen from the presented specifications electric pit drills are significantly inferior to some models that work on gasoline engine. Therefore, if you need to drill the ground often and a lot, then you should give preference to gasoline equipment. For rare use, electric is ideal.
You can make any drill with your own hands, however, to make an electric or gasoline drill, you will need a lot of parts, tools and a solid knowledge base. Therefore, if you are thinking about a homemade drill, then it is easiest for you to make a manual drill.

For its manufacture, you do not need a lot of material and special tools. Particular attention in the manufacture should be paid to the blade of the drill. Often, a chainsaw disc is used to make the blade. With the help of "Bulgarian" it is cut into two parts and welded to the bar at an angle. Such a drill can be used in the private sector, but it should be understood that during its operation it will be necessary to apply a lot of physical strength.
An earthmoving electric drill is successfully used in cases where it is necessary, for example, to drill a hole for piles, make a trench or recess for mounting fence posts, drill a hole for planting a tree or shrub, etc.
Brief description of the device and the advantages of the equipment
By design, an earthmoving electric drill is an electric motor that has two handles, as well as a clamping mechanism used for clamping. This tool is most often made in the form of an auger. It should be noted that the nozzles are removable and can be different diameter, which allows you to adjust the size of the hole to be drilled. It is also worth noting that there is a conditional division of drills into types, depending on their purpose. Allocate garden, earthen and pile tools.
An earthmoving electric drill is a rarity among people with suburban areas, despite the fact that it has some advantages. If we compare it with the manual type, then, of course, the plus is that the main rotational force is due to the electric motor, and not human forces.
If we compare the device with a gasoline unit, then the advantages include silent operation, environmental friendliness and readiness for work (you don’t have to start it like a gasoline one).
Equipment Application
As mentioned earlier, one of the biggest advantages in terms of using a drill is that it easily copes with arranging pile recesses. Of course, you can do this with a manual type of unit, but an electric drill for earthworks will cope with this task much faster. In addition, the presence of small stones or roots inside the soil will make it very difficult to dig a recess if it is done by hand, this is not a hindrance to an electric motor.

Another convenience of using the equipment is that it is more compact than a conventional drill, and therefore its operation in places with limited space is most acceptable. Small dimensions and high functionality of the unit are its main positive qualities. It is also worth adding that, in comparison with gasoline models, the weight of the electric drill is less, which makes it easier to work with it.
Models and disadvantage
Large models of earthen drills are also used for digging wells, for example. Types with a smaller diameter nozzle are used for domestic use (planting plants, installing poles, etc.). However, it is worth noting that in the line of models there are also multifunctional types with removable nozzles. This makes it possible to use them depending on the needs, as well as on the quality and type of soil with which you have to work.
Naturally, the main disadvantage of the drill is that its operation in places where there is no electricity is impossible. Yes, when buying a device, a battery is usually included in the kit, but charging it lasts for a short period of time.
The principle of operation of the unit
An electric drill is an electric motor and a shaft that has a type. When using such equipment, the hole in the ground will have smooth edges and a clear auger diameter. The direct drilling process is carried out due to the fact that the auger has a very sharp tip, as well as pointed helical blades. When the equipment is started, the electric motor begins to rotate, transferring its force to the shaft to which the auger is attached. This is how drilling happens.

Favorable cost of the device
The price of an electric drill for earthworks is also one of its advantages. The approximate cost of the device is 1,000 rubles. It is important to note here that the device itself and the basic nozzle included in the kit are purchased for this amount. And then you can purchase separately augers of different diameters, if necessary. Thus, you can greatly increase the functionality of the equipment at a minimal cost. Choosing the right one will also save you money.
If you plan to operate the device in the garden, that is, for garden needs, then a power of 1.5 kW is enough. If you plan to drill holes for construction needs (pile foundation), then you will need a device with a power of 2 kW or more. If there is such a need, then electric units can also be used for ice drilling.

Reviews about the electric drill for earthworks are mostly positive. Of the main qualities that buyers distinguish, it is worth highlighting the ease of operation, low weight, the quality of the device and its relatively low cost.
There are also negative reviews. However, most often they are left by people who have not understood the rules of its operation and have acquired, say, a less powerful model than was required to work with a certain type of soil. Naturally, the result was bad.
From this it should be concluded that it is necessary to examine the soil with which you will have to work, decide for what type of work the tool is purchased, and only after that buy it. It is also recommended to purchase products only from trusted companies. It is better to pay a little more, but buy a better item than to pay less and buy equipment again in a year.
Motodrills from "Hitachi"
Electric drills for earthworks "Hitachi" are products of quite high quality and reliability. The manufacturer of this equipment is Japan. However, it should be noted that the range of goods is not too large. From electrical models there are only garden types. This means that the manufacturer does not produce electric models with high power. Only gasoline models from this brand have high power ratings. Today, there are three main qualities due to which Hitachi products have become quite popular.

- The assembly quality of the units is very high.
- Coefficient useful action these devices are also high.
- The service life of the devices is quite long.
Product selection and operation
When buying an earthen drill, it's best to always go to a specialized store where they can help with the choice. However, there are a few guidelines that should always be followed. Three parameters should always be considered Special attention- power, screw head size and engine size (if it is a gasoline model).
Quite often, when working with this tool, it happens that the drill burrows into the ground. For this reason, almost all new models are equipped with a safety system that turns off the engine if this occurs. This system protects equipment from damage. To avoid such a shutdown, it is necessary to periodically stop work and clean the auger from dirt.

It is also intended to protect the unit from accidental start-up or to protect a person in case of loss of control of the product.
If during earthworks on the site you need to dig several holes-holes for poles or racks, then the garden drill of the Fiskars Quikdrill model will help to significantly speed up this process.

Electric manual auger hole drill Zubr, Tornado or Fiskars, can greatly facilitate the entire process of land work. In addition, the Fiskars Quikdrill garden drill can drill holes in the soil to depths of 100, 200, 300 or 500 mm.
The electric manual auger hole drill Zubr, Tornado or Fiskars can form a hole in the soil for trees and shrubs.
1 Purpose and characteristics
Currently, drilling operations are carried out everywhere due to the ongoing and developing suburban construction. In most cases, units such as the Zubr, Tornado or Fiskars earthen auger hole drill are used in drilling operations in summer cottages and suburban areas.
It is worth noting that the garden drill of the Fiskars Quikdrill model and its analogues such as Bison, Tornado and Fiskars are able to create holes in the ground for:
- Installation of fence posts;
- Mounting piles;
- Pile foundation laying with a depth of 100, 200, 300 or 500 mm;
- Creation of shallow trenches and technical holes;
- Planting shrubs, seedlings and small trees.
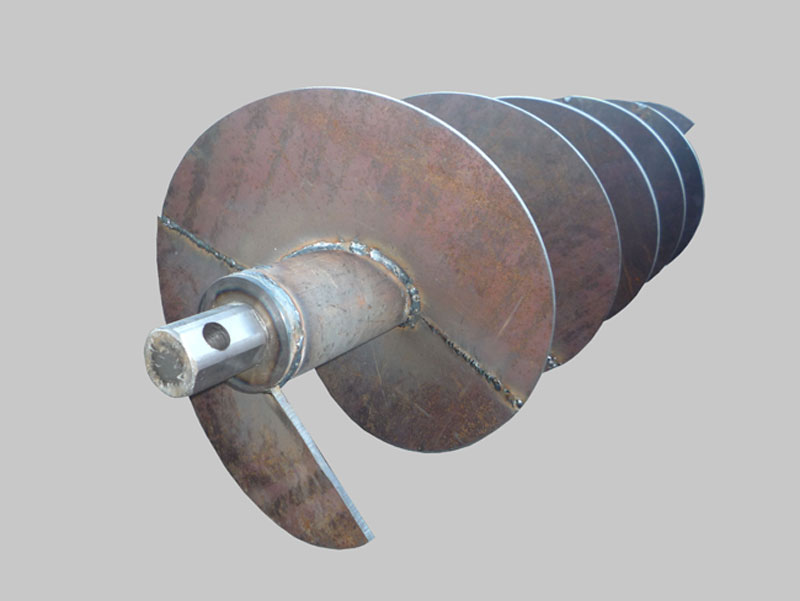
The auger homemade hole drill is presented in the form of an electrical device that belongs to the category of tools for cutting.
Common machines such as Bison, Tornado and Fiskars have excellent user reviews and are capable of making holes with depths of 100, 200, 300 or 500 mm in materials such as:


- A rock;
- Concrete;
- Brick;
- Soil rich in pebbles.
Structurally, a manual earthen auger homemade hole drill is similar to a conventional drill, equipped with a shank and a spiral. Due to the presence of such a spiral, such units as the Zubr, Tornado and Fiskars are able not only to create holes with a depth of 100, 200, 300 or 500 mm, but also to remove waste material from the drilling zone.
Earth hand auger hole drill is made of materials with excellent performance strength characteristics. Its cutting part is made using an alloy with a high degree of hardness.
Presented auger manual hole drill Tornado, Zubr, Fiskars, and similar analogues, have several configurations for sharpening the cutting edge.
A distinctive feature of such portable devices as the Tornado, Bison or Fiskars manual hole drill is the presence of an electric motor equipped with two comfortable handles.
The electric motor is equipped with a special clamping type mechanism in order to fix the drilling tool - auger. The auger in such units as the Tornado, Bison or Fiskars manual hole drill is presented in the form of a rod with a continuous helical surface along the entire longitudinal axis.
2 What are the features of a garden electric drill?
The electric drill is presented in the form of an electric downhole machine, which is equipped with an electric motor, which is mounted in the tubular body of the device.
The body provides movement of the bit drive during the work. A well created with the help of such a unit can last a long time.
Reviews about the presented unit are mostly good. All modern products are equipped with an asynchronous oil-filled motor equipped with a squirrel-cage rotor.
Thus, the main parts of an electric drill are an asynchronous oil-filled motor and a spindle, which is located on rolling bearings.


Inside the tubular body there is a package of magnetically conductive steel of the stator mechanism. This compartment is divided with the help of non-magnetic steel packages in those places where the radial ball bearings of the rotor are located.
All rotor packages are covered with a layer of aluminum winding and are included in the hollow rotary shaft of the motor. Inside the motor cavity is filled with a special kind of dry insulating oil.
In addition, the internal cavity of the engine is hermetically sealed off by the upper and lower seals. When the system is started, the seals are filled with oil.
In order to compensate for oil leaks and to maintain a constant internal pressure in the engine, so-called lubricators and three oil seals are placed in its upper part.
Each of the glands is equipped with a cable gland, which is fed from the edge of the contact rod, and, passing through the glands, is connected to the stator winding.
In order for the weight of the rotating shaft to be perceived by the entire mechanism, its lower part is equipped with an installed thrust ball bearing.
A spindle is attached to the bottom cover of the engine. It is equipped with a multi-row axial bearing, which moves due to the presence of ball bearings.
Another shaft moves in the housing, which is hollow inside, and its alignment is carried out with the participation of a number of ball bearings. There is a connection between the spindle shaft and the main motor shaft.
It is implemented using a gear-shaped coupling. There is a hinge type seal where the shafts meet.

It provides a high degree of waterproofing against the ingress of flushing fluid. All axial loads to which the rock-cutting percussion tool (auger) is subjected are completely absorbed by the spindle body and are not transferred to the motor shaft.
All types of asynchronous motors that are used in electric drills have a rather limited operating speed range.
The change in this parameter directly depends on the speed with which the rotor is able to slide with respect to the stator field. Thus, the value of the motor torque directly depends on the square of the input voltage.
When the voltage is reduced, there is a significant reduction in torque. Based on this, the voltage drop during short-term types of loads must be compensated by increasing the voltage at the input to the motor by 10-15% of the nominal level.
Depending on the characteristics and type of the engine, the voltage at the terminals of the electric drill can be from 1000 to 1200 V. At the moment when the engine starts, there is a significant reduction in torque - this is the so-called dip zone.
This parameter is then restored when the unit returns to normal operating pace. Due to the fact that the engine is started with a focus on a small degree of load, the flywheel moment of all parts involved in the rotation is very small.
However, even if the torque is greatly reduced, the engine is able to accelerate the speed of the working shaft in a matter of seconds.
By the way, the efficiency of such an engine, when testing the rated load, can be about 70%. This is due to the low level of mechanical losses during the movement of the spindle on fixed points of support.

The power supply to the drilling engine is carried out using a sectioned cable. It is placed in the inner channel of the drill string.
The current is supplied using a three- or two-core cable. Instead of the third wire, a drill string can protrude.
It should be borne in mind that the cable supply of an electric garden drill is generally considered one of the weakest nodes of the presented system.
The voltage may drop due to the broken tightness of the cable segments and their further contamination. Violations in the operation of the electrical circuit are observed when the contacts made using copper are broken in those places where they are connected to the coupling.
It is worth noting that a portable manual garden drill has a number of advantages, which are expressed in:
- Facilitation of conditions during the operation of the drill column;
- Reduced wear located in the well;
- Minimization of power costs at idle.
In addition, the operating mode of the unit does not come into contact with the fluid flow for. Therefore, the device shows the greatest efficiency in the case when the hole in the ground is completely cleared of the sludge accumulated there.
In addition, the operating cycle of the device does not depend on the quality and characteristics of the mud used for drilling. This property implies the use of the product in working with weighted solutions.
The communication channel for monitoring the work performed by the unit is presented in the form of a current duct. This allows in some modifications of the device to remotely carry out drilling operations.
Due to the fact that the manual electric drill is presented in the form of an oil-filled engine, all its parts work in an environment that is isolated from the ingress of sludge.
Based on this, the rotational elements of the screw are least exposed to harmful corrosive and abrasive processes.


Among the disadvantages of such a device, a rather high cost can be distinguished, compared with mechanical counterparts. Possibility of getting damages and distortions due to sticking in the wellbore and a low degree of reliability of the cable connection.
Sergey, 45 years old, Samara:
I decided to equip my country house household plot and put up a mesh fence. In order to make small wells for digging in columns, I used a hand-held electric drill, which I borrowed from a neighbor.
He completed all the work in the shortest possible time, while not spending a lot of effort. Excellent unit. I read reviews - now many people have one on the farm, so I decided to buy it myself. I advise everyone!
Vladimir, 53 years old, Voronezh:


