How and with what to make holes for fence posts. How to drill the necessary hole under the pole? Metal fence posts how to dig in
In order to put up a high-quality fence made of corrugated board, it is not enough to purchase metal fence posts and install them. In general, the installation of pillars in terms of a construction operation is sometimes simply underestimated, while the durability of your fence depends on the quality of the installation and the correct implementation of the technology.
So, let's start with the main question - why make a foundation for the fence at all? Many frankly believe that it is enough to dig in the pillars and tamp them well. Not so far gone simplest way installation of metal poles - the hole is sprinkled with gravel, slag or other similar material and compacted.
Basics of mounting metal poles
In order to establish a durable and strong you should know a few very important basics:
- The first thing you should pay attention to is the weight of the fence.. If you are planning to mount a fence made of corrugated board, then this type can be safely attributed to a lightweight structure. And since this is a lightweight construction, accordingly, you can do without a strip foundation;

- Pillars for the lung can be concreted using the pit foundation method;

- Despite the imaginary simplicity of the process, you should take into account another important factor, namely the size and depth of the hole under the post;
- Also, you should remember about the proportions of the concrete mixture (in this case, the question comes down to the durability of the pour, because a lot also depends on the type of soil and climate);
- And the last one is reinforcement. Even for lightweight structures, it can be used as an additional fulcrum.
Digging holes

To dig a hole for a 100x100 metal fence post, you will need a good old bayonet shovel. In general, in order for the fence to stand firmly, it is necessary to dig a hole with a size of at least 400 × 400. In solid ground (clay, stony soil, rock), dimensions of 200 × 200 are possible, but these figures are indicated taking into account reinforcement.
Second or more modern way put metal posts for the fence 80x80 - use a manual hole drill. Such a tool is most suitable for drilling in soft soil (sand, black soil and other loose soils).

Attention!
Digging holes for poles with a pit drill is associated with one significant disadvantage - the pits are round, not square, which can significantly complicate their pouring with concrete.
If you want to avoid such troubles, experts recommend selecting the cross section of the head of the hole drill by 15-20% more than the diameter of the post.
Technology for installing metal poles
We seem to have sorted out the holes.
Now let's move on to the next questions:
- What foundation to choose for the fence and,
- How to properly reinforce the pillars?
In general, the main thing in these matters is to delve into the situation with the soil, the level of its freezing in winter and figure out approximately what height they rise ground water.
But if you are simply too lazy to mess with all this, you can fulfill the standard requirements of the technology. It all comes down to digging nests for metal fence posts measuring 400x400mm.
If you are concerned about the question of how to properly install a metal pole so that it does not fall by the next season, let's turn to the technical calculation formulas. According to experienced engineers, it is recommended to dig in the pillars to such a level that the depth of the foundation is 20 cm below the freezing level of the soil. But how to determine this level?
In order not to bother with such a question, many builders recommend digging holes 100-120 cm deep (for middle lane Russia). These dimensions are taken for a reason - the average depth of soil freezing in the European part of the country is approximately 70 cm (somewhere a little more, somewhere less). The reserve, which remains just in case, compensates for the influx of groundwater in the spring.

If your house (cottage, cottage) is located in a wetland or is in a zone of constant flooding, there can be no question of any pit foundation at all! Here it will save only, which we will now talk about in more detail.
In this case, you will need to do a good job with a shovel, since the strip foundation in the flooded areas must be at least a meter deep and at least 300 mm wide. The question immediately arises - how to install the pillars? Just! Before pouring the strip foundation, you need to leave (using formwork) nests, 400 × 400 in size and at least 1 m deep (recommended 1.2-1.5 m).

After the trench for the foundation is dug and the pillars are placed in the cells, reinforcement should be started. To reinforce the pillars with your own hands, it is customary to use not thick reinforcement with a diameter of 10 to 16 mm. In general, reinforcement can be produced in two ways: frame and continuous.
In the first case, the reinforcement is cut into pieces of the required length and knitted (welded) into boxes, which ensure the strength of the entire concrete structure and the fence as a whole.

The continuous method implies a one-piece reinforced frame (also wired or welded) that passes through the entire strip foundation and pillars (in other words, it is a single structure).

Important point!
With continuous reinforcement, the "ring" under the gate should not be interrupted. Experts recommend closing the structure so that it simply does not part in the future.
Summarize
As mentioned earlier, installing fence posts is not as simple as it seems to many at first glance. In order to better understand all the technological nuances, we have a photo and video instruction that will clearly demonstrate to you the main aspects of the workflow.
The price of poles is different almost everywhere, but in order to enclose a house, you will not need serious expenses (of course, if your site is not located in a flooded area).
That's basically all - it remains to wish you only good luck in your engineering and construction activities! Good luck!
The fence of a suburban area, which is an integral part of the architectural ensemble, must have an attractive appearance and be reliable and durable. The main load from the mass of the fence and the impact of natural factors is perceived by the pillars, which are used as various materials - profile pipes, stone, brick and reinforced concrete. It is important to choose the right material and install the fence supports in order to ensure the stability of the erected fence and a long service life.
How to install fence posts - features of installation methods
The correct choice of the option for installing support posts for the fence is determined depending on the design of the fence, the characteristics of the soil and the preferences of the owner of the site.
The pillars can be hammered into the soil or concreted in pre-prepared pits.
Each of the methods has certain advantages and, at the same time, has weaknesses.
Driving: advantages and disadvantages
Driving fence posts is a budgetary method for quickly creating the foundation of a fence.
The mechanism of immersion of support pillars into the ground by impact consists in driving the elements manually or using special equipment for driving.
The technology is used on soils with medium density and small stony inclusions. Giving preference to the method of driving supports, it is important to evaluate all aspects of this technology.
The main advantages of the method of deepening the pillars by impact:
Pillar driving technology has weaknesses:

Concreting: pros and cons
The traditional way of fixing fence posts is by concreting the supporting elements intrainedpits.
The process of installing fence posts involves making holes in the soil, the depth of which is 30% of the height of the protruding part of the support.
The method of installing fence supports poured with concrete has undeniable advantages:
- increased strength of the building envelope. Regardless of soil moisture, the fence is stable and, if properly maintained, can be used for decades;
- the ability to withstand the weight of a heavy fence. Massive fence made of concrete structures, steel sheets, corrugated board or wood, will not sag under its own weight;
- resistance to corrosion of concreted parts of metal supports. The part of the metal pole located in the hardened concrete protects the support from corrosion more reliably, compared to the primer or paint that covers the metal pole;
- maintaining the integrity of supports installed without deformation. The absence of the need to drive the pillars into the ground reduces the likelihood of damage during installation;
- difficult extraction from the soil of pillars filled with concrete. It is problematic for attackers to pull out the supports without going deep into the ground.
Despite the complex of positive aspects, the concreting technology has some disadvantages:
- the duration of the measures to install the fence. The process of digging pits, installing supports, pouring and curing concrete can take a long time;
- increased costs associated with the laboriousness of the work and the need to use concrete mortar. Acquisition cost building materials increases in proportion to the length of the fence;
- the probability of pushing support pillars out of the ground, concreted in areas with heaving soils. Freezing at negative temperatures, moisture squeezes out the concreted supports from small pits 40–60 cm deep.
Choosing the optimal solution
Before making a decision, it is important to carefully analyze the risk factors and carefully consider the choice of the optimal method. When deciding on the method of installing fence posts, consider the following points:

The desire to quickly install a fence on clogged supports at low cost can result in a loss of stability of the fence and unforeseen expenses. Builders recommend giving preference to a more reliable, albeit time-consuming method of installation - installing supports in pits with subsequent concreting. However, for temporary fences made of metal mesh or wooden planks, it is quite possible to use supports driven into the ground.
We hammer in the pillars
Preparation for work: development of a scheme and calculation
The implementation of measures for driving fence supports is preceded by the development of an installation scheme and the performance of the necessary calculations.
The diagram indicates the distance between the support posts, which, depending on the characteristics of the fence, should be in the range of 2.5–3 meters.
Knowing the size of the fenced area and setting the step between the supports, it is easy to calculate the number of racks. Using the example of a rectangular area of 6 acres with sides of 20 and 30 meters, we determine the number of pillars:
- Calculate the area's perimeter by adding the lengths of its sides. We get 20+30+20+30=100 meters;
- determine the need for supports by dividing the perimeter by a step - 2.5 meters. The number of racks will be 100: 2.5 = 40 pieces.
The calculation is simple. However, if there is a gate and a wicket, this distance must be additionally taken into account when calculating.
To calculate the need for material, it is necessary to set the height of the fence and add to it the length of the part of the support driven into the soil.
The size of the rack immersed in the ground must be at least 1/3 of the height of the support, which rises above the soil level.
For example, for the support shown in the diagram with a height of 2.05 meters above the soil level, the length of the buried part is 1.2 meters.
The total length of the rack is 2.05 + 1.2 = 3.25 meters (3.2 m is rounded).
Multiplying the number of racks by the length of each supporting element, we get the need for material for the manufacture of pillars.
Result: 40x3.2 = 128 meters. To fence a site with an area of 6 acres, with a given size of 20x30 meters, it is necessary to purchase material for racks with a total length of 128 meters.
The choice of material for the pillars
As a material for the support posts of the fence, which are planned to be immersed in the soil by the impact method, you can use a regular or profile pipe.
Given the increased fragility of concrete, as well as the possibility of cracking wood under impact loads, only metal racks are suitable for installing supports by driving.
Required Tools
Depending on the method of driving and the dimensions of the supports, the following can be used:
- ordinary sledgehammer;
- special tool for punching.
Supports up to two meters high are clogged manually, and from two to three meters in an automated way.
To break down the site and control the correct installation, you will need:
- roulette;
- cord and pegs;
- building level.
Work technology
The complex of measures for the installation of supports provides for anti-corrosion treatment and installation.
Treatment
The immersed part of the support should be pre-treated with a corrosion protection compound - bitumen, paint or primer. After drying protective coating you can start installing the poles.
Rack installation
The algorithm for performing operations for driving fence posts is quite simple:
- Mark the perimeter of the site using a cord with pegs.
- Divide the sides of the site into equal intervals, guided by a previously developed scheme.
- Drive in the corner post, controlling the depth of immersion and the verticality of the support.
- Carry out the driving of the remaining pillars around the perimeter of the fenced area.
- Check the correct location of the supports along the cord attached to the top of the outer supports.
Video: driving poles with a fixture
We concrete the supports
Preparatory stage: choice of concreting method and calculations
At the preparatory stage, it is important to determine the method of concreting the pillars. It is possible to completely fill with concrete the part of the column immersed in the pit or partially concrete the base of the support:

The use of the method of partial concreting makes it possible to achieve savings in concrete.
The amount of material for concrete supports is determined depending on the length of the fence and the spacing between the posts. The calculation algorithm is the same as for driven pillars.
The calculation of the total amount of concrete required is made by multiplying the poured volume of the pit by the number of supporting elements. Multiplying the base area of the pit by the depth, we get the volume of concrete for pouring one support.
When performing calculations, the small diameter of the support column can be neglected. We calculate the volume of concrete to completely fill the pit with a diameter of 0.4 m and a depth of 1.2 m:
- We determine the area of \u200b\u200bthe base by multiplying 3.14 by the radius squared - 3.14x0.2 2 \u003d 0.1256 m 2.
- We calculate the volume of the solution by multiplying the area by the depth - 0.1256x1.2 \u003d 0.15 m 3.
If, for example, it is necessary to concrete 40 pillars to a depth of 1.2 m, then 6.0 m 3 of concrete will be required (40x0.15 \u003d 6.0).
By choosing a materialsupportsintended for concreting, it is important to ensure the reliability of the construction of the fence. For concrete fence posts, the following materials are used:
- metal pipes, round and profile section. This is a universal material used for the installation of fences made of profiled flooring, wood, metal mesh or steel profile;
- concrete columns, which are durable and affordable price. The supports have a long service life, are resistant to natural factors and easily withstand the mass of concrete fences;
- brick used in the construction of pillars for massive fences. Brick supports - an elite version of the pillars installed when installing brick, forged and wooden fences;
- natural stone, with which it is difficult to compete with other materials in terms of strength. The stone is perfectly combined with fence sections made of various materials.
Required tools and materials
The formation of pits can be carried out using:

To perform markup you will need:
- rope;
- pegs;
- building level.
For concreting, a concrete solution is needed based on Portland cement grade M300, sand, mixed in a ratio of 1: 3 with the addition of crushed stone and water. Would need:
- trough or concrete mixer for the preparation of the solution;
- shovels and buckets.
Step-by-step instructions for installing metal supports
Pillar preparation
Preparatory work includes:

Installation of supports
Using the example of widely used steel pipes, we will consider the technology for installing poles. Carry out the work, observing the sequence of steps:
- Mark the perimeter of the site with a rope and pegs.
- Prepare the holes using a drill or shovel.
- Fill the bottom of the pit with a gravel-sand cushion with a layer of 10 cm.
- Install metal posts in the pits.
- Knead the concrete solution, following the recipe, submit to the work area.
- Fill the holes with the mixture to the level of the soil.
- Keep the posts stationary until the concrete has fully cured.
Installation of supports from reinforced concrete carried out in a similar way.
Any fence, one way or another, begins with marking and drilling holes for poles. The durability of the entire fence, the ability of the building to withstand harsh gusts of wind and withstand powerful heaving of the soil depend on how correctly the installation of the fence posts is done. Only after understanding the simple, but rather laborious process of drilling wells and pits, you can purchase material and get to work.
How and with what to dig a hole under the fence post
The depth of the hole for the fence post depends on the height of the fence structure and the weight of the web, the higher the fence and the heavier the material, the deeper the drilling under the fence posts. For a gate 60 cm high, a pit depth of 25-30 cm is required, for a two-meter column, drilling of 60-70 cm is required.
There are few drilling methods:
- Punch a hole with a shovel or a specially made tool;
- Use a manual motor rig for drilling wells up to one and a half meters deep;
- Rent for the day the services of a drilling machine on a car carriage.
Advice! To select the scheme and method of drilling holes for the installation of pillars, first of all, it will be necessary to estimate the amount of work to be done.
Usually, vertical supports are used to install the fence, buried in the ground and concreted every 2.0-2.5 m of length. This means that for fencing a site of 60x10 m and a perimeter of 140 m, it will be necessary to drill for the installation of 50-60 pillars. For a small fence enclosing the "front" part of the site, 5-7 wells are needed at the most. In the latter case, drilling can be performed without the involvement of special equipment, if the soil in the area is relatively soft.
Drilling methods, advantages and disadvantages
It’s worth mentioning right away that it makes no sense to dig holes and wells for the installation of a one and a half to two meter pole with an ordinary shovel. That is, it is quite possible for a physically strong adult to dig a hole 60 cm deep, but at the same time it will be necessary to increase the width of the pit to 40-50 cm, otherwise it will be almost impossible to remove the soil from the hole. So the volume earthworks will double or triple.

How easy it is to do your own drilling
Since ancient times, drilling holes for poles was carried out using special devices and tools:
- redone garden tools- drilling shovel and cutter;
- A garden-type auger drill or a converted tool for drilling wells for TISE piles;
- Homemade machines and devices for drilling any number of wells for poles and piles.
Note! The most difficult task in drilling is to ensure the required accuracy of the vertical position of the well.
After installing the pillar, the concrete cushion around the support should be as symmetrical as possible, otherwise, with a sharp increase in the level of groundwater or an increase in heaving forces, the fence posts will roll to the side. If, for technical reasons, the direction of the well has deviated from the vertical position, it is necessary to stop drilling and level the hole, removing part of the soil.
Some of the oldest devices for digging holes for fence posts are a sharpened bayonet shovel and an ax soil cutter. The shovel is cut to a smaller size, the edge is bent at an angle. Steel is welded to the ax inch pipe and bent at right angles. The result is a tool with a narrow, 5-7 cm blade at the end.

In this case, the hole for the fence posts is not drilled, but cut with periodic removal of the crushed soil. In this way, it is realistic to punch a well to a depth of at least 50-60 cm on any, even the most solid soil with large quantity rock fragments.
The easiest way to drill holes is with a screw or auger. garden drill. The device of the tool allows you to drill both alone and together.

On soft ground, drilling with auger tools is quite easy. Approximately the first 20-30 cm, drilling takes place in one breath. Further, before working with a drill, the soil has to be loosened with a home-made cutter or periodically pour 4-5 liters of water to soften the rock.
The cutting edge of the drill in the standard version is made in the form of two flat knife blades. This is the most loaded part of the drill. If the soil is sufficiently dense, with a large amount of gravel, the knife edge of the drill quickly loses its sharpness, therefore, every one and a half to two meters of penetration, the cutting part has to be corrected and reground. AT makeshift designs handicraft forged knives, cutting nozzles from sharpened segments are widely used automobile springs and circular saw blades.

Often, for drilling wells for poles, a pile drill is used for TISE supports. It is more difficult to work with such a tool, but this method gives a serious advantage over conventional garden drills. As a result of drilling, a widening is formed at the base of the well, due to which, after pouring concrete, the fence post acquires a high level of stability even on heavily watered clay soils. The use of a drilling tool for TISE supports makes it possible to build a fence even on heavily heaving soils.
Homemade unit for drilling wells
Except hand tools, many of the craftsmen build real drilling machines with their own hands, allowing them to punch a hole for a pole or a pile support for a fence without the use of expensive specialized equipment.
An example of one of the most successful home-made units used for drilling wells for poles and piles is shown in the diagram.
The design of the machine allows you to drill wells under fence posts with a diameter of 40-360 mm to a depth of 2.5 m. You can work alone or together. The performance of the unit is such that on the most difficult soil, drilling a well to a depth of 1500-1800 mm is carried out in 40-45 minutes. It will take another 15-20 minutes to move the machine to a new hole drilling site. With a manual drill, a similar amount of work is done twice more slowly.
The structure of the machine is welded from steel angle in the form of a truncated pyramid. To rotate the drill, a drive made from a GAZ-66 towbar is used. The drill is a one and a half inch steel pipe with welded blades from a cultivator and a thin twist drill at the end. The device of the machine is provided with a cable winch, which fits the lifting of the working tool to remove the drilled volume of soil.
Using Motorized Hole Drilling Tools
In the case when, for the construction of a fence, it is necessary to break through a hundred points for installing pillars, it is quite difficult and long to do such work with your own hands, even when using easel drills. For example, for a simple fence of 20 posts, with a net drilling time of 40 minutes and 20 minutes to move the device, it will take 20x (40 + 20) \u003d 20 hours of continuous work, or 2 days of work with rest and smoke breaks.

A similar volume can be completed by a special petrol unit in one working day. If you need to install more than ten fence posts, it would be more rational to rent a manual or easel version of a motor drill. The cost of renting the simplest gasoline auger unit will cost 1000 rubles per day, with a deposit of 6-10 thousand rubles. The amount of the deposit is determined depending on the price and condition of the equipment. For a longer period, the daily rate can be reduced from 1000 to 600 rubles, subject to a rental period of at least a week.
Conclusion
As an option, you can buy a new unit for drilling wells, today the cost of a gasoline unit in a package is at least $ 300. Usually, a new or used motor drill is bought together for several sections of a garden or dacha cooperative. At correct use motodrill, even after the installation of all fences and poles on the territory of the cooperative, gasoline engine at least 50-60% of the planned motor resource is still preserved. In this condition, the unit can be sold at a residual value to builders or a private company involved in the installation of fences and barriers. You should not purchase decommissioned motor units in offices and organizations that provide services for drilling wells for fences. Their equipment, as a rule, is sold already in a very deplorable state.
The fencing of the site serves not only as protection from outsiders, but also as an important decorative element, making the first impression of the owner of the site. Passers-by and guests remember the house along the fence. Regardless of the cost of the material, installing a fence takes a lot of time and effort, so you want to ensure its maximum service life. Pillars perform a function load-bearing structure, and the durability of the entire fence depends on their quality and correct installation. The article will discuss how to properly install fence posts with your own hands.
What are fence posts?
- The traditional material for the manufacture of pillars is considered wood. To date wooden poles of proper quality are quite an expensive solution. They are made from solid hardwood logs. Pine, larch, ash, oak, acacia and mulberry are the most resistant to adverse environmental factors (temperature changes, humidity, mold fungi). In second place is a group of spruce and fir. Unsuitable for the manufacture of pillars are such species as birch, maple, linden, aspen, alder and beech. To increase the service life of wooden poles, additional treatments with antiseptic preparations and firing to charring are necessary. The choice of this kind is often associated with style. landscape design. As a rule, a wooden support is used for a fence made of the same material.

- A universal and widespread solution is metal poles. They are equally well combined with a wooden picket fence, chain-link mesh and a metal profile. In addition, such a support is able to withstand a significant load. Metal is more durable than wood, but requires pre-treatment against rust. To extend the service life, the paint layer is updated annually. Two options are possible: hollow welded pipes of a certain diameter and from metal profile with a square section. Strict requirements are imposed on the diameter of the pillars and the thickness of the metal, ensuring practicality and reliability of operation. The optimal diameter is 6 cm with a wall thickness of 2 mm. Fastening to a metal support log and other elements of the fence is simple and fast.
- Asbestos-cement and concrete pillars characterized by a high rate of durability, but they also have a number of disadvantages, in addition to the high price. Asbestos-cement pipes are inconvenient when installing a fence, they are not combined with all materials, they are prone to rupture under the action of freezing water that has entered the hollow space through the open top. Concrete poles are rarely used and mainly for powerful and colorful fences.
- brick pillars characterized by the complexity of installation and high decorativeness. Specialists with professional skills take part in the construction of such pillars, which greatly increases the cost of the support. Before installation, foundation equipment is required, on which the entire load of heavy pillars will be transferred. Durability is largely determined by the correct installation, otherwise the poles warp, and the fence needs to be reconstructed.
When choosing a material for poles, they are guided by financial capabilities, characteristics, installation features and requirements architectural style. Forged fence structures look spectacular with brick pillars.
Installation of wooden fence posts
- To beat the perimeter of the site, it is better to use poles with a diameter of about 15 cm, for intermediate poles a diameter of about 10 cm is allowed. The tree needs to be dried and pre-treated with a solution of copper sulphate or a modern antiseptic preparation to kill microorganisms. The lower ends are tarred and wrapped with roofing material.
- For better protection poles are stained from moisture oil paint. When installed, they are oriented in such a way that the top of the once growing tree is at the bottom. This trick will prevent the rise of water along the microcapillaries and the accumulation of moisture inside the column.

- A wooden support is installed mainly for lightweight structures, so its fastening can be quite simple. With the help of a drill, a hole is made about half a meter deep with a height of the above-ground part of the column up to 1.5 m. With an increase in the height of the fence, the depth of the embedding is also increased, observing the rule that the buried part should be 1/3 of the entire length of the column.
- The diameter of the pit is twice the diameter of the column. The drill must be held strictly vertically to obtain an even, straight hole. Further, a layer of crushed stone or building expanded clay is laid out at the bottom of the recess to drain rainwater. The column is installed strictly vertically (its position is checked by a level), after which it is covered with rubble or broken bricks from the sides. As the material falls asleep, it is periodically compacted with a crowbar. After each tamping, the position of the post is checked.
- For the durability of fences, wooden poles can be installed in metal sleeves, which serve as a casing for the entire recessed part. In this case, the sleeve should pass close to the tree, excluding the possibility of water penetrating inside. To do this, use metal cylinders of a slightly smaller diameter than that of the column.
How to install metal fence posts
- The strength of metal poles can withstand even heavy structures and significant wind loads (corrugated fence), so they must be firmly fixed. For the installation of metal supports, concreting and driving into the ground are used.
- There are two ways of concreting. In the first method, a hole is made of a slightly larger diameter than that of the column. And then the space between the vertically mounted post and the ground is filled with concrete. The second method is to fill the hole with concrete mortar and then install the post. In this case, a stronger fixation is provided.
- Concreting is used on sandy soils with good water permeability and not prone to bulging.
- Driving in poles with a sledgehammer is the simplest and most reliable way, but requiring physical effort and skills. The post is hammered into a hole of a smaller diameter for a snug fit to the ground. This method is suitable for fences of light structures and is used on heavy soils with dense soil. A positive point is the ease of reconstruction of the fence in case of distortion - the pillars are aligned using the same sledgehammer.
You can buy metal poles with a spiral at the end. Screw piles are screwed into the ground, ensuring its sufficient compaction.
Installation of asbestos-cement fence posts
- The most common pillars are about 12 cm in diameter. The asbestos-cement support is not considered strong, therefore it is only suitable for lightweight structures. With proper installation, the service life exceeds 50 years.
- Pits are drilled with a depth of about 80 cm (with a column height of more than 2 m), making an expansion at the bottom. The expansion is poured with concrete, and the walls are reinforced with a roofing material tube, which should protrude by 15 cm. A wooden formwork is made around the protruding part of the roofing material. The pit is filled with concrete, but not completely. While the solution has not hardened, an iron rod or pin is inserted with a length slightly shorter than the pillar itself.

- Further, after the rod is fixed with a mortar, a pole is put on and all the remaining space is poured with concrete to the edge of the formwork. At the same time, the structure does not come into contact with the ground at all and is securely fixed. To protect against rupture under the action of freezing water, the cavity of the pillars is poured with concrete to the very top, forming a convex cap to prevent water accumulation.
- A less time-consuming method is also possible, similar to the installation of metal pipes, in which the pillars are buried in the ground and poured with concrete. But its use is allowed only on sandy soils.
Installation of brick pillars for the fence
- Installation of poles from brickwork begins with the preparation of the strip foundation. To do this, a broken brick is laid in a dug trench and concreted. In place of the future pillar, strong reinforcement is mounted with several metal rods that will serve as a frame. You can use wide pipes.

- The top of the foundation is covered with waterproofing material. Before starting laying, check the correctness of the markings. The first row is checked for evenness using a level. Bricks are laid out around the frame, and the resulting cavity is filled with concrete.
Installation brick pillars requires skill and is rarely performed independently without the involvement of specialists.
The method of installing pillars on heaving soils and with a close occurrence of groundwater
- Heaving soils are dangerous because they can push the pillars to the surface along with the poured concrete. Already after 2-3 years, the promised durability of the fence may squint. The close occurrence of groundwater increases corrosion and decay, and also causes a change in the upper layer.
- In such cases, it is necessary to use more time-consuming, but also more reliable methods of installing poles. Many practitioners advise to increase the depth of the pits below the level of groundwater passage. This method entails an overspending of the solution and does not always justify itself.
- The following method is considered more efficient. Crushed stone or expanded clay is laid out at the bottom of the prepared hole with a layer of 20 cm. After installing the pillar, the space is also filled with crushed stone 15 cm to the ground level. These remaining 15 cm are poured with concrete. The crushed stone layer provides good drainage and does not present an obstacle to the flow of water. The concrete top serves as a guarantee of a strong fixation of the column. Although many builders in such cases refuse concrete altogether.

General steps for installing fence posts
- After choosing the material for the pillars and the optimal installation method, they begin to prepare all necessary tools. You will definitely need a garden drill, a shovel, crowbar, cord, building level, drainage material. Depending on the method chosen, a sledgehammer, roofing felt, a mortar container and cement may be required.
- Responsible stage - planning and breakdown of the site. Along the perimeter, in place of future pillars, pegs are driven in, along which the twine is pulled. In this case, each peg should stand strictly opposite the neighboring one. In the corners, they plan to put poles of a larger diameter for a high load. The recommended length of one section - the distance between two pillars - is no more than 3 m. If the fence construction is heavy, then the distance is reduced to 2.5 m to avoid sagging.
- After installing the first corner post, they proceed to the second corner post, aligning its height relative to the first one using a hydraulic level. Between the two pillars, two cords are pulled at the bottom and at the top, which will serve as markers when installing intermediate ones.
- With a significant difference in height (more than 25 cm), it is planned to install additional poles and install a stepped fence. Auxiliary supports with greater strength are installed at the locations of gates and car gates.

- When fixing the column, its position is checked by a vertical level. It is important that all the pillars are not only the same height, but also stand exactly. When using concreting, work on fixing the fence begins no earlier than 3-5 days to allow the solution to completely set and harden.
fence posts video
To install a fence suburban area you can do it on your own if you choose the most versatile method and material. At the same time, the fence will last quite a long time and without the annual hassle of repairs. The most popular recently are metal poles with chain-link mesh, often there are profile fences. It is impractical to build wooden fences in a budget version from low-grade wood. For more complex structures with the use of asbestos-cement and brick supports, the help of specialists will be required.
The main tasks that are solved when choosing fence posts and concreting them are resistance to mechanical and wind loads, the ability to withstand the load of the material from which the fence will be, and durability.
The most common types of fence posts country houses and cottages: from wooden beam, metal profile, concrete and brick. Concreting of fence posts is carried out only for metal and concrete supports.
Metal pillars (pipe or rectangular profile) are used mainly if around country house, cottages erect light types of fences - from a chain-link mesh, corrugated board, wooden picket fence or forged metal.

When arranging wooden fences, which are organically combined with sawn log cottages or wooden country houses, it is preferable to use timber. However, even with careful processing of wood with special compounds, the maximum life of a wooden support does not exceed three decades, unlike metal or concrete, which will last two or even three times longer.
Wooden poles are simply dug into the ground or into specially installed "glasses" from an asbestos pipe so that it is possible to replace the pole.
If you need to install a massive fence behind which any cottage or Vacation home will be "like stone wall", then best solution there will be concrete supports, or brick columns.
Pillar calculation
For determining the exact amount fence posts to be concreted, the total length of the fence is measured. The accepted distance between concrete pillars when constructing a fence from corrugated board or boards is usually from 2 to 2.5 meters, for lighter sections from a chain-link mesh, this distance can be increased to 3.5-4 meters. Concreting of fence posts made of heavier material, such as slate, should be done no more than 2 meters apart.

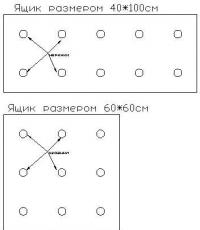
After that, we proceed to marking places for holes under the pillars. The length of each side must be divided by the planned width of the section and add one more (corner), this will be the number of columns. If a figure with a fraction is obtained, then the width of the sections increases. For example, the length of a part of the fence is 17 meters, where it was planned to fix sheets of corrugated board 2.5 meters each.
Calculations show that a little more than seven columns are needed. In order to mount exactly 7, you need to slightly increase the length of the section and order metal profile sheets 9 / (7-1) = 2.83 meters. If it is planned to install gates and wickets, then their dimensions are taken into account separately, since the number of supports will be different than in the same straight section. As a rule, the size of the gate is chosen from 90 to 120 cm, and the gate - from 3 to 3.5 meters. It is optimal to make a drawing on a piece of paper in a cage.
In the center of future holes we hammer pegs. The next step is to choose the method of concreting.
Calculation of pillars and markings should be done before ordering materials for the fence.
Types of concreting pillars
It is necessary to install supports for the fence strictly in accordance with the type of fence chosen and taking into account the characteristics of the soil. The most versatile way is concreting fence posts. The quality of concreting the base of the fence post depends on compliance with the technology.
If the number of holes to be dug is large, then it is advisable to purchase a motor drill, this will speed up and facilitate the process. If you need to make up to a dozen holes, then you can use a hand drill. If the earth is very hard, then it can be softened by pouring water first. On average, the depth of the hole should be no less than 1/3 of the height of the pillar, but always below the freezing point of the soil, otherwise the pillars will fall in the first winter.
The diameter of the blades of the drill must correspond to two diameters of the column. This will allow you to compact the loaf in the hole without any problems.
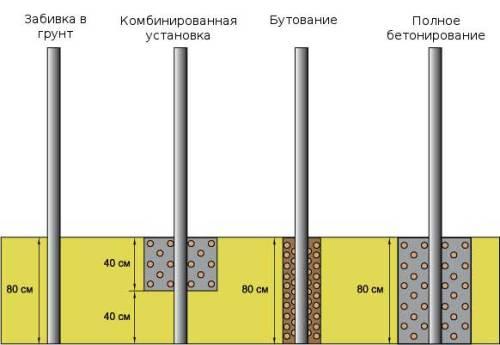
At the moment, several methods of concreting are used:
- partial (characterized by the economical use of cement);
- point, wins in terms of price-quality ratio;
- dry, the most economical, but subject to the absence of strong wind loads on the fence;
- tape mounting, the most expensive, but reliable option, suitable for all types of fences and soils.
Pillar concreting technologies

Any concreting technology involves drilling a hole into which a fence post is installed. If the height of the fence is planned to be two meters, then you need to deepen the meter of the column (total length 3 meters). In the first method - partial concreting of the fence posts, the post is driven into the bottom of the hole 80 cm deep, the verticality is checked with a plumb line, then a third of the height is covered with soil, which is tightly rammed. The rest of the hole is filled with concrete mortar, which is also compacted. If an open-top metal profile is used as a pole, a plug must be placed to prevent moisture from entering inside.
This method is cheaper than the point method, since only part of the hole is poured with concrete, while part of the support is in the ground. However, this method has a significant drawback. It is contraindicated for use on heaving soils and where there is high groundwater. In frosty weather, the supports are simply squeezed out of the ground along with concrete base, which violates the strength of the structure, and sometimes the fence may simply fall. In this case, other technologies are suitable - spot concreting, or a strip foundation for the entire fence.
Spot concreting technology involves drilling a hole 30 centimeters deep deeper than the base of the pillar will be installed, since a pillow of sand is created at its bottom, and then fine gravel or slag. With this method, a “heel” is attached to the support (a steel sheet, or a square of reinforcement along the diameter of the hole). The column is installed in the hole, leveled and the entire hole is gradually poured with concrete, not forgetting to pierce each layer of concrete with a piece of reinforcement to expel excess air.

If the hole was dug with a shovel, then its width will significantly exceed the diameter of the support, in this case, concreting work must be carried out in a wooden formwork installed around the support. After stripping, the pit is covered with earth and compacted.
If water begins to appear in the hole, then the support is placed in a waterproofed "glass". It can be made from roofing felt, which is twisted into a pipe along the diameter of the hole, but 20 centimeters above ground level, it is stitched along the seam with a stapler, and a plastic bag is put on the bottom, which is tightly fixed with adhesive tape. The “glass” is lowered onto the prepared pillow, then a support is placed in it and poured with concrete. The top of the glass is cut with petals, which are then bent onto concrete.
The technology of dry concreting has spread not so long ago, but because of its cheapness it is becoming more and more popular. Before installing the support in the hole, a “glass” is prepared from waterproofing material but without bottom sealing. As in the previous version, it is installed in a hole, a support with a “fifth” is placed in it, then the entire space is covered with a mixture of sand and gravel, with each layer spilled with water and rammed.
Do not forget to align the post strictly vertically before pouring, checking it with a plumb line, and fix it so that it does not budge during pouring and tamping the mortar.
The most labor-intensive and expensive, but, nevertheless, the most reliable way of concreting is the strip foundation. In addition to holes that make less depth, a trench is dug around the entire perimeter of the fence with a depth of 35-40 centimeters. The width of the foundation will depend on the type of fence chosen. For example, 10 cm is enough for a grid, for a metal profile, slate or concrete sections- 20-30 cm, and for brickwork 40 or 45 mm.
The formwork is made continuous, at the bottom of the trench they arrange a sand and gravel cushion of 10-12 cm, after which we vertically hammer the reinforcement along the entire length in a checkerboard pattern flush with the formwork. Putting supports, laying reinforcing mesh formwork and pour concrete. If a powerful fence is supposed, then, accordingly, the reinforcement is carried out more powerful. Pillars can be overlaid with bricks.
Such a design can withstand the weight of a high cinder block fence, and steel poles can be overlaid with bricks in the future.