Bath with an attic: construction technology. Bath with an attic: delightful projects with a comfortable space under the roof
At the moment, the perception of the bathhouse as an exclusively auxiliary building has undergone significant changes - now it often performs additional functions, and due to a well-thought-out architectural solution, it plays the role of a full-fledged element in the formation landscape design.
Comfortable rest rooms, billiard rooms, miniature SPA-salons, gyms, guest bedrooms are added to the main premises. The best option for the realization of ideas is the construction attic floor, the construction of which is much more economical than the construction of a two-story building.
Advantages of a bath with an attic:
- Attractive architecture inherent in a full-fledged cottage, and not an outbuilding;
- Lightweight structures that do not require a powerful foundation, which saves on its construction;
- Possibility of building on narrow plots or having an area that does not make it possible to place a one-story building with all the necessary premises;
- The presence of the second tier allows you to reduce heat loss from the bath;
- Multifunctionality of the structure due to the device additional premises;
- The release of the area on the ground floor for the device, for example, a swimming pool.
Basic design principles
When choosing a place for a bath on the site, the minimum standard distances should be taken into account:
- From other buildings - 10 m;
- From wells and wells - 20 m;
- To the borders of neighboring plots - 2.5 m.
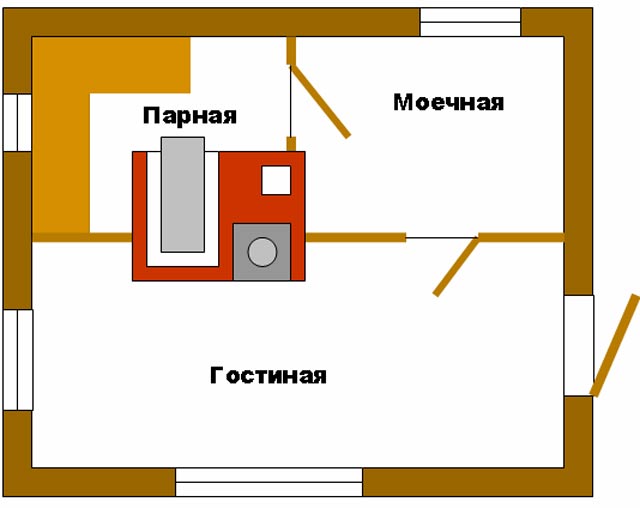
The most common dimensions of the bath in terms of - 6x6 m, if the construction of a terrace is planned, 1.5-3 m is added to them. If desired, and the availability of space, it is possible to arrange a recreation room, a swimming pool, utility rooms.
In principle, the configuration of the roof of the attic floor can have almost any number and slope of slopes. It is preferable to choose a device with a broken structure shape - its use allows you to get the maximum usable area of \u200b\u200bthe room (the calculation takes into account the space with a minimum height of 1.6 m).
Important! Stairs should, to ensure safety, have a convenient height and width of the steps, an arrangement for ascent and descent from the premises of both floors.
Screw type design takes less space and is often used when building an attic floor over an existing bath, but moving along it is not particularly comfortable for older people. A marching staircase is preferable in terms of convenience and safety, but it occupies a significant area of the premises.
Look also at the projects of baths with an attic and choose the option to your liking.
Stages of construction of the main structures
The material for the construction of a building with your own hands is selected based on financial capabilities, the required completion time, the availability and level of your own building skills:
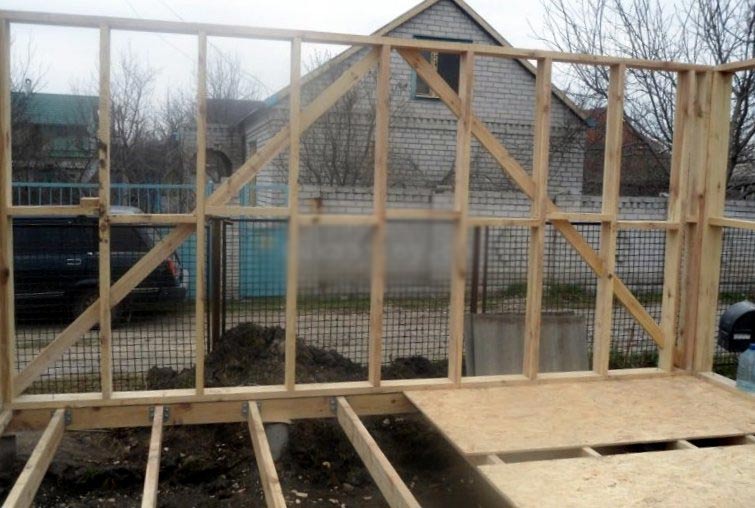
- It is easy to make a frame structure with your own hands - this is the cheapest and fast way erection of a bathhouse or an attic superstructure. A beam is used for the skeleton, the sheathing is made of OSB sheets. The design does not shrink, so you can start finishing work immediately after the end of the "box".
- From profiled or glued beams, it is more expensive and difficult to build. Even a slight shrinkage of these materials requires some break in work before finishing.
- A log cabin is the most expensive and long-term option - it takes about a year for the structure to shrink, which is 8% in height, but such a bath does not require additional insulation and finishing.
Foundation construction
Depending on the nature of the soil, determined by geological surveys by a specialized company, the type of foundation is selected. The most common columnar foundation. On unstable soils, preference is given to piles, with high soil density - to the construction of a shallow-depth tape structure.
Column foundation device:
- Marking with pegs and fishing line the location of the pillars on the site - they are located at the corners of the building, under the walls with a selected step, at the intersection of the partitions and under them with an interval of 1.5-2 m;
- Digging a trench 30 cm wide and 50 cm deep;
- Backfilling the trench with crushed stone by 15 cm;
- Installation of plank formwork in the places of pouring pillars;
- Knitting a reinforcing frame from rods with a diameter of 8-10mm;
- Pouring the structure with concrete;
- Solidification of the foundation for a month, after which construction continues.
Important! The base for the furnace should not be connected with the main structure and is carried out separately.

Walling
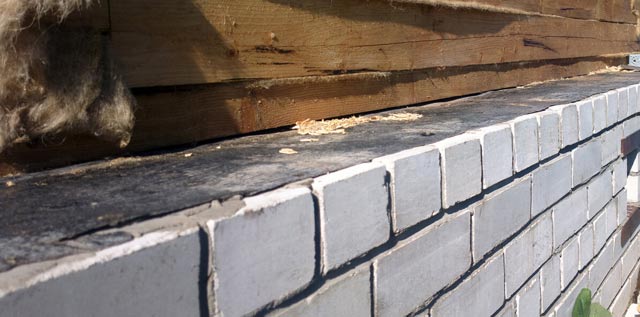
After waterproofing the foundation by laying a double layer of roofing material on the pillars, the first row of timber 200x200 mm, pre-treated with an antiseptic, is mounted. It is important to align it clearly horizontally with a level, since the position of this element determines the geometry of the entire structure. The profiled timber is interconnected by wooden dowels, which are hammered to half the thickness of the lower row into a pre-made hole. The upper bar is put on pins. between rows wall structure tow or jute is laid.
Bath floor device
After backfilling the pillow of sand and gravel, lay logs 100 mm high. The space between them is filled with insulation, for example, expanded clay. A waterproofing layer is laid on top. The floor covering is usually arranged from boards; in the shower room it is more practical to lay tiles on a monolithic screed.
Floor installation
For the ceiling of the bath, a crate is made of edged boards, which is sewn up with clapboard. A vapor barrier is laid on top of the structure, insulation is laid, the second layer of the vapor barrier is laid, with the organization of the gap, the finishing floor covering.
At the location of the steam room, before filing the ceiling, foil is attached to the crate. From the side of the attic, this area is insulated with expanded clay.
Important! Key moment when installing the ceiling - the correct organization of the steam and hydrobarrier to protect the attic room from the penetration of moisture from the bathhouse.
Mansard roof construction
The most optimal design option is the use of a broken roof configuration using U-shaped frames, the vertical elements of which will become the frame of the walls, and the horizontal elements will become the ceiling. When determining the angle of inclination of the rafters, it is required to take into account that the steeper it is, the larger the usable area of \u200b\u200bthe room will be.

In the context of the reconstruction of the existing bathhouse with the completion of the attic, three options are possible:
- Dismantling of the old and construction new roof;
- Refurbishment of the attic;
- The completion of the walls up 1-1.2 m and the construction of the roof again.
Important! To provide natural light, only special roof windows are required, the tides and opening of which are adapted to the inclined position.
During construction, it is recommended to use external insulation of the roof and walls; in conditions of reconstruction, only internal thermal insulation is available. For this purpose, you can use polystyrene foam, isopane, foil teplofon, basalt and mineral wool. From the side of the room, the insulation is closed with a vapor barrier, and a hydrobarrier is laid outside.
Options interior decoration attic spaces are limited only by the need to use lightweight materials to prevent additional stress on the foundation. Depending on the design idea, you can choose a traditional wooden lining, modern plastic panels with a variety of color solutions and textures, drywall with subsequent painting.
A bath with an attic belongs to one of the types. These baths are especially popular in garden and small sizes, as it can be used not only for its intended purpose, but also as a dwelling.
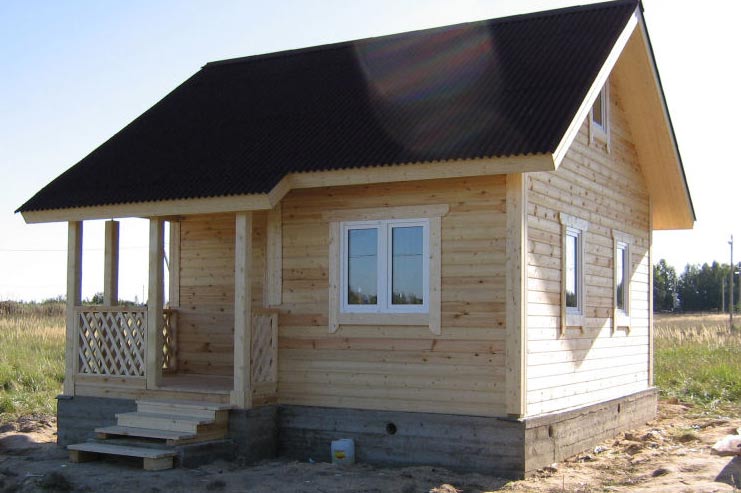
Finished project frame bath with an attic and a veranda
 An example of sheathing with boards of a frame bath and an attic
hallmark of these structures is the frame of the structure, made of wooden beams, as well as the presence - attic.
Frame baths, compared with or, have their undoubted advantages. These advantages include:
- The speed of the construction of the bath.
- Simplicity of design.
- No shrinkage after construction.
- Economy of the building.
- possible at any time of the year, even in winter.
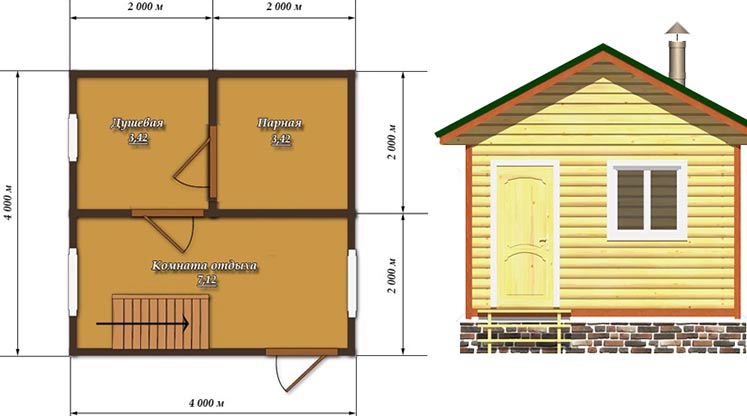 Design and layout of a small bath
On your site frame bath with an attic, almost everyone can afford. The price of such a structure is not so great. In addition, once you have built such a bathhouse according to a standard project, you can expand it in the future by adding more than one room to it.
Frame baths with an attic
Frame baths with attics, their projects, involve the typical placement of all rooms inside the building. Namely:
The first floor is connected to the second internal staircase, located, as a rule, in. 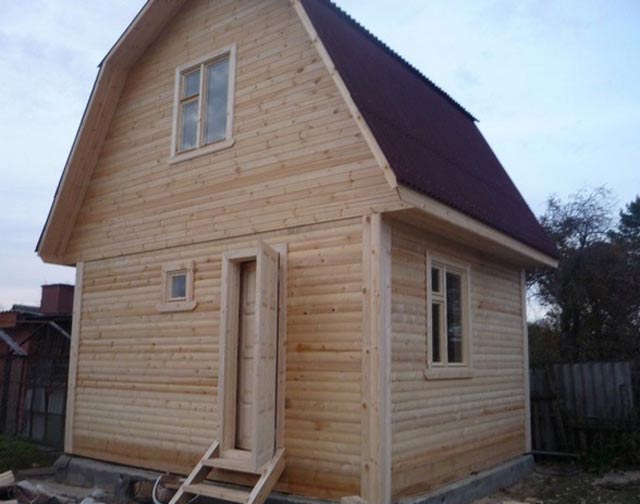

Order ready-made baths in specialized companies
The easiest way to install a bath on the site is, of course, ordering it from a turnkey company.
This will be the best and right decision on the part of the owner of the site. This choice can be supported by facts such as:
The most common version of the project is a frame bath with an attic 6 * 6. These baths are inexpensive, and take up very little space on the site.
Who has a rather large plot of land, they can put themselves a frame bath with an attic 6 * 8.
Both of these projects are able to meet all human needs.  Project of a wooden structure and slate roofing
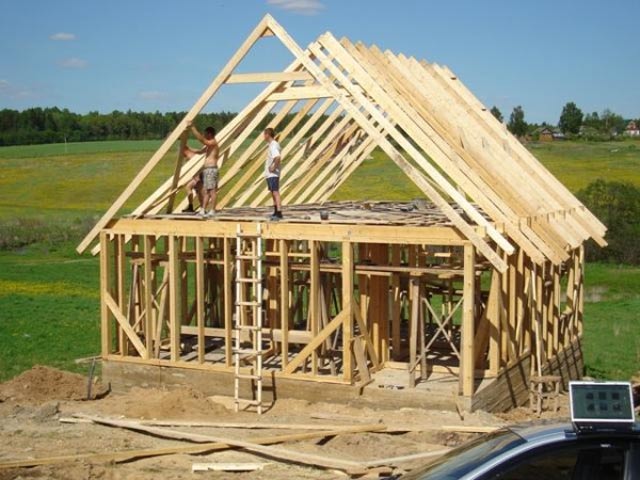
Do-it-yourself construction of a frame bath with an attic
The construction of a frame bath with an attic is not such a complicated and time-consuming process as it might seem at first glance. Any person who is at least a little familiar with the basics of the construction business can handle this. That is why many people prefer to build baths on their site with their own hands.  The process of erecting a frame bath with an attic
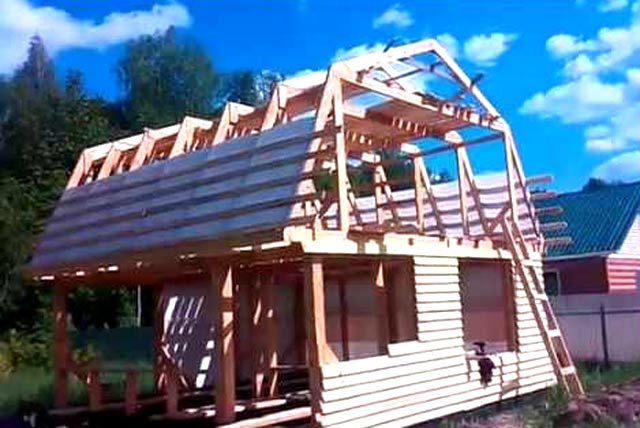

At the same time, you can prepare the material for construction yourself, and not order a ready-made kit from the factory.
The main points of the construction of the bath. Nuances worth paying attention to
When choosing wood for construction, you must first pay attention to its moisture content. It should not exceed 20%, otherwise the bath may soon give unnecessary deformation or it will have to be completely redone. 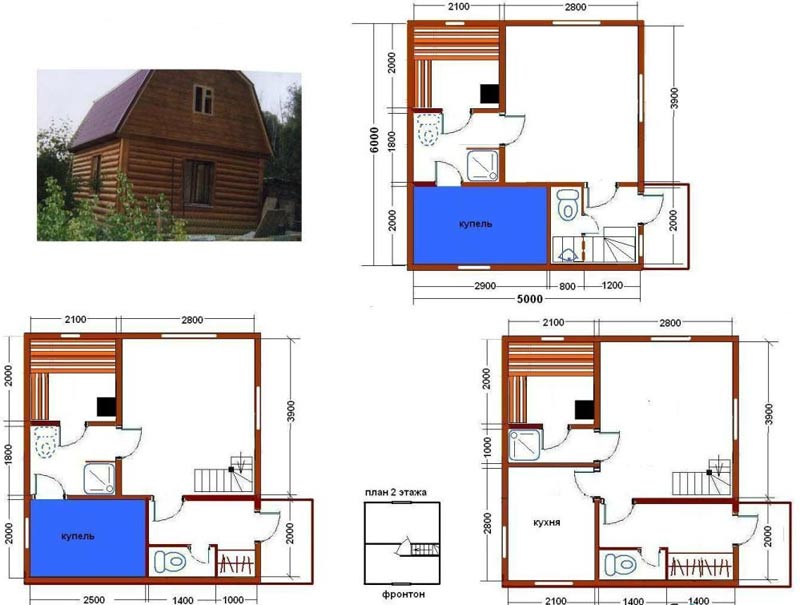 original project and layout of all floors of the bathhouse and attic
Before starting construction work, the following points must be considered:
- Possibility of conducting all communication systems (water, electricity) to the future bathhouse.
- Possibility of removal from a bath of thawed and waste water.
- Placement of the toilet directly in the bath itself.
- Opportunity or another.
Read also
Projects of baths with a gazebo
All types of baths, including the frame type, are small structures.  An example of lining a clapboard bath with an attic
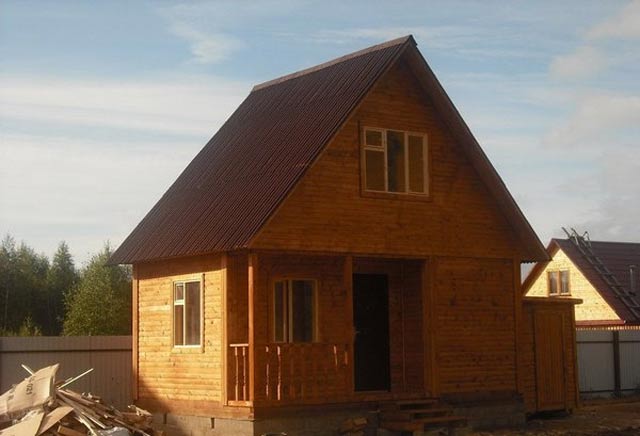
Therefore, during its construction, the following types of foundation can be used: pile,. The choice of foundation depends on what communications will be brought to the bath, as well as on the method of their supply.
When developing a frame bath project on your own, you need to pay attention to such nuances as:

A detailed video review of a frame bath with an attic.
Stages of building a frame bath with your own hands
The construction of a frame bath is carried out according to the usual scheme for such types of work: base, racks, both corner and wall, strapping, ceiling, roof. All work can be divided into several stages:
- Preparation of a place for the construction of a bath. This includes cleaning up debris, grass, stones.
- Site marking, .
- Laying the first strapping of logs on the finished foundation. Just before laying the log on the foundation, you need to put roofing material on it in two layers. It is done in this way.
- Laying lag for the floor. It is made by cutting the ends of the log into the lower log. Before laying floorboards on them, it is necessary to remove all debris. The finished floor is insulated with expanded clay.
- Rack installation. Racks are fixed as bottom harness logs, and on the top. All this is done while maintaining the same distance between them.
 The process of mounting frame racks
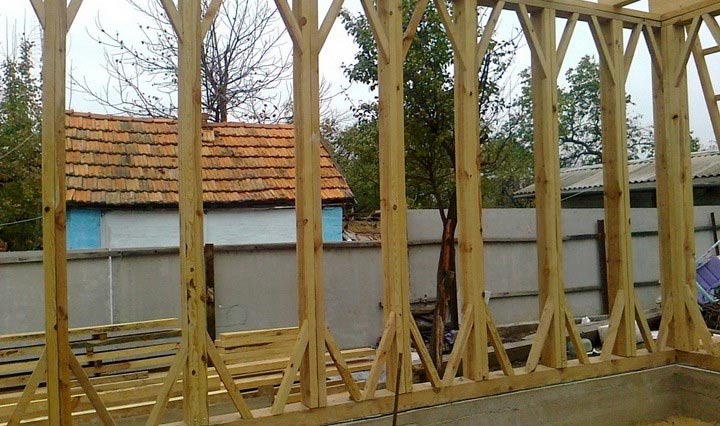
- Ceiling laying. First, ceiling beams are cut into the upper logs, then boards are laid on them. Roofing material is used to waterproof the ceiling. It is laid on overlapping boards, in two layers. On top of this, a double crate is laid. Then everything is covered with metal tiles.
- Frame sheathing, as with inside, as well as from the outside. From the outside, the bath can be additionally sheathed with a board or siding.

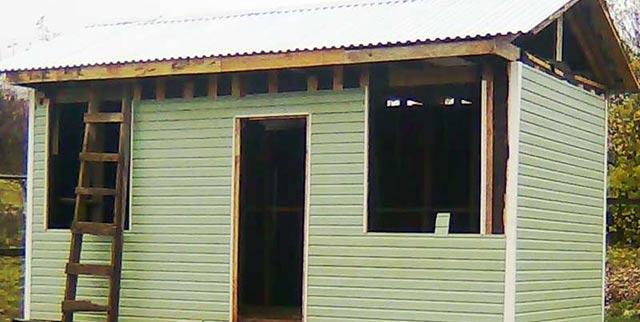
- Installation of windows and doors. To do this, use a special building level.
Construction of the attic and the roof of the bath
After carrying out the main work on the construction of the frame of the bath and all internal partitions, you can proceed to the construction of the attic and.
Installation of the attic begins with laying the floor beams and fixing the U-shaped frames. As a result, it turns out, as it were. This type of roof allows you to make the attic more spacious. From the outside, it looks very beautiful and unusual. In addition, this can significantly reduce the load on the walls of the frame.  Scheme of the device of the roof frame and the attic of the bath
  Roof frame design drawing for a bath On the beams, flooring is made of boards and immediately proceed to the installation of rafters and skates.
All rafters must be the same. To achieve this, you must first assemble one rafter, and then assemble the rest along it. In this case, to eliminate the difference in size and possible displacement of parts, all roof units are finalized on the spot.
As for the roof of the bath, the block method of installation is used to speed up and facilitate the procedure. In this case, the beams are laid across relative to each other. In this case, an element such as a pusher is additionally used. 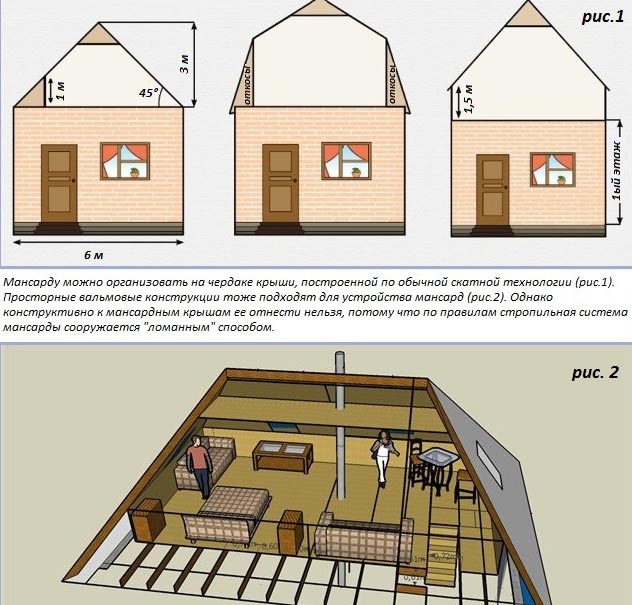 An example of the design and layout of the attic frame bath

It is fixed above the center of gravity, and also firmly connected to the uprights with a screw - capercaillie. It has a bolt that acts as an axle. In order to avoid displacement of the frame along the boards underlay, a wire clamp is additionally used.
With these devices, you can easily lift all the roof frames up on your own, without resorting to the help of special equipment, and fix them in place.
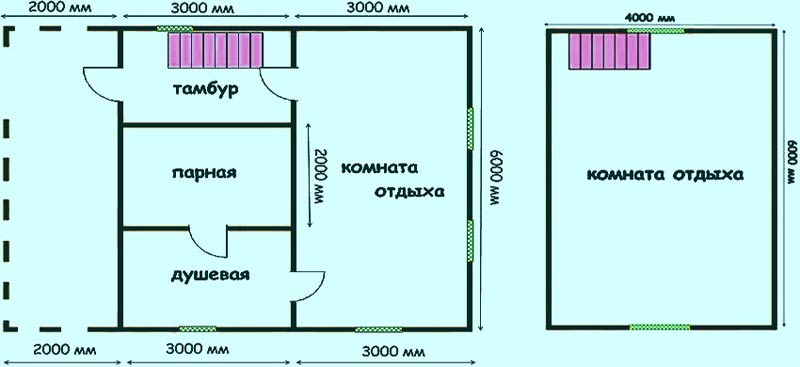
Roof can be closed different types roofing materials.  Drawing with dimensions for the construction of a frame bath with an attic
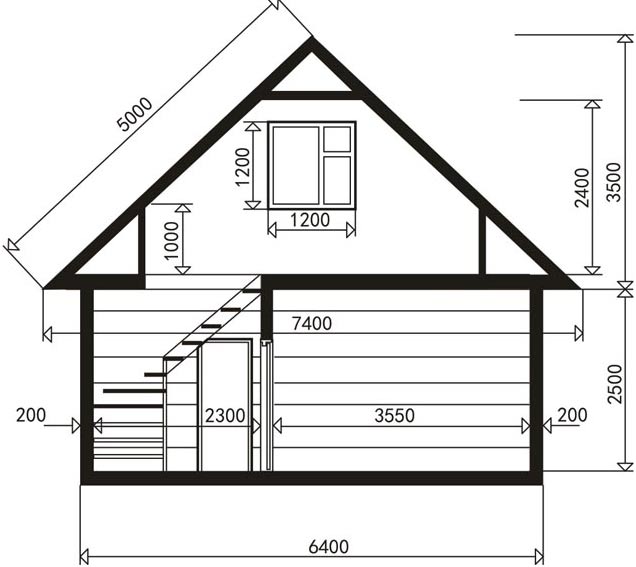
For example, such as slate, metal tile, soft or sheet ondulin. But before using these materials, a roofing material is laid on the crate in two layers. From above, roofing materials are closed with a ridge. No attic is complete without windows. They can be completely different sizes and shapes. modern windows can be installed anywhere, even in the plane of the roof itself.  The process of assembling and sheathing attic rafters

An attic room above the bath is often equipped to save space on the site. It can be used as a guest room or lounge. At the same time, the construction is much lighter than a full-fledged second floor. And following the instructions, you can build an attic yourself.
Content:
It is optimal if the attic above the bath was included in the overall construction project and was built along with it. However, it happens that the desire to expand the area of \u200b\u200bthe bath at the expense of the attic floor arises a little later. Then all the difficulties of its completion will be associated with the location of windows and stairs. The latter in the completed attic can be predominantly screw. It can also be difficult to cut windows. However, these problems are solvable.
Features of the arrangement of the attic over the bath

The attic above the bath is a compact and functional room. Basically, baths with attics have become so popular, because on the top floor you can equip a room for every taste. Most often, a rest room is equipped here.
Creating a rest room has undeniable advantages:
- Spectacular appearance baths.
- Ease of construction, since its construction does not involve the installation of a powerful foundation.
- Minimization of heat losses in the bath.
- No need for individual heating of the attic, thanks to the heat coming from the steam room.
Before you start drafting a bath attic project with your own hands, you should decide on the type of roof. An attic is equipped only if there is a special broken roof shape. Of course, the smaller the angle of inclination, the more usable indoor space you save.
The completion of the attic floor or the conversion of the attic into an attic does not require any approval or obtaining permits.
Selection of materials for the construction of the attic bath

As a rule, the attic is completed over the bath from the same material as the entire building. However, combinations are also not uncommon: the first floor is log or brick, the attic is a wooden structure.
The easiest way is to build an attic over a bath from a bar. This design is lightweight, so the foundation of the structure will practically not feel additional load. And an almost perfect rectangular layout will make it possible to avoid unnecessary expenses and efforts when creating a complex project and its implementation. It is also worth noting that the timber looks quite aesthetically pleasing when assembled and does not require additional cladding and complex interior decoration.
Concerning roofing material, then you can choose it, focusing on your own taste and availability of finances. Experts advise using metal tiles for such buildings or shingles. These materials are easy to install and look attractive. In addition, they are quite light, which is important when completing the attic to the finished building, since the additional floor should exert as little load as possible on the walls and foundation.
Particular attention should also be paid to the means of steam, hydro and thermal protection. The attic above the bathhouse is a specific place, which differs in its characteristics from the usual attic in a residential building. In particular, the aggressive environment that is present in the steam room has a huge impact on the second floor. Therefore, the issue of isolation should be approached carefully. As a heater, most often, mineral wool is used.
Rules for dismantling the old bath roof

Before starting work on the construction of a full-fledged attic floor, you should calculate the attic for the bath and truss system. If it does not match your project, it will have to be dismantled along with the old roofing, only after that you can start installing new rafters.
Before dismantling the roof over the bath, it should be cleaned of all communications - wires, antennas, drains. stock up necessary tools and materials - a screwdriver, a nail puller, a rope, a saw, a crowbar. Be sure to take care of your own protection and insurance. It is also recommended to install a block system for lowering roofing materials to the ground.
We carry out the work in the following sequence:
- We begin the disassembly by removing the roofing material near the pipes, walls.
- To remove the metal tile, we start with the ridge, the lining of the wind and valley components. We disassemble the sheets of material from top to bottom.
- To dismantle the rafters, we remove everything metal parts. After that, we remove the free-lying elements. First, we tear off a couple of boards 1-1.5 meters from the ceiling. Through the resulting hole, remove the boards that lie below.
- We disassemble the rafters, formwork and crate using an electric or chainsaw, scrap. If we are dealing with hanging rafters, then every 4-5 purlins should be left in order to avoid the collapse of the rafter system.
- We lower the rafter legs down one by one.
The construction of a new truss system for a bath with an attic

Before starting to build a truss system above the bath, a new layer of waterproofing should be laid on the ceiling of the building. It is optimal in such cases to use roofing felt or roofing material. If the floor is wooden, then there is no need to lay the bars under the main beams.
We carry out further work in this order:
- We prepare wooden bars with a section of 10x10 cm. We put racks at a distance of about 2 meters from each other. They will form a kind of skeleton of the attic floor. Make sure that each rack is set perfectly level (use a level for this).
- Installed racks are sheathed on both sides. From the inside we use drywall or plywood, from the outside - slab.
- Between the racks we lay insulation (mineral wool).
- We fix each rack separately with spikes and brackets. Make sure they don't lean in the process. To do this, you can fix them with temporary braces.
- We lay the top beam. It should have a similar section of 10x10 cm. We fix it with nails or self-tapping screws.
- Install Mauerlat. You will need a 40x40 cm beam for it. Do not forget to install a waterproofing layer under it to avoid wood rotting in the future.
- We strengthen rafter legs. To do this, we make markings on the Mauerlat and the rafter frame in those places where the rafters will be installed. As a rule, the pitch is 1-1.2 m. For rafters, you can use boards measuring 5x15 cm. Do not skimp on the quality of the rafter board, so as not to become a victim of roof collapse due to low-quality wood.
- We install mares. We produce the process by analogy with rafters. We start with a pair of extreme ones, we stretch the twine between them and align with it during subsequent work.
- We nail the hem board to the fillies. It will prevent wind and precipitation.
- We strengthen the rafters in the places where the roof windows are installed. To do this, install the transverse bars. They will serve as the upper and lower parts of the opening, where the frame will be fixed.
Remember that everything wooden elements, which are used in the construction of the attic, must be treated with antiseptics and fire retardants. Before proceeding to the next stage of surface isolation, make sure that all bearing structures OK. All small flaws and cracks must be sealed with mounting foam.
Installation of a roof for a bath with an attic

After the roof skeleton is created, you can proceed with the installation of the roof and the equipment of the crate. The step in this case depends on what roofing material you will cover the roof with.
If you chose soft tiles, then a continuous crate is installed for it, which is made of grooved boards. We install a solid crate on a sparse one with a step of 30 cm. Thus, a double crate is obtained.
Next, we install a hydrobarrier on the crate. Usually, ordinary polyethylene is used for this, the layers are laid with an overlap from the bottom up. We put a layer of thermal insulation on top of the film, for example, mineral wool, cover the insulation with a layer of vapor barrier and fix it with adhesive tape.
We install the roofing material in the same way as the waterproofing. Roof elements are laid from the bottom up with an overlap. Make sure that in places where the roof breaks, the top layer of the roof protrudes above the bottom. We install the ridge so that its design does not allow water to enter under the roof.
Installation of skylights in the roof of the bath

Skylights look great, although their equipment is a rather laborious process, and you need to do this at the stage of erecting the truss system. Proper ventilation and lighting in this room is ensured precisely thanks to the competent arrangement of windows.
To make the most of window openings, we perform the work in the following order:
- We install a panoramic large semi-oval window on the pediment. You can also choose any other shape, except for square and rectangular. Non-standard lines will visually expand the space.
- We equip at the window opening on the slope of the roof a wide wooden window sill and insert a transformer window that opens in the vertical direction. It can easily be transformed into a small balcony. The upper sashes will serve as a canopy, and the lower ones will be used as a fence.
- We install small vertical windows around the perimeter of the roof.
- We place blinds for inclined structures on the windows on the slopes. They are equipped with special supports and fasteners that allow you to easily adjust the position.
- Above the small windows we install double cornices and fasten them roller blinds Lightweight material in a soft pastel shade.
To ensure good ventilation, give preference to high-quality double-glazed windows. The best option there will be "breathing" wooden windows. The use of wooden structures is preferable, since PVC windows will not fit under general style room lined with wood.
The technology of interior decoration of the attic of the bath

Most design projects decoration of this room above the bath, preference is given to natural materials. Of these, wood is the most popular. Surface finishing wooden materials makes it possible to create a rest room in almost any style.
Brief instruction for the interior decoration of the attic above the bath:
- We process floorboard antiseptic compositions and flame retardants in several layers, we mount wooden flooring.
- We fasten the crate to the ceiling, sheathing it with a wooden clapboard. The panels are arranged along the length of the room.
- The surfaces of the roof slopes and struts are covered with edged boards.
- We fix the lining on the walls of the attic, having previously fixed the crate.
Please note that the floor is best done in one plane. Podium structures are an unsuccessful solution for an attic room.
Do-it-yourself outdoor decoration of the attic of the bath

Immediately upon completion of construction, the attic from the timber should be caulked with tow, flax or jute.
Outside, the completed attic should be decorated in the same style as the entire bath. Regardless of the chosen finishing material, the timber structure needs to shrink. Therefore, before proceeding with finishing outdoor work, you should wait a couple of years.
If both the bath and the attic are built of timber, then it is enough to wait for the shrinkage of all structures and cover them with varnish that is suitable for exterior finish wooden buildings.
How to build an attic over a bath - look at the video:
Knowing how to make an attic in a bath, you can cope with all the work yourself, without resorting to the help of professional builders. The main thing is to choose high-quality building materials, because the reliability of the structure will depend on this, and strictly follow the instructions.
The construction of baths in a summer cottage is becoming more and more popular. And probably in our time, even those who have not previously been a particular fan of vaping, are thinking about building a small bathhouse on their own site, and preferably with an attic. In the article you can read about how to finish the attic in the bath.
Projects of baths and materials for their construction are very diverse. According to your preferences, you can build a bath of any size, using traditional timber, log cabin, stone, brick, or choose modern materials of innovative technologies. If the area of \u200b\u200byour site does not allow you to arrange a bath "on a grand scale" or you are somewhat cramped in financial plan, an excellent solution would be the construction of an attic in the bath and the question of how to finish the attic in the bath.
The attic above the bath can be larger
The advantages of such a two-story structure are many. The cost of building materials and work is significantly saved, the area of land occupied by outbuildings, another room is added to your living space that can be used for different purposes.
As a rule, the attic above the bathhouse serves as a relaxation room after water-improving procedures. Depending on your preferences, you can equip a billiard room, a games room, a small oasis for relaxation, etc. The second floor of the bathhouse can also be easily converted into a living space, and in the event of the arrival of unexpected guests, you can offer them to comfortably sit in the attic.
Construction of an attic in a bath
The arrangement of the floor under the roof can be carried out simultaneously with the construction of the bath as a whole, when such a layout is included in the project, it is quite possible to complete the attic over an existing house, or you can convert the attic space into a living space.
As a rule, the same materials are used for the construction of the attic as for the construction of the bath in general. In this case, the thermal insulation characteristics of the walls of the first and second floors are similar and do not require any special additions. It is possible that the under-roof floor will be created from a different material. Then you definitely need to take care of providing the attic with appropriate heat and waterproofing.
To build an additional room above the bath, use one of three options. In the first case, the side walls are completed in height, the second is possible when planning a special form of the roof, in the third option, the attic space is converted and insulated.
Above a bath from a log house or a bar of a conventional, rectangular layout, the construction of an attic requires the least labor costs. If the second floor will be used year-round, and approach the usable area of the first floor in area, then after laying interfloor overlap with a staircase, the walls of the room are completed to a height of 1-1.2 m. After that, gables and internal load-bearing walls are erected, in compliance with the usual construction rules.
Since the bath is a specific structure, prerequisite for the attic is a careful arrangement of interfloor and wall layers insulating moisture, steam and heat. And of course, you need to take care of proper ventilation and the connection of technical channels to the attic room. Compliance with all these conditions in the future will make the operation of the attic as comfortable as possible. They will prevent the formation of ice and icicles on the roof, as well as the occurrence of excessive dampness in the room, and will significantly extend the life of the building.
When the walls of the attic floor of the bath are ready, the roof is being installed. Additional hydro and thermal insulation for the roof is also required.

In the roof of the attic, the right decision would be the arrangement of windows
At will, windows can be made in the attic roof canvas. If you are planning more complex structure attic, with a balcony, loggia or sloping roof, their design must be carefully worked out at the initial stage of construction.
Attic insulation
Before work on the insulation of the attic, you must make sure that all the supporting structures were in order. All kinds of flaws and cracks need to be caulked with tow or sealed with mounting foam.
You can insulate the attic external, internal and external ways. Each of them has its own advantages and disadvantages. The choice of the option for warming the attic floor of the bathhouse with your own hands mainly depends on the method of its construction.
External attic insulation is considered the most appropriate, when the heat-insulating layer is laid in the walls and ceilings of the main structure. But this method is possible only with the simultaneous construction of the entire building.

Izospan serves as a reliable heat insulator for the attic
You can make thermal insulation inside the attic. In this case, you should beware of the greenhouse effect. Consequently, this option requires equipment on the second floor of the bath of a reliable ventilation system and additional waterproofing between floors.
If you insulate the attic from the outside, then you need to do this with the simultaneous warming of the entire bath. With this method, the microclimate in the room on the second floor is most consistent with its purpose.
As thermal insulation material use foam sheets, mineral wool, isospan or a heat phone with aluminum foil. The use of modern high-tech material, a heat phone, provides additional benefits. Since it is produced with a one- or two-sided aluminum coating, any heat rays are easily reflected from its surface. In addition, there is no need to cover the thermophone with a reflective film on top, which saves your money.

A waterproofing film is applied over the insulation
The phased finishing of the attic in the bath provides for the consistent application of a reflective film, insulation, waterproofing material and, finally, decorative finishing panels.
Finishing the attic in the bath
Before deciding how to finish the attic in the bath, you need to decide what its layout will be. You may want to divide the space into separate corners, equip niches, place built-in interior elements. Then, before the final finishing, install all the necessary partitions and additional details.
If you built an attic in the bath with your own hands, then it most likely serves as a rest room or living space. Be sure to follow the strength of the interfloor ceiling and the reliability of the load-bearing walls.
Stairs can be made at different angles of ascent, from different breeds wood, located in different parts of the first floor of the bath.

Staircase to the attic in the bath

Linden staircase to the attic in the bath
In order to avoid injury, the stairs to the attic are flat, with steps wide enough so that a person in a relaxed state after a steam room, accidentally slipping, does not fall off it. Making the stairs comfortable and as safe as possible is not so easy, as certain engineering skills are required here. But with maximum effort and patience, you can make the stairs to the attic in the bathhouse yourself. The choice of material of manufacture, elevation angle, design and enclosing fences can be done by yourself or using the advice of the master.

Separation of the room at the top of the bath with stair railing
The railing on the stairs ensures the safety of people and serves as an additional element of the attic decor.

The attic railing is an insurance against falls from a height
When all the work on the creation in the attic is completed optimal conditions for the comfort of people, proceed to the final decoration of the interior space. The most popular material for this is lining. Made from deciduous or coniferous wood, lining is quite reliable and easy to use. Attic sheathing finishing material requires minimal effort and is carried out in the shortest possible time.
Instead of lining, you can use plastic panels. Harm to human health panels manufactured according to modern technologies, do not apply, because they are made from environmentally friendly materials. And amazing variety. colors and textures will allow you to create the most unexpected design of your attic.
Alternatively, you can use drywall sheets if you plan to plaster or paint the inside of the attic walls in the bath in the future.
If your bath is built from natural wood, and you consider the main advantage of such material to be the benefits brought by water-health procedures in a log cabin steam room, then it would be logical to finish the attic with a clapboard made of larch or linden.

The room on the attic floor can be divided and decorated according to your wishes and preferences.
How to finish the attic in the bath from the inside
Nowadays, even those who have not previously been a particular lover of vaping are thinking about building a small bathhouse on their own site, but preferably
Bath with an attic: we choose projects for construction with our own hands
The desire to put a bathhouse on personal plot almost every owner of private housing has experienced it at least once. After all, its versatile value, ranging from health benefits to aesthetic advantages in the exterior of the site, no one doubts. Therefore, someone has long fulfilled his dream, and someone is just going to start realizing it, looking for opportunities, choosing the internal arrangement of the building, its functionality, design, thinking through the stages of construction. In this good aspiration, a special place is occupied by the layout of baths with an attic for small areas. They have a number of undoubted advantages against the background of simple one-story solutions, the nuances of design, construction and use.

Why does the bathhouse need an attic superstructure?
Often such architectural layouts are chosen, initially guided by their functionality, as well as design features:
- the use of a common foundation that allows you to combine a hygienic (1st floor) and a recreation area under the roof, for example, for a tea party or a billiard room, saves land under the building spot area;
- a larger project, such as a 6x6 bathhouse with an attic, can already become a fully functional option for a plot of several acres. It is able to simultaneously play the role of a venue water procedures and living, and for large private areas with separate full-fledged housing, such a layout can solve the problem of accommodating guests;
- two-level structures often include terraces (verandas, loggias or balconies), on which it is pleasant to relax while contemplating the surroundings;
- they allow you to create aesthetically correct architectural forms. For example, the same project of a bathhouse with an attic and a terrace, guided by the requirements of landscape design, is much easier to adapt in many areas, as a complete solution, in contrast to separate one-story steam rooms.
Advantages of bath projects equipped with attics
- The first thing that engineers always talk about when building attic superstructures is a significant reduction in the load on the supporting foundation, compared with the construction of a full-fledged second floor.
The bath complex is no exception, unless you have a light frame in mind. For him, the difference between the mass of an entire floor or an under-roof operating room is not so significant. By the way, when the strength of the foundation raises concerns, it is frame technology the most favorable, if necessary, the completion of rooms above the reconstructed object.

Therefore, for most projects of baths with an attic, various economical pre-fabricated types of foundations are suitable: columnar, screw, MZL. Naturally, it is necessary to take into account the type of construction, as well as the properties of the soil. So, for a brick structure on heaving soils, either powerful piles or a deep reinforced foundation tape may already be needed.
- The base and roof common to both levels save construction investments compared to an extension auxiliary premises or terraces.
- The attic in the bath allows you to optimize heating costs. Firstly, a significant proportion of thermal energy, rising with air flows upwards, is dissipated through the roof (25% -30%). Therefore, the material consumption of roof or upper floor insulation is higher than that of walls, since thicker layers of insulation are required. Secondly, from the point of view of the minimum ratio of the external surface to the internal volume, a building that is close in shape to a cube (a building with under-roofing rooms) loses heat more slowly. It is faster and cheaper to heat it than a one-story one with auxiliary rooms docked on the side.
In addition, given the tendency of thermal energy for upward movement, it is possible to simplify the heating of a room under the roof by competently ensuring the flow of air from the first floor up.
- The layout solution "bath house with an attic" makes it possible to simplify the installation, operation, regulation of communication systems (ventilation, heating). The use of vertically oriented risers or main lines is more convenient than numerous horizontal branches.

Features of design solutions
Even before the development or search for a suitable turnkey design solution for self construction, it is good to pay attention to some design features of the structures we are considering.
It is always one of the main negative arguments of the opponents of superstructure floors. It is natural to dispute the fact that the staircase in the bathhouse to the attic will occupy squares of space, which are especially valuable when creating compact architectural forms, no one will. However, since we have found numerous other counterbalancing advantages, we should choose an option for ourselves, taking into account the characteristics of different systems:
- Marching stairs are the most comfortable, functional and safe. They take up more space than other types. They are difficult to adapt to small areas, for example, if you have a 4x4 m layout.
- Boltsevye - have all the advantages of marching structures. Not suitable for frame buildings, as they require a strong bearing wall, to which the support pins of the steps should be attached.
- Screw - the most inconvenient, although spectacular, take up a minimum of space. Often they can help out if you have a compact 5x5 bath project with an attic or, especially, 4x4 m.

Features of the geometry of the attic
When choosing a roofing configuration, it is necessary to take into account the limited internal area of the object. After all, it is not too big. Therefore, in order to create a more or less functional floor, it is undesirable to use shed roof. A gable is also not the most convenient option, since even for a 6x6 m building, in order to effectively use the space under the slopes, they will have to be made too steep, and this will already adversely affect the wind resistance and material consumption of the entire structure.
The optimal choice of the type of coverage for a bath house with an attic tends to a broken gable roof or to the device of an upper half-storey operating room.
We select projects for construction with our own hands
When the main points of creating your personal bath and household complex are already clear, you can come to grips with design issues. Taking into account the fact that small-sized structures with a rather limited variability of layouts are often considered for individual use, it is easier to take as a basis turnkey solution best suited to the needs of the owner. Then, no one interferes with any architectural idea you like, a little adjusted to personal preferences. You can, for example, move or add partitions, or slightly change the external dimensions of the object.
At the stage of working out the geometric parameters of the future construction plan, it is important to take into account not only user characteristics. It has already been said above that the issue of heat conservation is especially important for a bathhouse. Therefore, like a cubic layout in volume, a square in a plane are the optimal energy-efficient forms. Therefore, a house with a square plan will cool more slowly. Let's analyze some of them on the basis of small typical projects.
Compact projects 4x4 m
Almost one of the smallest architectural solutions that owners of even the smallest plots can navigate. However, despite the fact that only a little more than 16 m 2 of territory is required for construction, it is quite capable of coping with the tasks assigned to it. Bath 4 by 4 with an attic already on the ground floor contains all the necessary target premises: a steam room, a washing room and a rest room. If desired, the rest room can be moved upstairs, putting there a not too bulky sofa or a couple of chairs plus a small table, and equip the lower entrance area as a dressing room. It is enough to mount an additional partition in it, which will reduce heat loss in winter. Using the upper level for relaxation will also allow you to allocate space for a bathroom or inventory storage below.

With proper arrangement, such a compact project is not only suitable to create a place for hygiene and relaxation with regular use by a small family. He is already quite capable of providing additional territory on which the owners will freely accommodate relatives or acquaintances who have come to visit.
We choose 5x5 m
In fact, a 5 by 5 bath with an attic is only a slightly enlarged analogue of the 4x4 m design solution. A slightly expanded area does not add much richness in the choice of zoning the ground floor space. However, the “extra” squares will allow pushing the boundaries of the washing or rest room, which will significantly increase the user comfort of the owners, even taking into account the fact that their guests will also be lovers of bath procedures. The washing room is already capable of accommodating not just a shower stall and a small font, but a couple of types of shower (regular and contrast) and a comfortable font.
Being engaged in redevelopment of the project, moving partitions, for the sake of increasing the volume of individual rooms, one should not forget that this is not always advisable. For example, the main trump card of a steam room is not its dimensions, but the ability to maintain a sufficiently high stable temperature. The thermal balance is more difficult to regulate, and heating costs will increase significantly if the steam room is too large. Therefore, it is better to leave the steam room as small as possible.

If we consider the upper level of the structure, then from this side the 5 by 5 bath project with an attic provides the possibility of internal arrangement somewhat wider than similar structures smaller in plan. Under the roof, you can get a pretty solid billiard room with professional table or a secluded room, separated from the stairway and access to the balcony.
When installing an interfloor ceiling, one should responsibly consider the issue of its strength, especially if the active operation of the attic tier is expected. As beam elements, it is recommended to use a board with a size of at least 150 * 50 mm, installed on the edge. If there is no intermediate support of the beams on the load-bearing partitions of the 1st floor, it is better to use ribs 200 mm high.
Layout 6x6 m
This type of layout is also often chosen by small lot owners. At the same time, although the project of a 6x6 bath with an attic can be attributed to the average architectural solution for such buildings, a structure erected on its basis is already a fairly complete structure. On the one hand, it is still not too expensive, and on the other hand, it can provide full comfort to the owners. The area allotted for construction fully accommodates both all the main internal and external premises, for example, with terraces on both floors. If a project with terraces is chosen, then it is no longer necessary to allocate space on the site for the construction of a gazebo. The veranda and loggia, protected from rain, are always ready for cozy outdoor gatherings.

If the layout of 6x6 m is developed for the sake of internal arrangement, then there is enough space to separate a spacious rest room from the entrance corridor on the lower floor, provide a compartment for storing firewood, a toilet, or even mount a voluminous font in the washing room like a mini-pool. The attic in the bath is zoned into fairly comfortable guest rooms for organizing gym, home cinema or other target premises.

What else to look for when building a bath with an attic with your own hands
After resolving issues related to the design layout of the building, you still have a number of important organizational and installation stages:
- decide on the material, buy a standard set of ready-made parts of the building or, based on your own developments, order an assembly kit from a specialized company, or completely manufacture structural elements with your own hands during installation;
- it is worth considering the aesthetic component of the location of the structure, especially if you have a bathhouse with an attic and a terrace or panoramic French windows at the top. The overlooked landscapes will become a significant component of your holiday;
- when arranging the roofing volume, one of the key tasks will be to protect it from high humidity and temperature fluctuations. On the one hand, heat and moisture will try to penetrate the attic from below, and on the other hand, from above, the roof will warm up in the summer in the sun or become supercooled in winter. Therefore, in addition to the use of high-quality heat-insulating materials, it is worth paying attention to careful vapor barrier in the interfloor overlap, as well as the tasks of vapor and waterproofing of the exploited under-roof space.
How to build a bathhouse with an attic: do-it-yourself construction projects
A bath with an attic built on its own can be created according to a typical or individual project which should take into account the features of these structures.
Do-it-yourself bath attic
It is optimal if the attic above the bath was included in the overall construction project and was built along with it. However, it happens that the desire to expand the area of \u200b\u200bthe bath at the expense of the attic floor arises a little later. Then all the difficulties of its completion will be associated with the location of windows and stairs. The latter in the completed attic can be predominantly screw. It can also be difficult to cut windows. However, these problems are solvable.
Features of the arrangement of the attic over the bath

The attic above the bath is a compact and functional room. Basically, baths with attics have become so popular, because on the top floor you can equip a room for every taste. Most often, a rest room is equipped here.
- Spectacular appearance of the bath.
An attic over an already built bath can be equipped in two main ways: from a finished, already used bath, the roof is torn off and the side walls are completed in height; re-equipment of the attic space above the bath for the attic floor.
Selection of materials for the construction of the attic bath

As a rule, the attic is completed over the bath from the same material as the entire building. However, combinations are also not uncommon: the first floor is log or brick, the attic is a wooden structure.
Rules for dismantling the old bath roof

Before starting work on the construction of a full-fledged attic floor, it is necessary to calculate the attic for the bath and the truss system. If it does not match your project, it will have to be dismantled along with the old roofing, only after that you can start installing new rafters.
- We begin the disassembly by removing the roofing material near the pipes, walls.
If you are removing soft roofing, then it should be removed in cool or cloudy weather. Under the sun, soft roofing materials heat up and soften, making it difficult to remove.
The construction of a new truss system for a bath with an attic

Before starting to build a truss system above the bath, a new layer of waterproofing should be laid on the ceiling of the building. It is optimal in such cases to use roofing felt or roofing material. If the floor is wooden, then there is no need to lay the bars under the main beams.
- We prepare wooden bars with a section of 10x10 cm. We put racks at a distance of about 2 meters from each other. They will form a kind of skeleton of the attic floor. Make sure that each rack is set perfectly level (use a level for this).
Installation of a roof for a bath with an attic

After the roof skeleton is created, you can proceed with the installation of the roof and the equipment of the crate. The step in this case depends on what roofing material you will cover the roof with.
Installation of skylights in the roof of the bath

Skylights look great, although their equipment is a rather laborious process, and you need to do this at the stage of erecting the truss system. Proper ventilation and lighting in this room is ensured precisely thanks to the competent arrangement of windows.
- We install a panoramic large semi-oval window on the pediment. You can also choose any other shape, except for square and rectangular. Non-standard lines will visually expand the space.
The technology of interior decoration of the attic of the bath

In most design projects for finishing this room above the bath, preference is given to natural materials. Of these, wood is the most popular. Finishing surfaces with wooden materials makes it possible to create a rest room in almost any style.
- We process the floorboard with antiseptic compounds and fire retardants in several layers, mount the wooden flooring.
Do-it-yourself outdoor decoration of the attic of the bath

Immediately upon completion of construction, the attic from the timber should be caulked with tow, flax or jute.
Knowing how to make an attic in a bath, you can cope with all the work yourself, without resorting to the help of professional builders. The main thing is to choose high-quality building materials, because the reliability of the structure will depend on this, and strictly follow the instructions.
How to make an attic over the bath with your own hands
An attic room above the bath is often equipped to save space on the site. It can be used as a guest room or lounge. At the same time, the construction is much lighter than a full-fledged second floor. BUT
Attics - life under the roof
A bathhouse with an attic is an unconventional type of structure, but at the same time, it is a structure that gives additional space to the owners. During construction, the bath is given little space, it is limited to a steam room and a dressing room. As observations show, the modern bath has ceased to be a place of hygiene, more and more often this facility is used to spend free time with family or friends. In this case, just the attic will be an indispensable solution to the problem of organizing recreation or leisure.

Bath with an attic from a log house
The positive and negative sides of the bath with an attic
Every construction project has its own positive sides and "pitfalls". Therefore, when starting construction or planning, it is necessary to take into account all possible problems that may occur during operation or, even worse, during operation, in order to prevent them in a timely manner.
A bath with an attic has positive aspects:
- Any attic is additional usable area for housing. When planning the construction of an attic, you win in the usable area of \u200b\u200bthe site, as the work is carried out upwards (there are no restrictions).
- financial benefit. Installation of the attic is much cheaper than the construction of the 2nd floor. You win an average of 30-35%. Carrying out construction in accordance with all necessary norms and regulations, you get living space no different from standard living space, even better in design. Peculiar broken roof will give your room an extraordinary color.
- The versatility of the structure. The attic can be used for various purposes and wishes of the owners. It can be a rest room after taking water procedures, or a game room for adults (billiards, hookah, etc.). In the attic room, you can equip a SPA-salon with all the devices for sunbathing, massage and aromatherapy. The attic room can be divided into two parts, one of which is a summer bedroom with a balcony. It all depends on the needs of the family and imagination.
- Originality of design. In this room you can experiment. Roof slopes, equipped inaccessible places will give your room individuality, originality and unusualness.
- Reducing heat loss due to the presence of a warm lower floor. Plus reduced heating costs.

Bath with an attic from a bar with a roof from a metal tile
The negative aspects of building a bath with an attic:
- When building a bathhouse with an attic, it must be taken into account that the lower premises will periodically be wet, even very. Moreover, it is not just high humidity, but also elevated temperature, frequent evaporation. That's why Special attention it is necessary to give insulation to the floor between the second floor and the first. Vapors from the steam room and the heat of the bath should not affect the condition of the attic room. Otherwise, mold, fungi and permanent dampness may appear. Poorly executed insulation will shorten the build service line.
- Carrying out work on insulation attic space. This must be done if you intend to live in an attic in winter time. If in winter it is not planned to use the attic, thermal protection can be simplified, since the bath is already protected by the attic room.
- Although it was said that when arranging such a structure, savings occur, but nevertheless, the construction of the roof will require additional investment. This is explained by the fact that such a room will require a gabled roof. The area of such a roof is directly proportional to the angle of inclination of the slopes, the greater the angle of inclination of the slope, the larger the area of \u200b\u200bthe roof. If you use a broken roof, the final cost of the roof, again, will increase.
- Need additional air conditioning. In summer, the attic is not needed additional source warmth from below.
- Additional work on fire safety.

Construction of a bath with an attic - you need to start with planning
Features of the construction of a bath with an attic
Well, if the construction of the attic floor above the bath was planned in advance when drawing up the project, this will make it possible to make the calculations more correct and accurate.
For the construction of an attic room above the bath use a frame system. The frame is mounted from horizontal rafters, which in the future will become the ceiling of the attic, and vertical racks, in the future, the walls of the attic. Particular attention must be paid to the selection of roofing material.
We will use the bath both in winter and in summer. In the summer heat, the attic room should not warm up much, otherwise it will not be possible to stay there. Therefore, we choose slate to cover the roof. The angle of inclination of the truss system is also important. In this design, 30° - 60° will be acceptable.

A bath with an attic may look like this
With an increase angle of inclination of the truss system, reduces the useful area of the room. For the roof of a bathhouse with an attic, it is better to choose a multilayer broken structure. Layering implies the presence of a slate roof, good waterproofing, insulation, battens, vapor barrier and interior decoration.
The situation is worse if the attic, when designing the bath, was not planned, and in the process of work the idea of building an attic arose. Here it is now necessary to consider the presence of stairs and windows. If inside the area for the stairs is not provided, then you will have to mount it from the outside, or spiral staircase with a hatch in the ceiling.
The design of the bath with an attic made from timber. Combination allowed building materials, namely the first floor is made of logs, the second - a wooden structure. There are frame structures of baths with an attic, lined with siding. You can build a bath with an attic and brick.
Protection of the attic from moisture
The attic above the bath is different from the attic above any other living space. This is due to the presence of the corresponding temperature of the lower room and high humidity. A lot of steam rises from the bottom of the steam room, therefore, in order to prevent the humidity of the attic room, special pay attention to the special layer between the first and second floors.
Interfloor overlapping is carried out in this way: a vapor barrier film (foil) is mounted from below, then a heater, then a floor covering. Mineral wool can be used as a heater.

Classic bath with attic 6×6
All wooden structures in the attic must be carefully treated with antiseptics and flame retardants.
If as a roofing material use metal tiles, then there must be a film under it to prevent condensation from occurring on the inside. You can also use a cheaper option: replace the vapor barrier with a reinforced film, seal the joints with adhesive tape. Insulate - Ursu for the floor, slab insulation - for the walls, inserted at a distance between the frame racks.
Ways to insulate the attic with a bath
Insulation can be done in two ways: outside or inside. More appropriate to produce insulation of the room outside. In this case, the insulation layer is laid in the walls of the structure and ceiling. This can only be done during the construction of a bath with an attic from a bar, but not after construction.
If it becomes necessary to insulate the finished structure, use internal method insulation. It will be important to avoid the greenhouse effect. This is served by well-mounted waterproofing of the interfloor ceiling and good ventilation system the whole structure.
Mineral wool, a heat phone with aluminum foil, isospan, polystyrene can serve as a heater. Next comes waterproofing with paneling. Calculations of the thickness of the insulation show that mineral wool is taken as a heater with a thickness of about 20 cm.


Do-it-yourself bath with an attic, Mansards - life under the roof
Mansards - life under the roof A bath with an attic is an unconventional type of structure, but at the same time, this is a structure that gives additional space to the owners. Bath during construction is given little
Rest in the country is great, but without a bath it’s not the same. Therefore, a do-it-yourself bath with an attic will come to the rescue.
The most important advantage of such a bath is the possibility of saving living space.
We build a bath with an attic
The construction of a bathhouse with an attic, in essence, is no different from the construction of a one-story bathhouse, only the amount of work and the price are greater, and the roof is higher. So, we choose timber as the material for the bath, as this is perhaps the most common of those that are on the market. Instructions for the construction of a bath with an attic is as follows:
Laying the foundation
The construction of baths with an attic begins with the foundation. Attic baths are quite heavy, so a strip foundation would be most suitable for such a structure.
It returns as follows:
- Focusing on the project, a trench is being dug. The depth of the trench is determined by the properties of the soil, including the depth of freezing.
- At the bottom of the trench, a sand cushion is made, 15 cm thick. For this, sand is poured, watered and rammed.
- A formwork is mounted around the trench, for which an edged board is used, 40-50 mm thick, in some cases 25 mm is possible.
- Inside the formwork, a reinforcing cage is mounted, where the diameter of the reinforcement is 8-10 mm.

- Concrete is being poured. Concrete can be ordered from an organization that specializes in this and it will be delivered to you by a mixer machine.
Tip: To save money, concrete can be prepared on site at the rate of cement-sand-gravel, in volume parts - 1:3:5.
A concrete mixer will be a very good helper.

Building walls
It is not difficult to lay down walls from a bar, the main thing is to follow a certain procedure:
- The surface of the foundation is covered with waterproofing, roofing material or waterproofing is suitable for this.

- On a row of boards, 50 mm thick. This is the so-called lining row, necessary to protect the lower row of beams from decay. Changes as needed.
- The first row of bars is laid. The bars are connected either in a quarter, or with a thorn-groove system, or with a dovetail.
- All inner rectangles are checked for diagonal equality, and this operation is performed every 4-5 rows and for the topmost row.
Tip: In order for the bottom row and floor beams to last for a long time, they must be treated with antiseptic compounds, and for fire-fighting purposes too.

- The second row is laid, aligned with the lower one, and fastened to it with the help of dowels. Holes for dowels are drilled every 1.5-2 meters of timber.

Thus, the walls are laid out to the place where they will be located, they are also the floor for the attic.
- Floor beams are cut at a height determined by the project.
- Since there is an attic in the bath, the installation of wall beams continues to a height of about 1-1.5 meters above the floor beams.

- The frontal walls are brought to the ridge.
We mount the roof
Among the tasks related to how to build a bath with an attic, the task of installing the roof is one of the first places and it is done like this:
- Auxiliary scaffolding is built in the center of the upper part of the bath, for more convenient installation of rafters.
- Rafters are mounted near the gables. A cord is pulled along the ridge so that the rafters are evenly spaced.
- With a distance of 60 cm, the remaining rafters are mounted. At the level of the attic ceiling, crossbars are mounted to strengthen the rafters. They are made from the same board as the rafters.

- The rafters are covered with vapor barrier. A counter-lattice is nailed along the rafters, which is a bar 50x50 mm .. A crate is mounted on top of the counter-lattice from a board 25 mm thick.
- Of modern materials, metal tiles are popular, so the step of the crate is 35 cm.

- The metal tile is installed.
Exterior finish
Since the construction of the bath is more often used ordinary timber, then such a bath needs external decoration. There is nothing difficult in this finish.
For its implementation, a crate is mounted outside, to which the skin is fixed. Siding usually acts as such a sheathing: metal, PVC, it can also be wooden. The type of siding, its color depends on the tastes of the owner.
Interior decoration
The interior decoration of the bath begins with the installation of the stove. It can be an iron stove or a stove-heater. After that, in order, they begin to finish the premises of the bath.
In the steam room, the walls must be completely sheathed, due to the fact that the beams are made mainly from coniferous wood. When heated to a high temperature, such wood releases resins in large quantities. This smell and is not good for humans.
When finishing, a frame is mounted, covered with a layer of foil insulation and hardwood. On the ceiling, the role of the frame is played by the floor beams, so the foil insulation is immediately attached and only then the clapboard is sheathed.
The floor is also made with insulation, installation of a vapor barrier on all sides of the insulation and is sewn up with a grooved floorboard.
In the washing room and the rest room, the floor and ceiling are also made. The only difference is that there is no need for a foil insulation, instead a vapor barrier is used. The walls in these rooms do not need sheathing, it is enough to process with a planer, sand and varnish.
In general, the methods of sheathing are currently so different, it is enough to show imagination.
What baths with an attic exist
A bath with an attic can be folded not only from a bar. To get a complete impression of the variability of the use of materials, see the photo gallery:


Output
A full rest in the country is impossible without a bath, and if it is residential bath with an attic, this will allow, firstly, to invite many guests. Secondly, to live there ourselves while the main building of the cottage is being built and much more. Well, our portal will help you with this with additional information and by providing a video in this article.